Production-Ready OpenAI (GPT) Template

OpenAI has a great quickstart template to help build applications using their APIs. Their APIs have been used for pretty much everything at this point, like generating marketing copy, procedural games, and even code.
Their template uses Next.js on both the frontend and backend, utilizing Next.js Serverless API Routes as its API. What’s great about this template is you can easily deploy it to Vercel or Cloudflare and have a working AI-powered application.
The downside of this template is that it’s not ready for production. There’s no usage tracking, meaning your users can rack up a huge bill for you and you wouldn’t know til its too late, and there’s no authentication. In this post, we’ll turn that template into a production-ready product that you can deploy right now. And we’re going to do it with about 30 lines of code! Let’s get started.
Understanding the starter template
To get started, clone this repo:
git clone git@github.com:openai/openai-quickstart-node.git
Next, you’ll need to follow the Readme in the repo, which has you install dependencies and add your API key as an environment variable. When you run it, you should see:
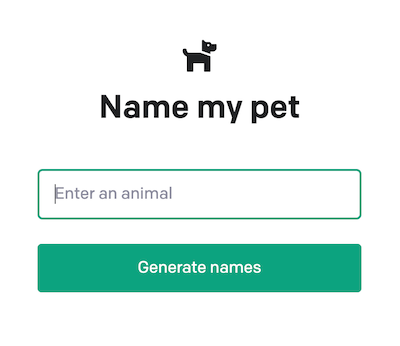
The frontend itself is very straightforward. It has a form, and when you submit that form, it makes a fetch request:
const response = await fetch("/api/generate", {
    method: "POST",
    headers: {
        "Content-Type": "application/json",
    },
    body: JSON.stringify({ animal: animalInput }),
});
In Next.js, any route that begins with /api is handled by their API routes. The request to /api/generate is handled by the file /pages/api/generate.js . If we remove some of the boilerplate/validation, the main pieces of that file are:
export default async function (req, res) {
  // ...
  const animal = req.body.animal || '';
  // ...
  const completion = await openai.createCompletion({
    model: "text-davinci-003",
    prompt: generatePrompt(animal),
    temperature: 0.6,
  });
  res.status(200).json({ result: completion.data.choices[0].text });
}

function generatePrompt(animal) {
  const capitalizedAnimal =
    animal[0].toUpperCase() + animal.slice(1).toLowerCase();
  return `Suggest three names for an animal that is a superhero.

Animal: Cat
Names: Captain Sharpclaw, Agent Fluffball, The Incredible Feline
Animal: Dog
Names: Ruff the Protector, Wonder Canine, Sir Barks-a-Lot
Animal: ${capitalizedAnimal}
Names:`;
}
And this is where all the magic happens. It makes a request to OpenAI’s completion API with the prompt seen above, using the user’s input as part of the prompt. The response is passed directly back to the user.
Unless you are building a product that generates pets names, you’ll want to change the prompt. As an example, you can change up the prompt to be: “Suggest three names for my new ${category} startup. It should convey ${properties}. It should be a compound word.” and you’ve got a product that generates company names based on user preferences. There are entire guides on how to write an effective prompt which can help you get better results.
Adding authentication to our frontend
The first thing we’ll need to add is a concept of a user. We’re going to use PropelAuth, which is an authentication provider designed specifically to get people live quickly, and as we’ll see later, also includes first-class support for B2B products.
After signing up for PropelAuth, we actually already have signup, login, and profile pages for our users. If you follow the getting started guide, you can see how to customize those pages and add options for SSO (”Login with Google”).
Those UIs are hosted by PropelAuth, on our domain (auth.yourdomain.com), so all we have to do is integrate our frontend and backend.
On the frontend, we need to install @propelauth/react:
npm i @propelauth/react
From there, we can add a RequiredAuthProvider to pages/_app.js:
import { RequiredAuthProvider } from '@propelauth/react';

export default function App({ Component, pageProps }) {
    return <RequiredAuthProvider authUrl={process.env.NEXT_PUBLIC_AUTH_URL}>
        <Component {...pageProps} />
    </RequiredAuthProvider>
}
RequiredAuthProvider will automatically redirect the user to the signup page if the user is not logged in. This is really useful if your entire application requires a login (like a dashboard). If you want to handle both logged in and logged out users, you can use the AuthProvider instead. Make sure to add NEXT_PUBLIC_AUTH_URL to your .env file - you can find your AUTH_URL under the Frontend Integration section of your dashboard.
To access user information in our components, we have a few options but for this application, we’ll use withRequiredAuthInfo, which we can place around our Home component in pages/index.js:
export default withRequiredAuthInfo(function Home({user, accessToken}) {
    // User information is available to our component
    console.log(`You are logged in as ${user.email}`)
withRequiredAuthInfo will automatically inject our current user’s information into our component. Similar to the RequiredAuthProvider, it will only render the wrapped component if the user is logged in, otherwise it redirects to the signup page.
This is great because we no longer need to deal with checking isLoggedIn in our components.
Making an authenticated request
When we make the fetch request to /api/generate, we need to pass in some proof of who the current user is. This is what the access token is for, which was one of the properties injected into our component by withRequiredAuthInfo. You provide it in the request in the Authorization header, like so:
const response = await fetch("/api/generate", {
    method: "POST",
    headers: {
        "Content-Type": "application/json",
        "Authorization": `Bearer ${accessToken}`, // <= NEW
    },
    body: JSON.stringify({ animal: animalInput }),
});
And that’s it - now all we have to do is set up our backend to reject unauthorized requests.
Protecting our API route
In order to protect our API route, we need it to verify that the access token is valid. Using @propelauth/node we can do this in under a millisecond with no external requests.
npm i @propelauth/node
Let’s add some helper functions so we can re-use the code across multiple routes. Make a new file lib/propelauth.js:
import {handleError, initBaseAuth} from "@propelauth/node";

// All these come from the Backend Integration section of your dashboard
export const propelauth = initBaseAuth({
    authUrl: process.env.NEXT_PUBLIC_AUTH_URL,
    apiKey: process.env.PROPELAUTH_API_KEY,
    manualTokenVerificationMetadata: {
        verifierKey: process.env.PROPELAUTH_VERIFIER_KEY,
        issuer: process.env.NEXT_PUBLIC_AUTH_URL,
    }
});

// If the access token is valid, this returns the user who made the request
// Otherwise, it returns a 401 unauthorized response
export async function validateUser(req, res) {
    try {
        return await propelauth.validateAccessTokenAndGetUser(
            req.headers.authorization
        )
    } catch (e) {
        // This will automatically return the proper response for the error
        let err = handleError(e, {logError: true, returnDetailedErrorToUser: false})
        res.status(err.status).send(err.message)
    }
}
Now that we have all that set up, we need to update our route (/pages/api/generate.js):
import {validateUser} from "../../lib/propelauth";

export default async function (req, res) {
  const user = await validateUser(req, res)
  //...
And that’s it! Now only valid users can make this request. You can test this out with curl:
$ curl -v <http://localhost:3000/api/generate>
...
< HTTP/1.1 401 Unauthorized
...
If you go to your frontend and log in, you’ll be able to make the request successfully, since the frontend is passing along the access token.
Quick aside: B2C or B2B
We’ve made a B2C product so far, because each of our users are individuals. OpenAI’s APIs make it very easy to build B2B products too, where our users are companies.
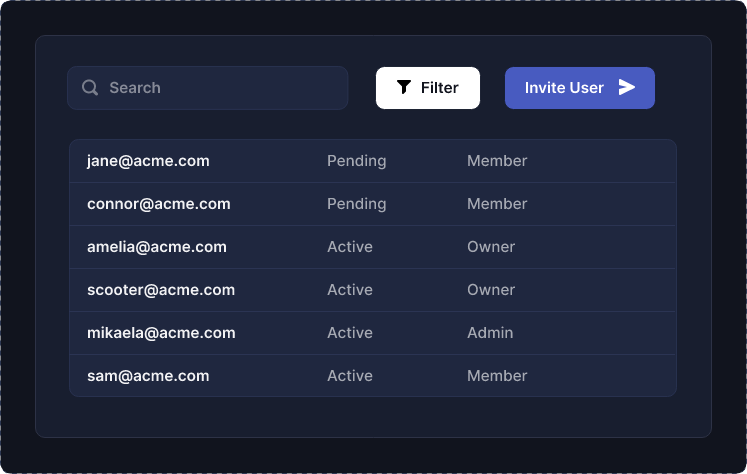
If you want to build a B2B product instead, you can do this by enabling Organization support in PropelAuth:

This immediately provides you with a full set of UIs, hosted on your domain, for your users to invite their coworkers, manage roles and permissions within their company, set up enterprise SSO connections, and more.
To learn more about converting your B2C application to be B2B, read this guide.
Tracking Usage
We now have a user ID (or if you followed the B2B guide, an organization ID), but we still need to track their usage so we can either cut them off or charge them more.
We need some place to store usage information per account, and we actually have a lot of options here. If you are using Cloudflare Workers, you can use their Durable Objects. If you want a Postgres interface, you can use CockroachDB or a managed Postgres provider like AWS RDS.
Whichever you choose, tracking usage is pretty simple (pages/api/generate.js):
export default async function (req, res) {
  const user = await validateUser(req, res)
  // ...
  const animal = req.body.animal || '';
  // ...

  // It's up to you on what information to record
  // You can record just the user ID and timestamp
  // You can choose to record the input / output as well
  await recordApiRequest(user.userId, animal)
  // ...
}

// Example of what it might look like with Prisma
async function recordApiRequest(userId, animal) {
  await prisma.animalRequest.create({
    data: {
      user_id: userId,
      requested_animal: animal,
      requested_at: new Date(),
    }
  })
}
And this is something you can build on top of. For example, here’s what it might look like to periodically send usage information to your billing provider:
async function calculateAndReportUsage(userId, billingStart, billingEnd) {
  const numRequests = await prisma.animalRequest.count({
    where: {
      user_id: userId,
      requested_at: {
        gte: billingStart,
        lte: billingEnd,
      }
    }
  })
  await reportUsageToStripe(userId, numRequests)
}
Summary
With just a few lines of code, we were able to take the OpenAI starter template and add authentication, analytics, and set ourselves up to bill our customers.
We didn’t have to build any new UIs and we can immediately onboard either individual users or companies.
What’s really fantastic about this, is you can use this over and over again as you get new ideas for prompts. With GPT, it really feels like the limit is just your imagination.