React/FastAPI Starter Guide
This guide walks through the process of setting up authentication using PropelAuth on top of a product built in FastAPI & React.
Setting up our Authentication UIs
PropelAuth provides UIs for signup, login, and account management, so we don’t need to build them ourselves.
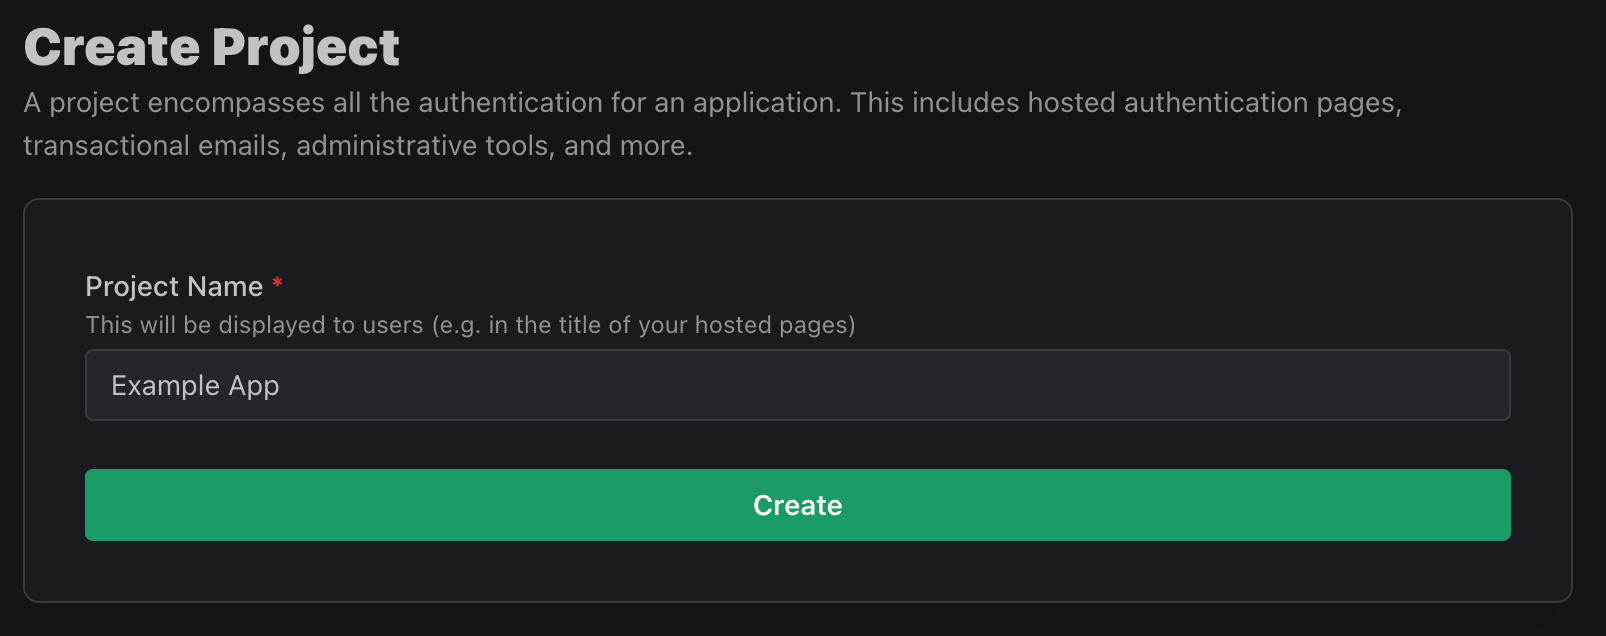
To get started, let’s create a project:
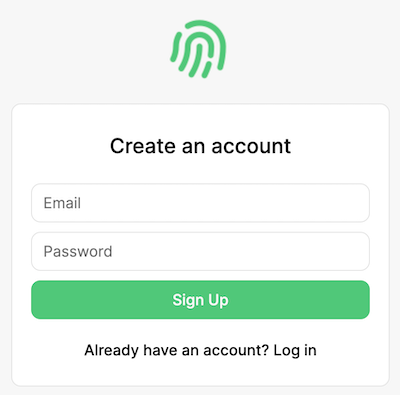
We now actually have all the UIs we need to fully test the experience of our users. The preview button lets you view different pages, like the signup page:
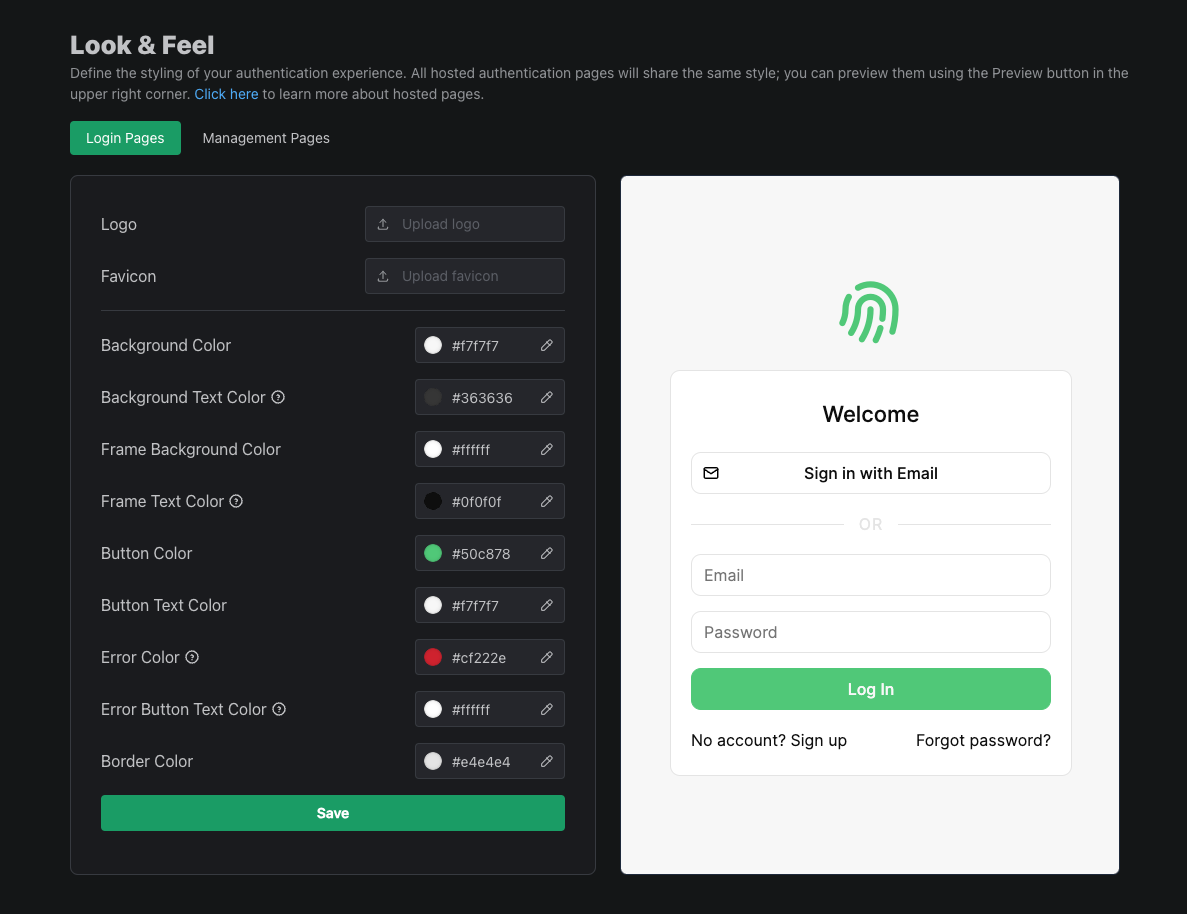
For now, though, let’s customize these UIs, which we can do on the Look & Feel section of the dashboard followed by Open Editor:
There’s a lot more to discover in the PropelAuth dashboard. We can set up social logins, like Login with Google, and enable passwordless logins via Magic Links. We can collect more information on signup like first/last name or accepting terms of service. We can also create and manage organizations, if our users need to work together in groups. But, for now, let’s jump right in to building our frontend.
Authentication in React
Prereqs
- An application using a React-based framework. We use Next.js Pages Router and Typescript for this guide. If you'd prefer to use Vanilla React or Next.js with App Router, check out our quickstart guide.
Next.js Installation
Start by creating a new Next.js project:
npx create-next-app@latest
CopyCopied!
For this guide we'll be using TypeScript as well as Pages Router, so make sure to set the following when prompted:
✔ What is your project named? `my-app`
✔ Would you like to use TypeScript? `Yes`
✔ Would you like to use App Router? (recommended) `No`
PropelAuth Installation
We’re going to use PropelAuth's @propelauth/react library which allows us to manage our user’s information. Change directory to your Next.js app and run this command:
npm install @propelauth/react
Run it and update the Dashboard
We are now ready to run the application:
npm run dev
Note down which port the application is running on, and then update the PropelAuth dashboard. We need to configure PropelAuth so that it knows both where the application is running and where to redirect the user back to.
Enter the URL the frontend is running on in the Primary Frontend Location section under Frontend Integration. For our example, this is http://localhost:3000
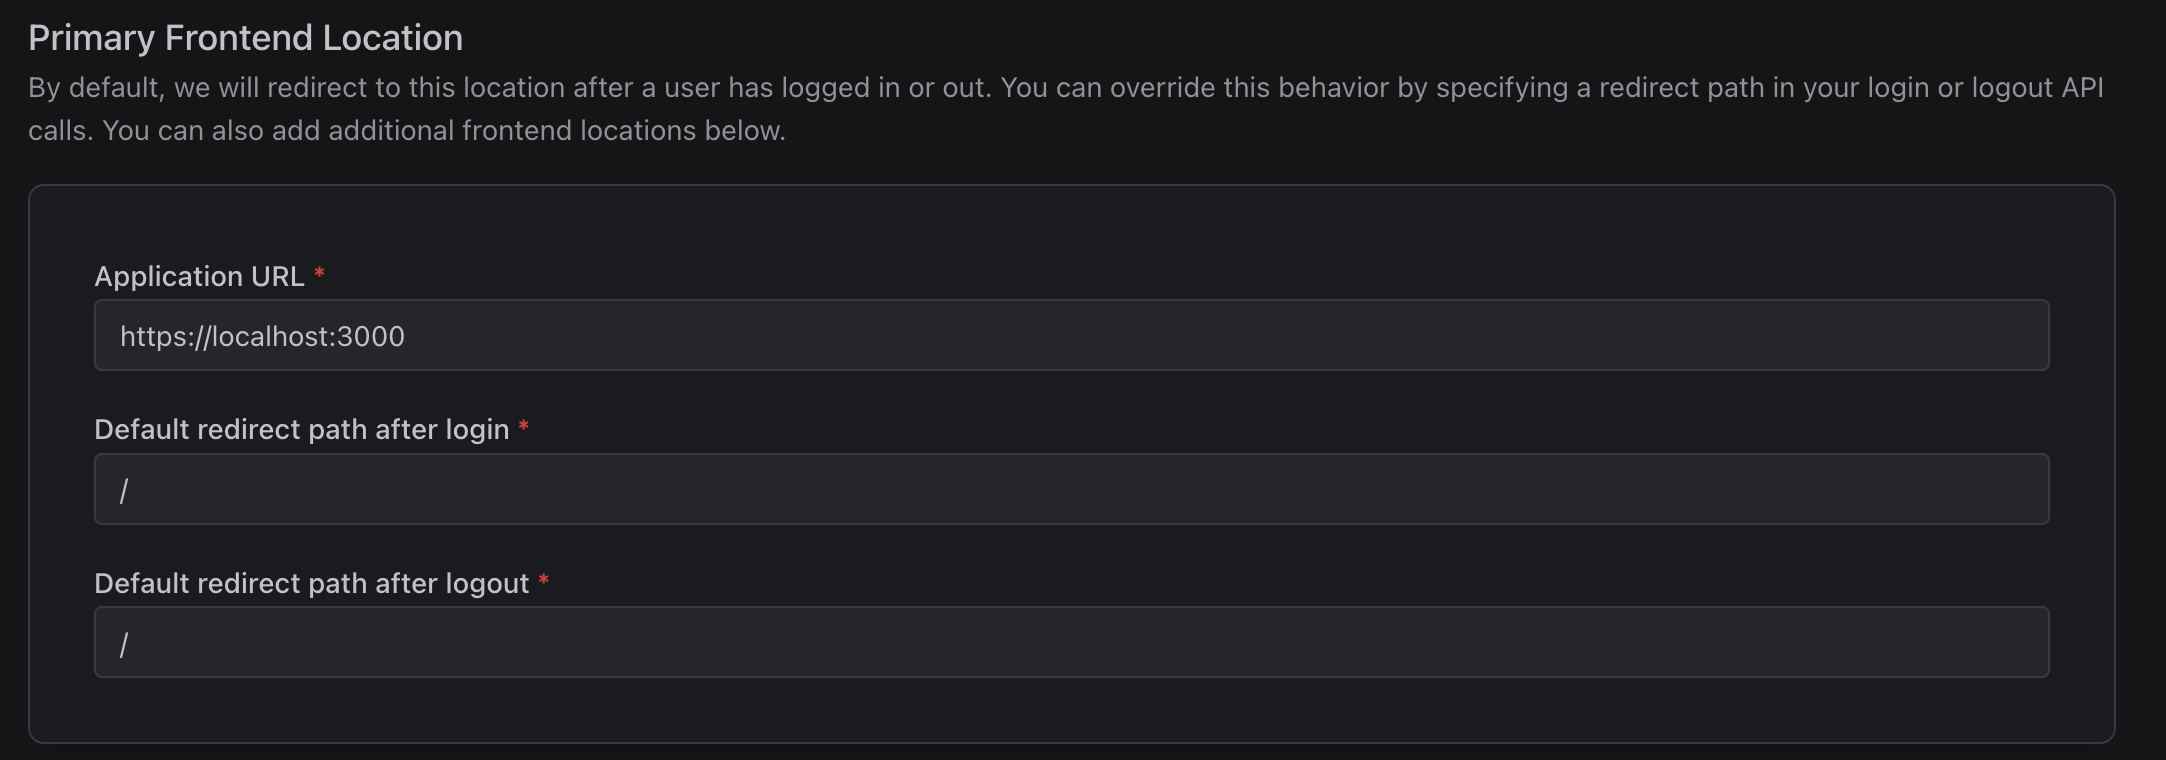
You’ll also want to copy the Auth URL, as we’ll use it in the next step.

Set up the AuthProvider
The AuthProvider is responsible for checking if the current user is logged in and fetching information about them. You should add it to the top level of your application so it never unmounts. In Next.js, this is the _app.tsx file:
import type {AppProps} from 'next/app'
import {AuthProvider} from "@propelauth/react";

export default function App({Component, pageProps}: AppProps) {
    return <AuthProvider authUrl="ENTER_YOUR_AUTH_URL_HERE">
        <Component {...pageProps} />
    </AuthProvider>
}
Displaying user information
And now, the moment you’ve been waiting for! Let’s display the user’s email address via the React hook useAuthInfo . We’ll replace our index.tsx file with this:
import {useAuthInfo} from "@propelauth/react";

export default function Home() {
    const {loading, isLoggedIn, user} = useAuthInfo()
    if (loading) {
        return <div>Loading...</div>
    } else if (isLoggedIn) {
        return <div>Logged in as {user.email}</div>
    } else {
        return <div>Not logged in</div>
    }
}
And…
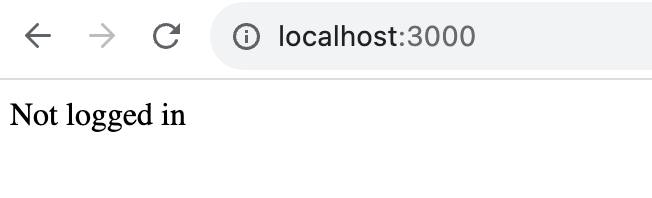
Oh, we’re not logged in yet. We could navigate directly to our Auth URL and login, but let’s instead add a few links to our application.
Small note: withAuthInfo and withRequiredAuthInfo
useAuthInfo is great, but it does mean you have to check the loading state often. PropelAuth also provides a higher order component withAuthInfo which won’t render the underlying component until loading is finishing, making the code a bit cleaner:
import {withAuthInfo} from "@propelauth/react";

export default withAuthInfo(function Home({isLoggedIn, user}) {
    if (isLoggedIn) {
        return <div>Logged in as {user.email}</div>
    } else {
        return <div>Not logged in</div>
    }
})
Similarly, if you know the user is logged in, you can use withRequiredAuthInfo which can make it even cleaner:
import {withRequiredAuthInfo} from "@propelauth/react";

// By default, will redirect the user to the login page if they aren't logged in
export default withRequiredAuthInfo(function Home({user}) {
    return <div>Logged in as {user.email}</div>
})
You can read more about this here.
Adding Login/Account/Logout Buttons to our application
The @propelauth/react library also provides React hooks useRedirectFunctions and useLogoutFunction which provide easy ways for us to send the user to the hosted pages (like login, signup, account, etc) or log the user out entirely. Let’s update our index.tsx file:
import {withAuthInfo, useLogoutFunction, useRedirectFunctions} from "@propelauth/react";

export default withAuthInfo(function Home({isLoggedIn, user}) {
    const {redirectToLoginPage, redirectToAccountPage} = useRedirectFunctions()
    const logoutFn = useLogoutFunction()

    if (isLoggedIn) {
        return <>
            <div>Logged in as {user.email}</div>
            <div>
                <button onClick={() => redirectToAccountPage()}>Account</button>
                <button onClick={() => logoutFn(false)}>Logout</button>
            </div>
        </>
    } else {
        return <>
            <div>Not logged in</div>
            <button onClick={() => redirectToLoginPage()}>Login</button>
        </>
    }
})

And now our users have an easy way to login, view their account information, and logout.

Sending Requests from Frontend to Backend
Prereqs:
- To make a request from Next.js to a backend running on a different localhost port, you’ll need to handle CORS issues.
For Next.js, we handle CORS locally by adding a rewrite for all /api/* routes to our backend on port 3001. This is our next.config.js:
/** @type {import('next').NextConfig} */
const nextConfig = {
  reactStrictMode: true,
  async rewrites() {
    return [
      {
        source: '/api/:path*',
        destination: 'http://127.0.0.1:3001/api/:path*'
      }
    ]
  }
}

export default nextConfig;
Start with an unauthenticated HTTP request
In our Next.js application, let's make a new file requestdemo.tsx that uses useEffect to make an HTTP request to our backend:
import {useEffect, useState} from "react";
import {withAuthInfo} from "@propelauth/react";

const fetchFromApi = async () => {
    const response = await fetch("/api/whoami", {
        headers: {
            "Content-Type": "application/json"
        }
    });
    if (response.ok) {
        return response.json();
    } else {
        return {status: response.status};
    }
}

export default withAuthInfo(function RequestDemo() {
    const [response, setResponse] = useState(null);

    useEffect(() => {
        fetchFromApi().then((data) => setResponse(data));
    }, [])

    if (response) {
        return <pre>{JSON.stringify(response, null, 2)}</pre>
    } else {
        return <div>Loading...</div>
    }
})
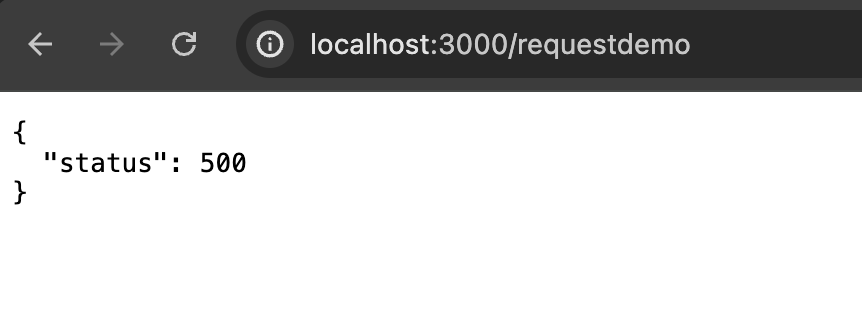
When we navigate to the /requestdemo page we get a 500 error! The reason? We don't have a backend yet - let's fix that.
Authentication in FastAPI
Prereqs
- A FastAPI application. If you don’t have one, follow the guide here.
- A PropelAuth API Key. You can generate one on the Backend Integration section of your dashboard.
Installation
Install the propelauth-fastapi library in your project:
pip install propelauth-fastapi
CopyCopied!
Creating an unprotected route
Let’s now create the route that our frontend is trying to make a request to:
from fastapi import FastAPI

app = FastAPI()

@app.get("/api/whoami")
def who_am_i():
    return {"Hello": "World"}
If we run the application:
uvicorn main:app --reload --port=3001
And then navigate back to the /requestdemo page:
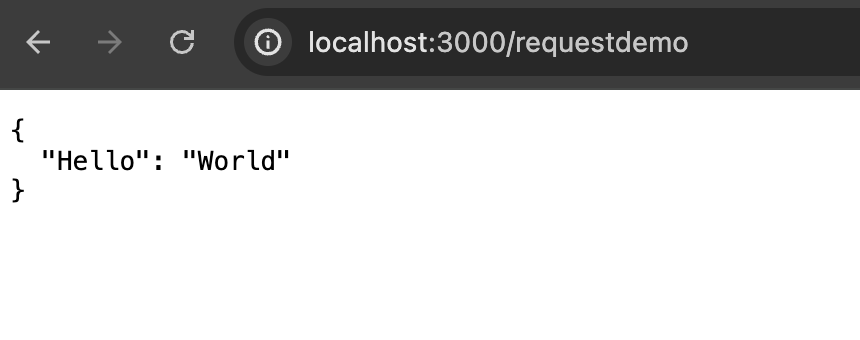
We have now made a request to our backend! The problem? who_am_i is currently accessible to anyone. Let's protect the endpoint using PropelAuth.
Protecting our unprotected route
To lock it down so that only users can access it, all we have to do is initialize the propelauth_fastapi library, and dependency inject a user.
from fastapi import FastAPI, Depends
from propelauth_fastapi import init_auth, User

app = FastAPI()
auth = init_auth("YOUR_AUTH_URL", "YOUR_API_KEY")

@app.get("/api/whoami")
def read_root(user: User = Depends(auth.require_user)):
    return {"Hello": user.user_id}/
And now when we hit the /requestdemo endpoint again, we instead get a 401 Unauthorized error!
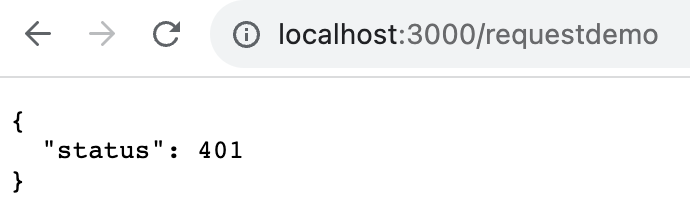
Why did this happen? Well, we didn’t pass in any information from the frontend to indicate who we are. Let’s go back to the frontend, and see how to make an authenticated HTTP request.
Making an Authenticated HTTP request
Similar to user or isLoggedIn , one of the other values that we receive from useAuthInfo, withAuthInfo, and withRequiredAuthInfo is an accessToken.
This accessToken is unique to our user, and is what our backend is checking when it says we are authorized or unauthorized. We need to pass this in to our backend via an Authorization header, like so:
Authorization: Bearer ${accessToken}
Here’s that same component from the last section, but this time it will pass the access token to the backend:
import {useEffect, useState} from "react";
import {withAuthInfo} from "@propelauth/react";

const fetchFromApi = async (accessToken: string | null) => {
    const response = await fetch("/api/whoami", {
        headers: {
            "Content-Type": "application/json",
            "Authorization": `Bearer ${accessToken}`
        }
    });
    if (response.ok) {
        return response.json();
    } else {
        return {status: response.status};
    }
}

export default withAuthInfo(function RequestDemo({accessToken}) {
    const [response, setResponse] = useState(null);

    useEffect(() => {
        fetchFromApi(accessToken).then((data) => setResponse(data));
    }, [])

    if (response) {
        return <pre>{JSON.stringify(response, null, 2)}</pre>
    } else {
        return <div>Loading...</div>
    }
})
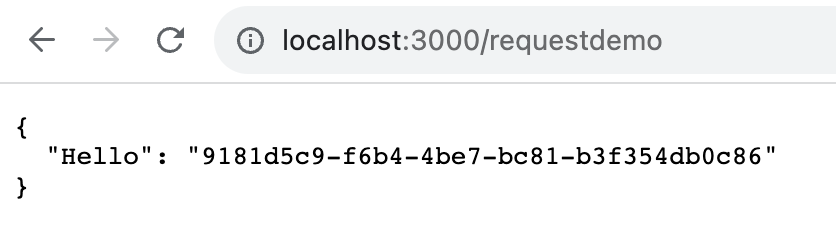
And now, as long as we are logged in, we see:
Organizations, Custom User Schema, Impersonation, and more
Now that you’ve built a basic auth system using PropelAuth, you can easily add more features on top of it. Whether you want to add organizations, collect and store more information about your users, or even see what your users are seeing - it’s all possible now!