Authentication and Authorization for Internal MCP Servers
Picture this: You’ve just built a brilliant Model Context Protocol (MCP) server. It’s the ultimate internal powerhouse, seamlessly bridging your organization’s LLMs with your most sensitive private repositories, production databases, and internal APIs. It feels like magic.
And then someone asks: "Wait - can every employee just… do all of that?". And reality hits.
The Model Context Protocol is an absolute game-changer for AI productivity, but out of the box, it’s missing a critical enterprise feature: it doesn’t actually have a built-in authentication or authorization layer.
By default, if an LLM can connect to your MCP server, it has access to everything that server can touch. Left unsecured, your AI assistant is exactly one rogue prompt away from accidentally reading executive payroll data, or worse, hallucinating a DROP TABLE destructive database command.
If you're giving an AI the keys to the kingdom, you can't rely on just MCP to protect you. You have to build the gatekeeper yourself.
That's exactly where PropelAuth comes in. PropelAuth gives you a powerful auth layer you can drop in front of your MCP server - complete with user management, RBAC, and Enterprise SSO.
In this post, we'll walk through how PropelAuth can lock down your internal MCP server by defining roles, attaching granular scopes and permissions to each one, and automating the entire user lifecycle directly through your Identity Provider (IdP).
Defining Roles and MCP Scopes
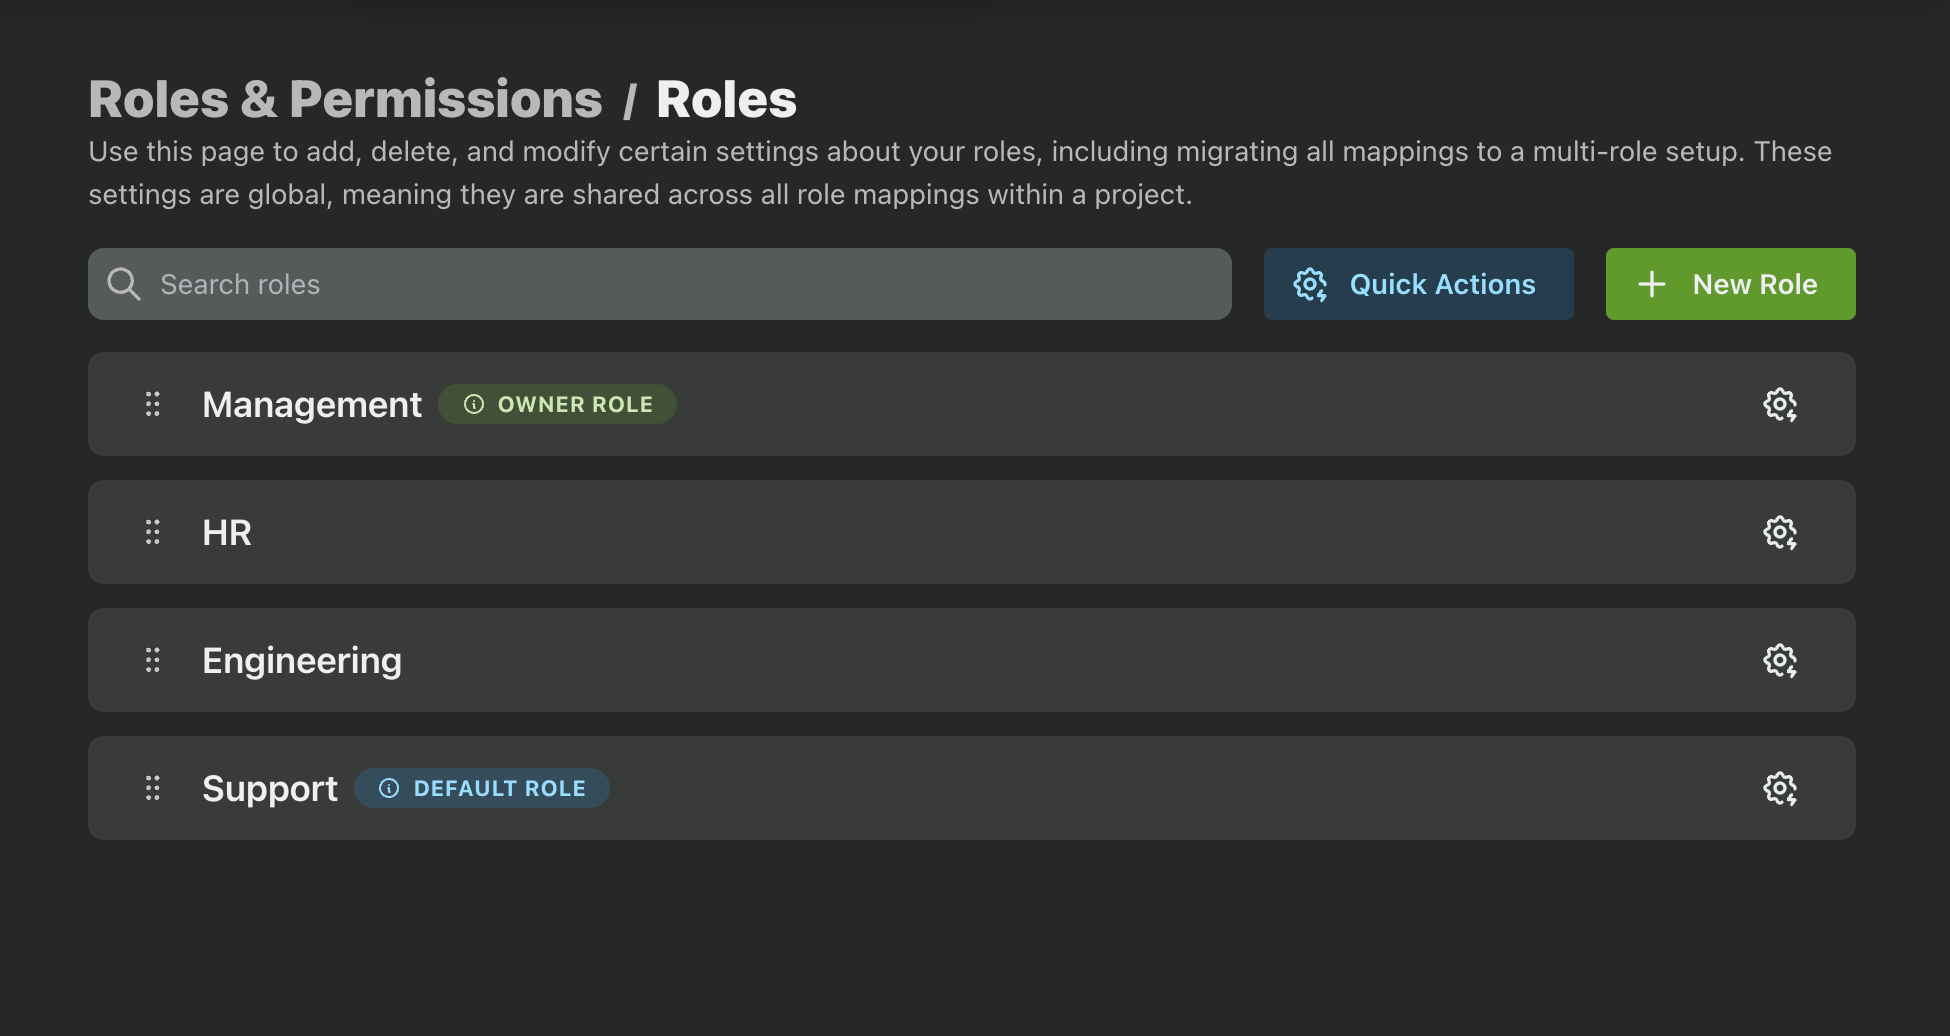
PropelAuth makes it easy to create and manage roles in your project. Let’s create a few roles to reflect departments in your company:
- Management
- HR
- Engineering
- Support
We can create these roles in PropelAuth by navigating to the Roles & Permissions page in the PropelAuth Dashboard, clicking Roles, and clicking + New Role. Once saved, your roles list will look like this:
Let’s now create some MCP scopes and configure which roles they should be assigned to. Navigate to the MCP section of the PropelAuth Dashboard and enable MCP if it’s not already. If you’re just setting up MCP for the first time, check out our MCP docs on how to get started.
Next, click on Org Scopes. We want to create scopes to define access for each tool and action that our MCP server can take. Does your internal MCP server have access to customer information? Let’s create a scope for that. Does it have access to your codebase? Let’s create a scope for that as well.
When we create an org scope we can assign it to any or all of the roles we just created. This part is really up to you, but here are some examples of what this can look like:
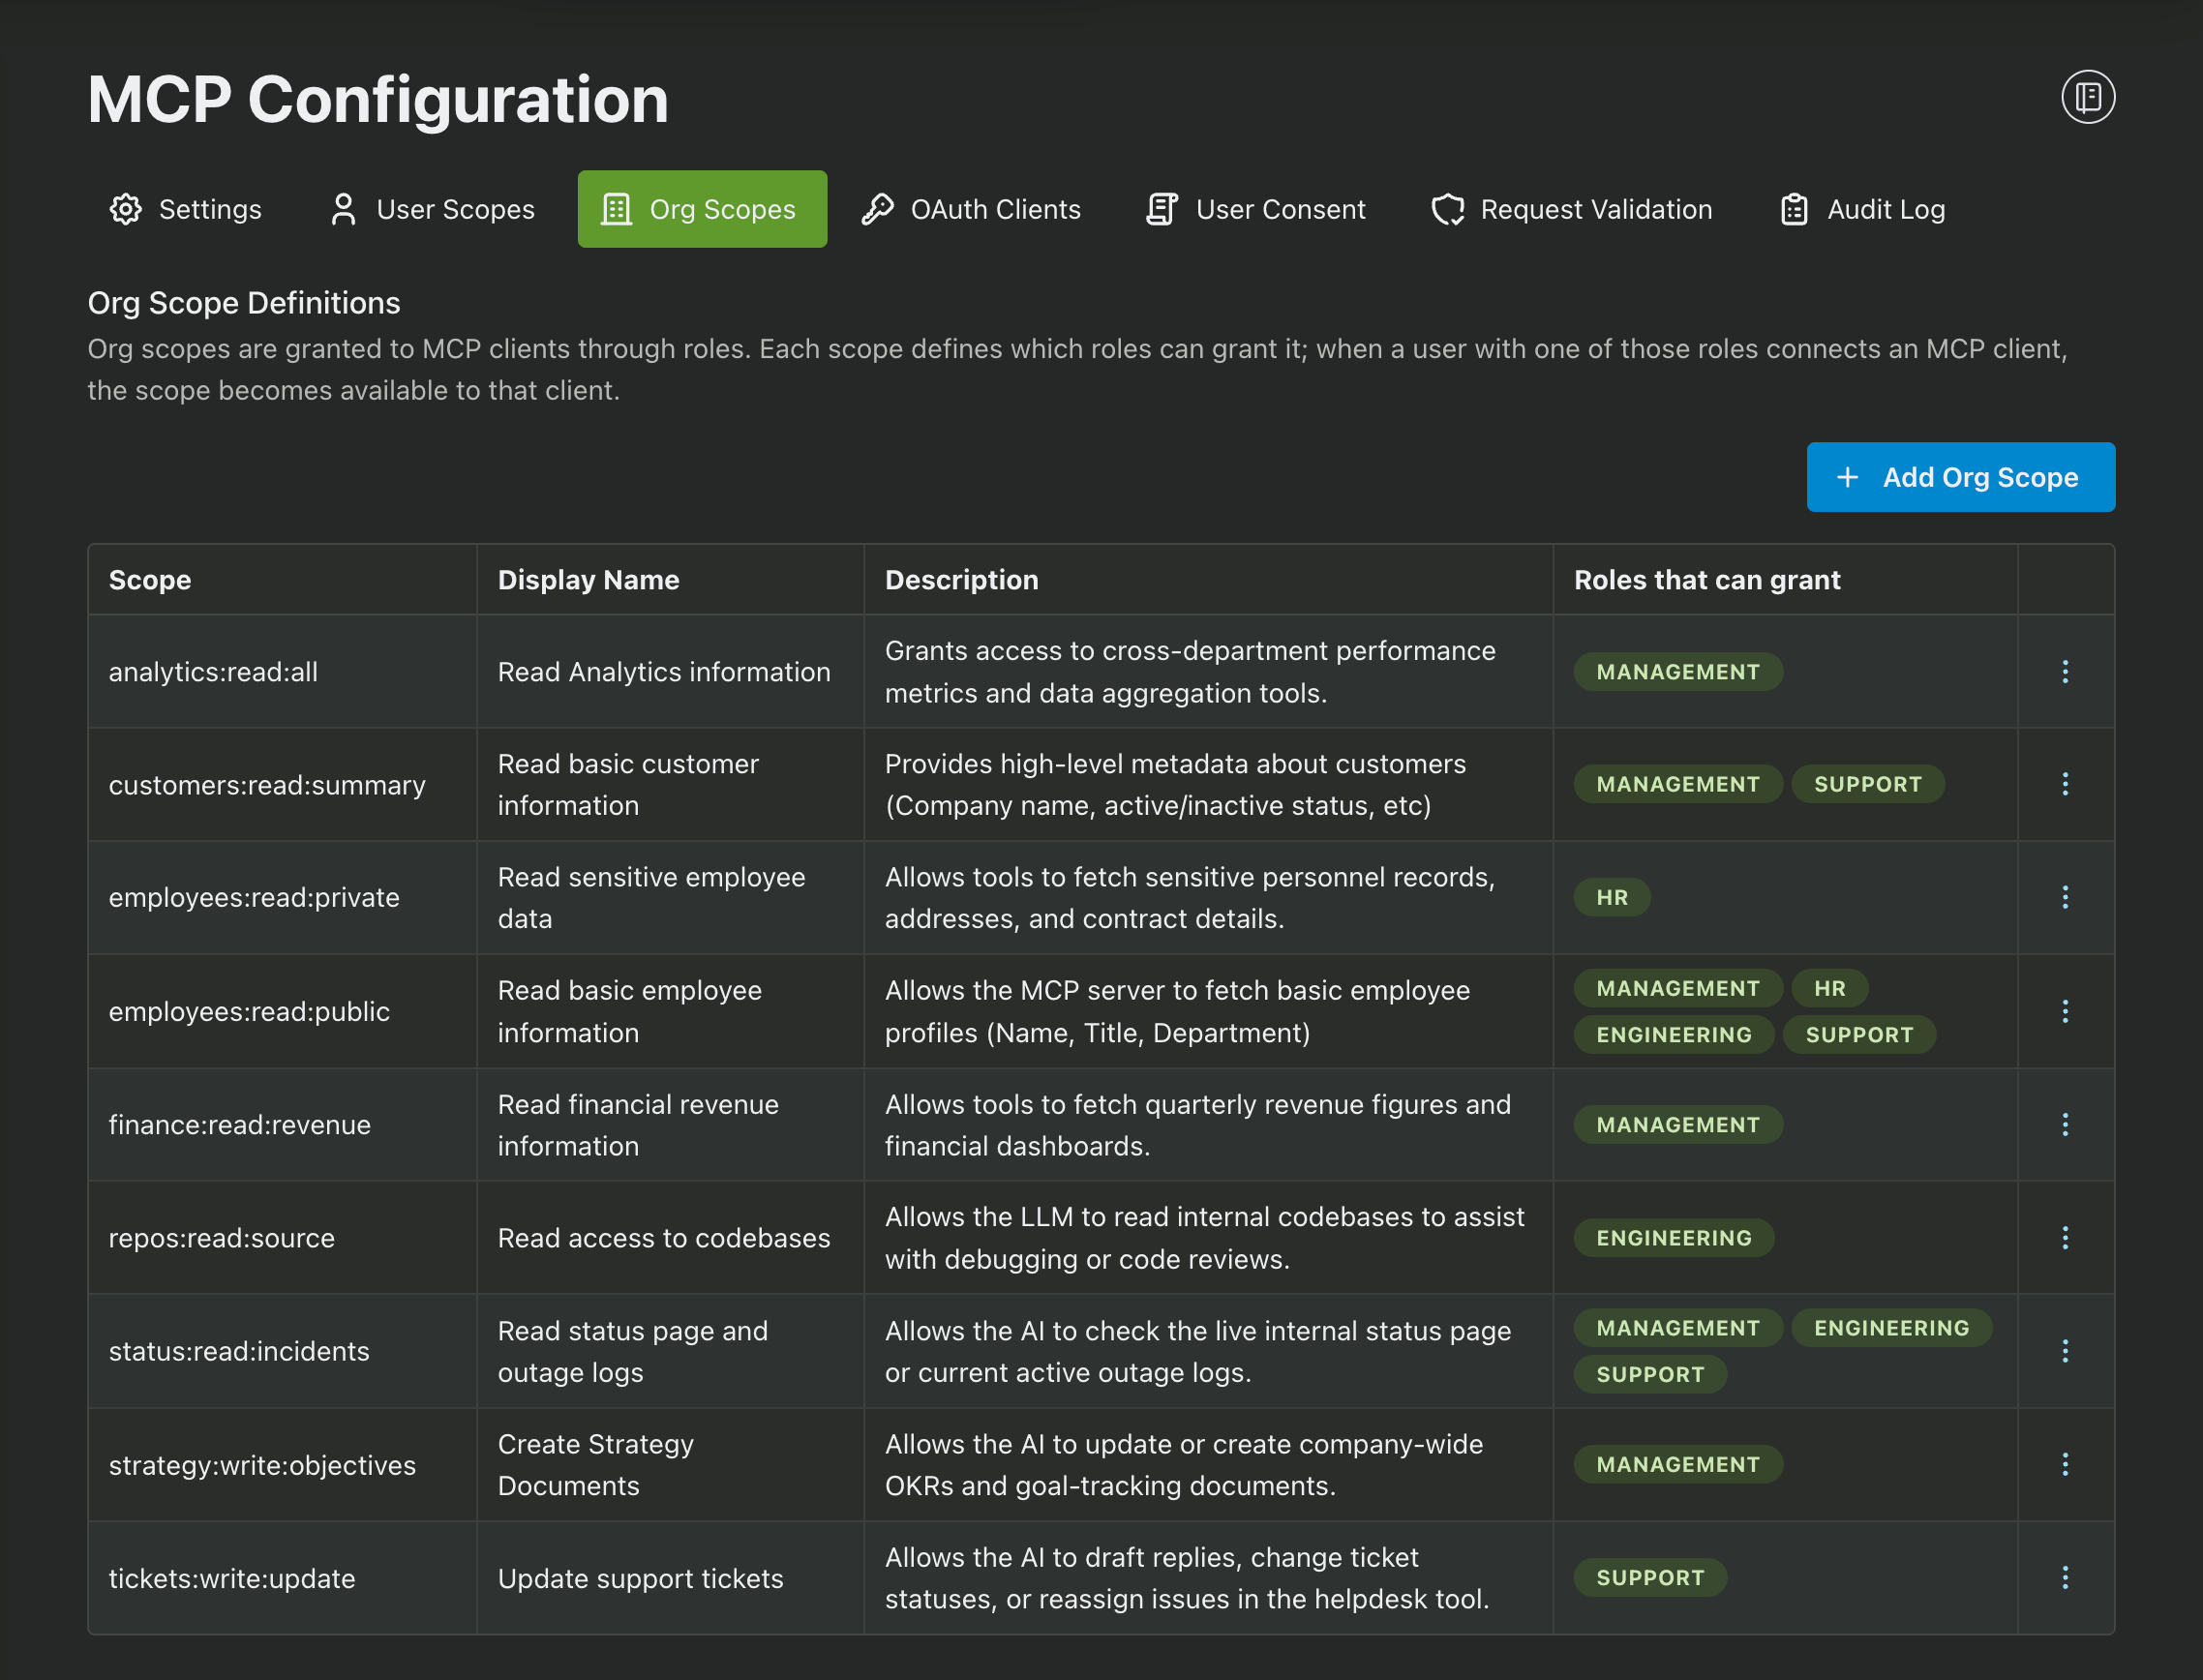
As you can see above, we have scopes that are assigned to just a single role, such as ticket:write:update, while some scopes are assigned to multiple roles, such as employees:read:public.
Isolating critical scopes ensures that sensitive actions, like modifying a ticket or accessing payroll, remain locked down to specific departments. Meanwhile, sharing common utility scopes prevents you from writing redundant code for data that everyone needs.
Now that we have our roles and scopes defined, let’s get create an organization in PropelAuth and provision our teammates to it.
Creating an Internal Organization
In PropelAuth, Organizations represent groups of users who use your product together. For an internal tool setup, you only need a single organization representing your entire company.
Navigate to the Organizations page in the PropelAuth Dashboard and create a new org for your company.
We can also add some additional protections to our PropelAuth project to ensure only users within our organization can join. Navigate to the Signup / Login page, click on Settings, and navigate to the Who Can Signup section. Here, we can disable public signups or enable the Allowlist. This allows us to specify which email domains are allowed to signup, such as your company’s domain.
Finally, we need to wire up our login methods. To ensure new hires instantly gain tool access on day one - and departing employees lose access the exact moment they leave - the gold standard is pairing Enterprise SSO with SCIM. We can enable Enterprise SSO by navigating to the Enterprise SSO / SCIM page of the PropelAuth Dashboard.

SCIM automates the synchronization of user identities between an IdP (Okta, Entra, JumpCloud, etc) and the connected application. When an admin creates, updates, or deactivates a user in their IdP, those changes are instantly synced to our PropelAuth project. This means there's no manual work or delay - revoking access for a departing employee, for example, takes effect immediately.
We can then enable Enterprise SSO and SCIM for our project by navigating to our organization in PropelAuth, clicking on Settings, and scrolling down to the Enterprise SSO & SCIM Settings.
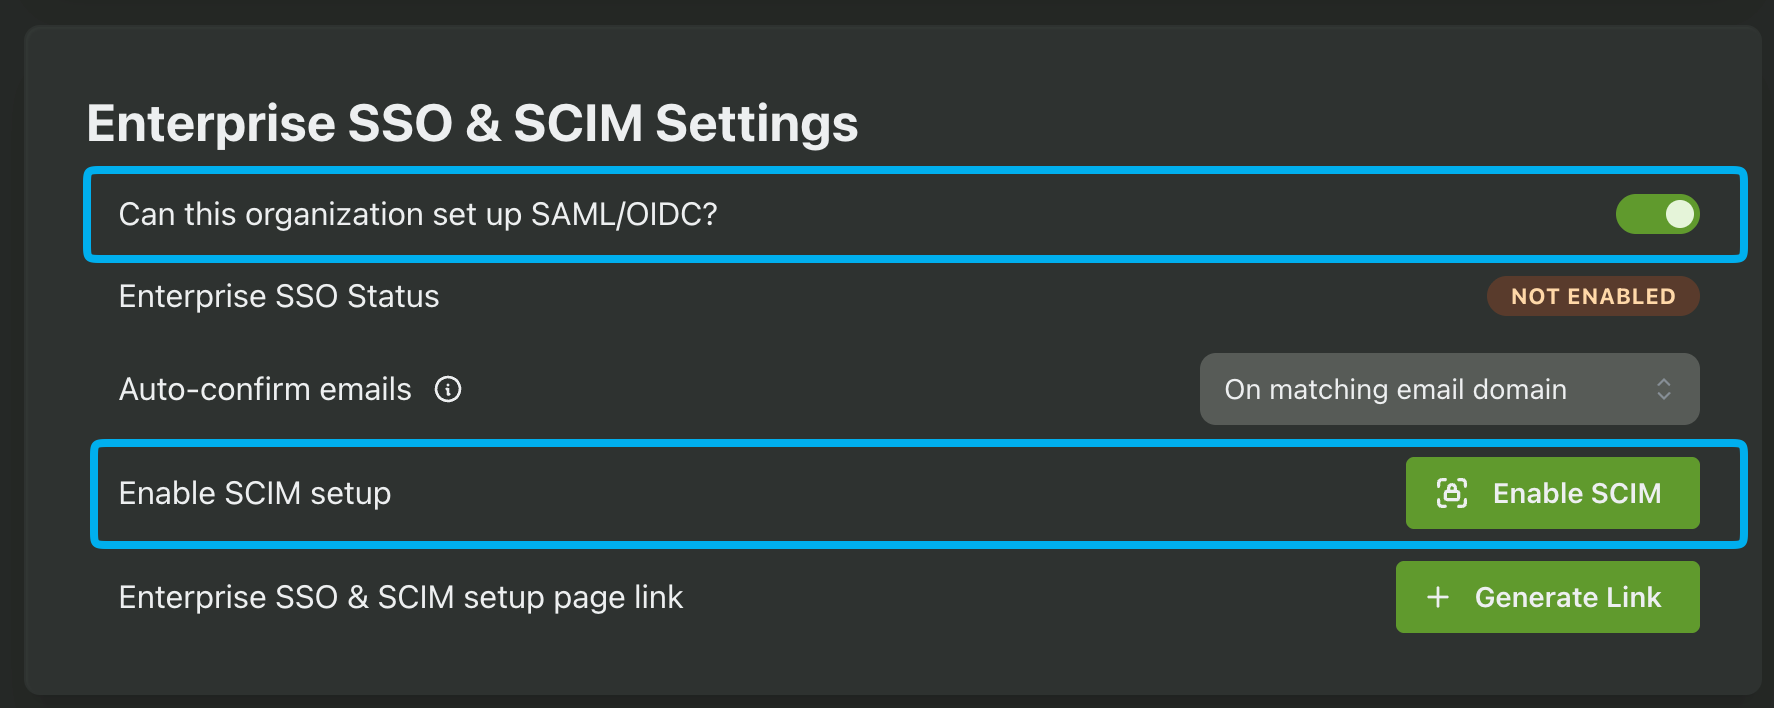
You can then click on the Generate Link button to create a link to configure SSO and SCIM with your IdP. You can pass this link along to your IT Department so they can configure the connection and provision employees (including mapping them to the correct role) to the application.
Next, let’s get to work on adding authentication and authorization to our MCP server.
Adding Auth to our Internal MCP Server
PropelAuth uses OAuth 2.1 to handle authentication for MCP servers. Most MCP frameworks, such as FastMCP and mcp-use, support this natively, allowing the server to challenge the connecting client (like Claude Desktop) for a valid access token.
In this guide we’ll be using FastMCP. Begin by installing the FastMCP library:
pip install fastmcp
We'll be using FastMCP's built in PropelAuthProvider to do most of the heavy lifting for us. All we have to do is configure it with the necessary information, such as our Auth URL (found in the Backend Integration page of the PropelAuth Dashboard) and the Introspection Client ID and Introspection Client Secret generated in the Request Validation section of the MCP page. ****
Lastly, we’ll register our permissions under scopes_supported. By keeping required_scopes=[] at the root provider level, we ensure users can connect to the server globally (as long as they’re authenticated), while allowing individual tools to demand specific, granular permissions.
import os
from fastmcp import FastMCP
from fastmcp.server.auth.providers.propelauth import PropelAuthProvider

SCOPES = [
	"analytics:read:all",
	"customers:read:summary",
	"employees:read:private",
	"employees:read:public",
	"finance:read:revenue",
	...
]

auth = PropelAuthProvider(
    auth_url=os.environ["PROPELAUTH_AUTH_URL"],
    introspection_client_id=os.environ["PROPELAUTH_INTROSPECTION_CLIENT_ID"],
    introspection_client_secret=os.environ["PROPELAUTH_INTROSPECTION_CLIENT_SECRET"],
    base_url=os.environ["SERVER_URL"],
    required_scopes=[],
    scopes_supported=SCOPES
)

mcp = FastMCP("My MCP Server", auth=auth)

if __name__ == "__main__":
    mcp.run()
And that's all it takes! We have successfully set up our MCP server with authentication. Now when we attempt to access the MCP server, our browser will open and prompt us to authenticate. Once logged in, we’ll be asked to grant scopes to the AI Agent.
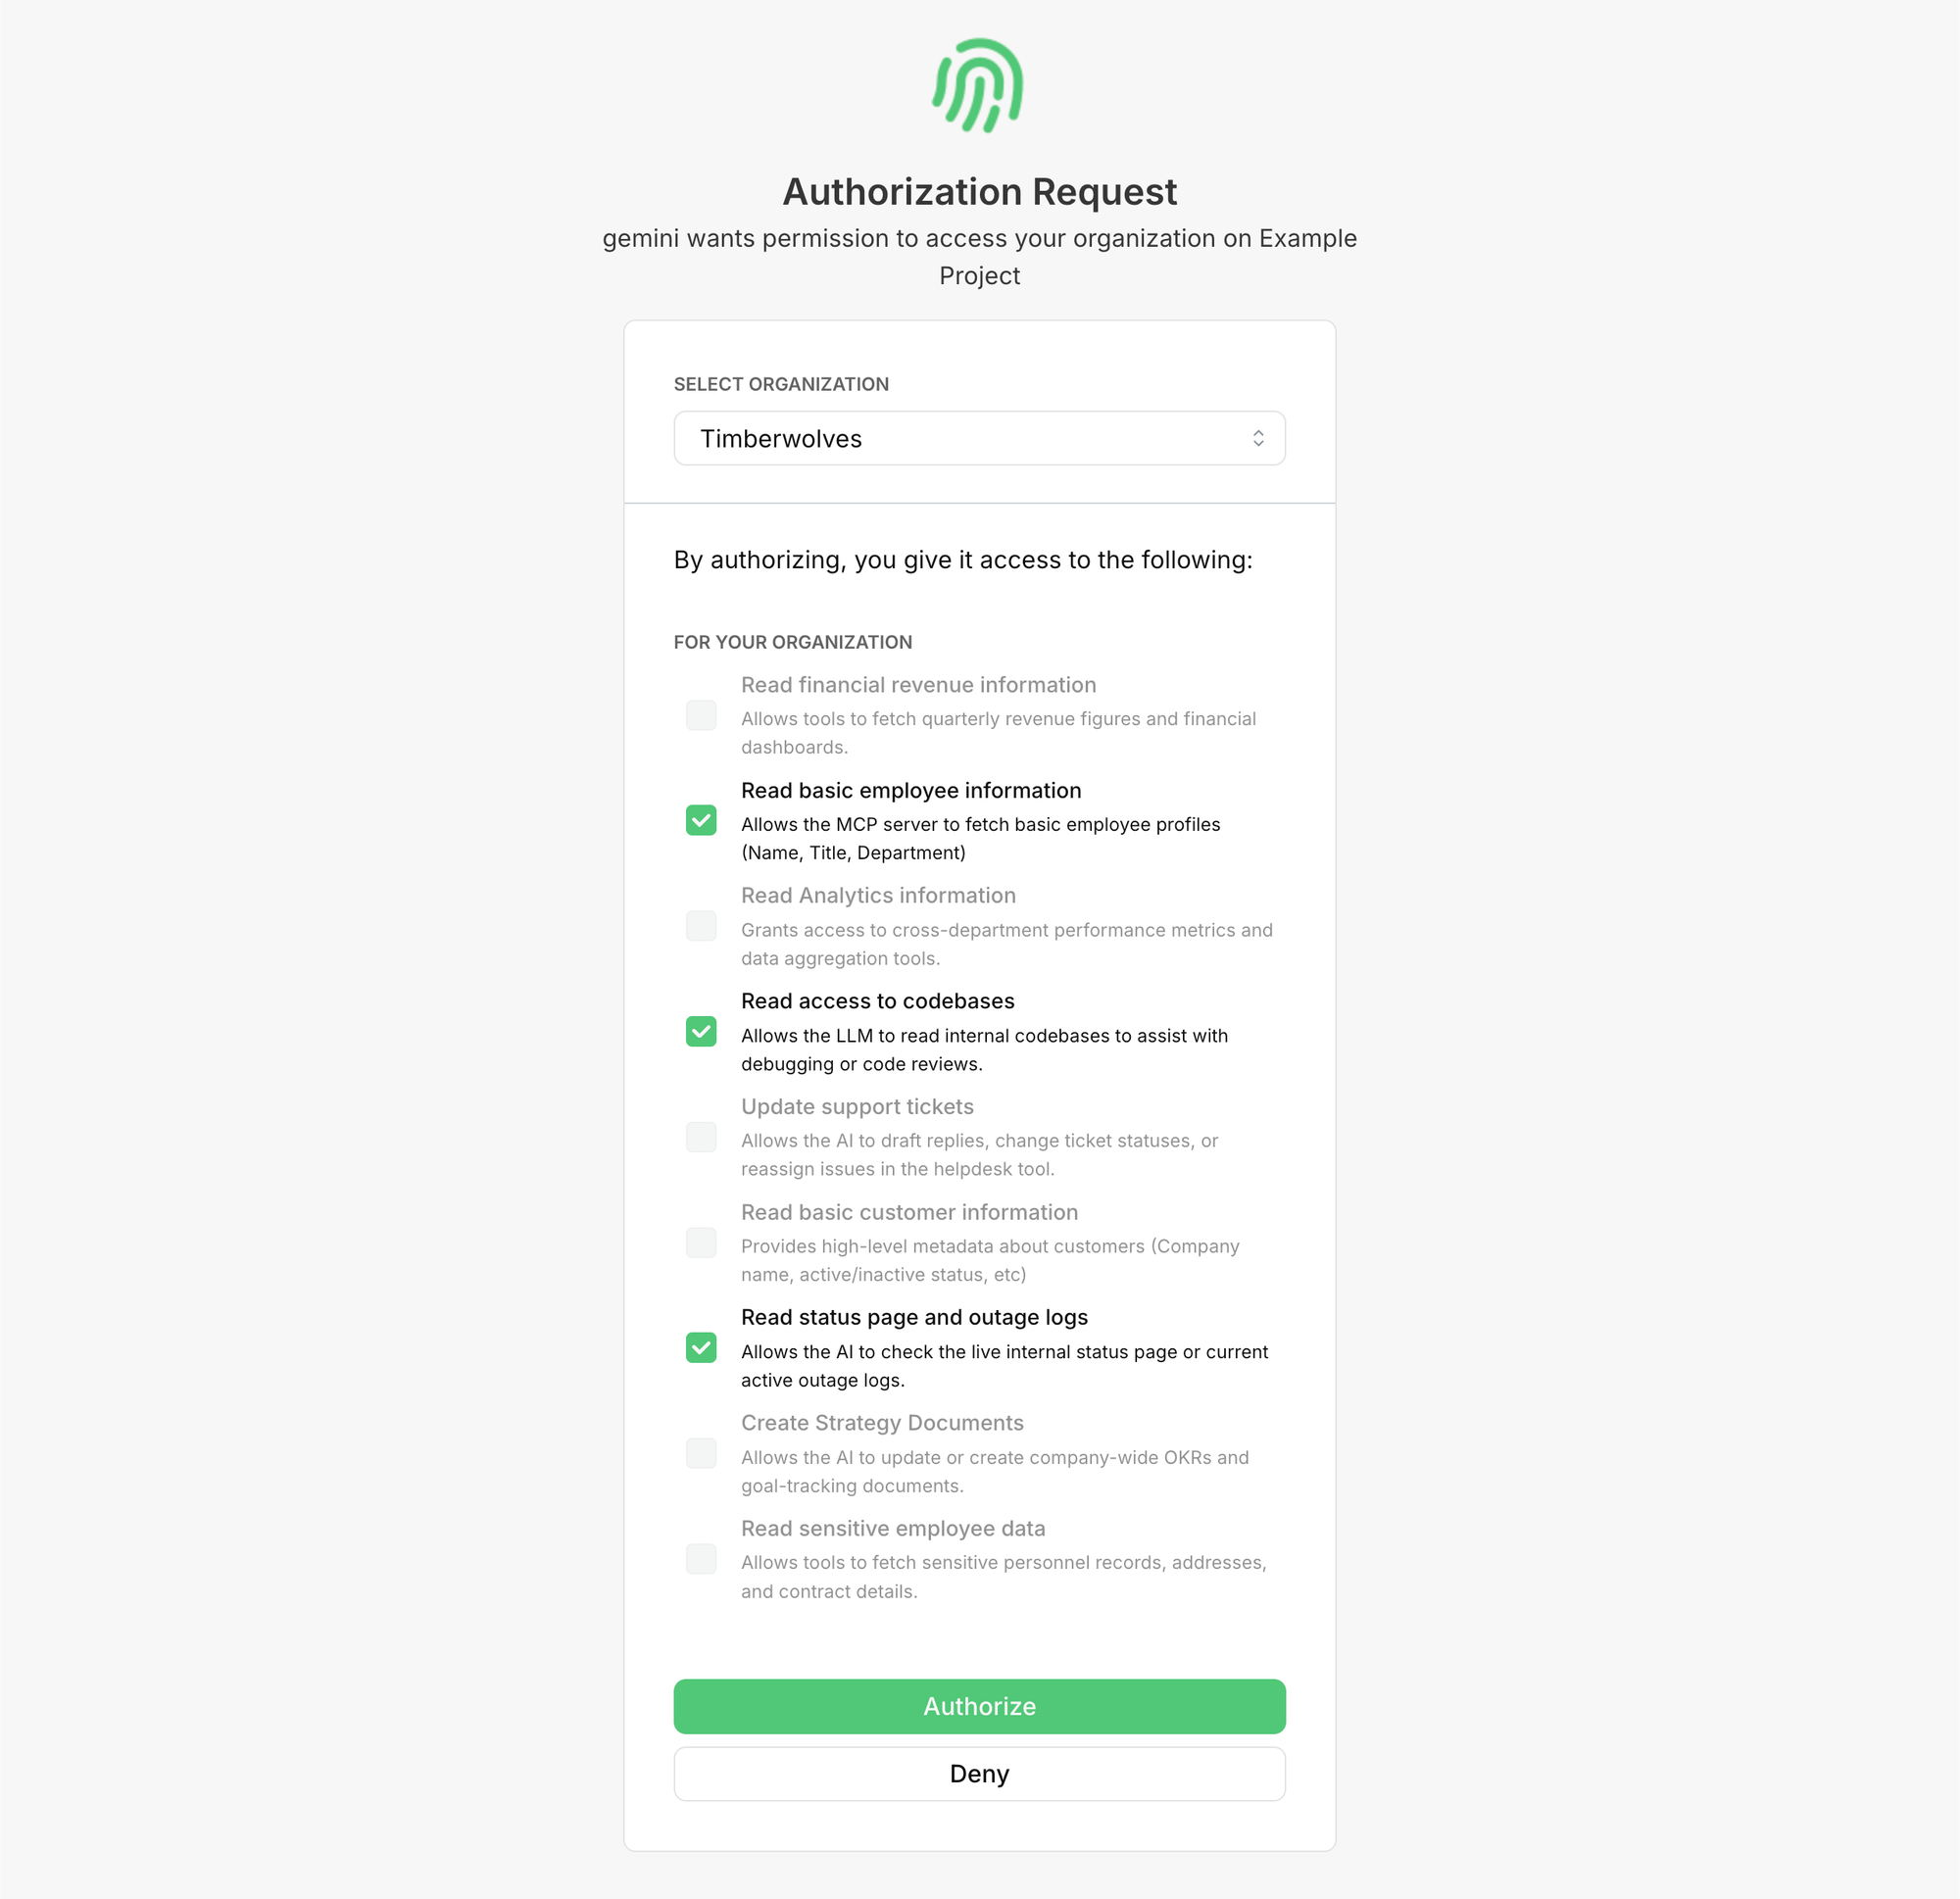
The user above is assigned the “Engineering” role we created earlier. As you can see, they are only allowed to grant scopes that we previously assigned to the Engineering role.
The last step is to control access to our MCP server’s tools based on these permissions.
Controlling Access to MCP Tools
Back in our MCP server, let’s add an authorization check to one of our MCP tools. With FastMCP, all we have to do is add a required scope to the MCP Tool Decorator to restrict access for a tool.
@mcp.tool(auth=require_scopes("employees:read:public"))
async def employee_information_public(
    employee_id: str
) -> dict:
    """Return an employee's public information."""

    employee_info_public = await fetch_employee_info_public(employee_id)
    return employee_info_public
Behind the scenes, FastMCP intercepts the incoming request before it ever reaches your MCP tool and inspects the authentication context to verify if the required scope is present.
If a user lacks the employees:read:public scope, FastMCP protects your server in two ways:
- Discovery: It completely omits the tool from the initial discovery call so the LLM doesn't even know it exists.
- Execution: If a direct execution call is attempted anyway, it short-circuits the request and throws an authorization error, ensuring your underlying database helper never fires.
Wrapping Up
Building internal tools with the Model Context Protocol feels like giving your team superpowers. But enterprise superpowers require enterprise guardrails. Without a proper authorization layer, you’re essentially leaving your corporate front door wide open and hoping the LLM doesn't decide to wander into the wrong room.
By layering PropelAuth on top of your MCP server, you get the best of both worlds:
- The flexibility of AI to query databases, read repositories, and update tickets.
- The iron-clad security of RBAC and Enterprise SSO/SCIM, ensuring employees (and their AI assistants) can only ever touch the data they are explicitly cleared to access.
Ready to secure your AI pipeline? Sign up for PropelAuth and check out our MCP Documentation to drop authentication into your MCP server today.