React + Flask Authentication Guide

In this guide, we’ll build an example application in React and Flask where users can sign up, login, and manage their accounts. We'll include social logins (Login with Google), passwordless logins, and allow our users to upload their own profile pictures.

We're going to use the following technologies for this blog post:
- React.js - for our frontend
- Flask (python) - for our backend
- PropelAuth - for user login and management
The code is available on GitHub in these two repos: React and Flask.
Setting up Authentication
PropelAuth fully manages your signup, login, and account management flows. Features like social login (Login with Google), passwordless/magic links, and 2FA for our end users can be enabled in one click. You can sign up here.
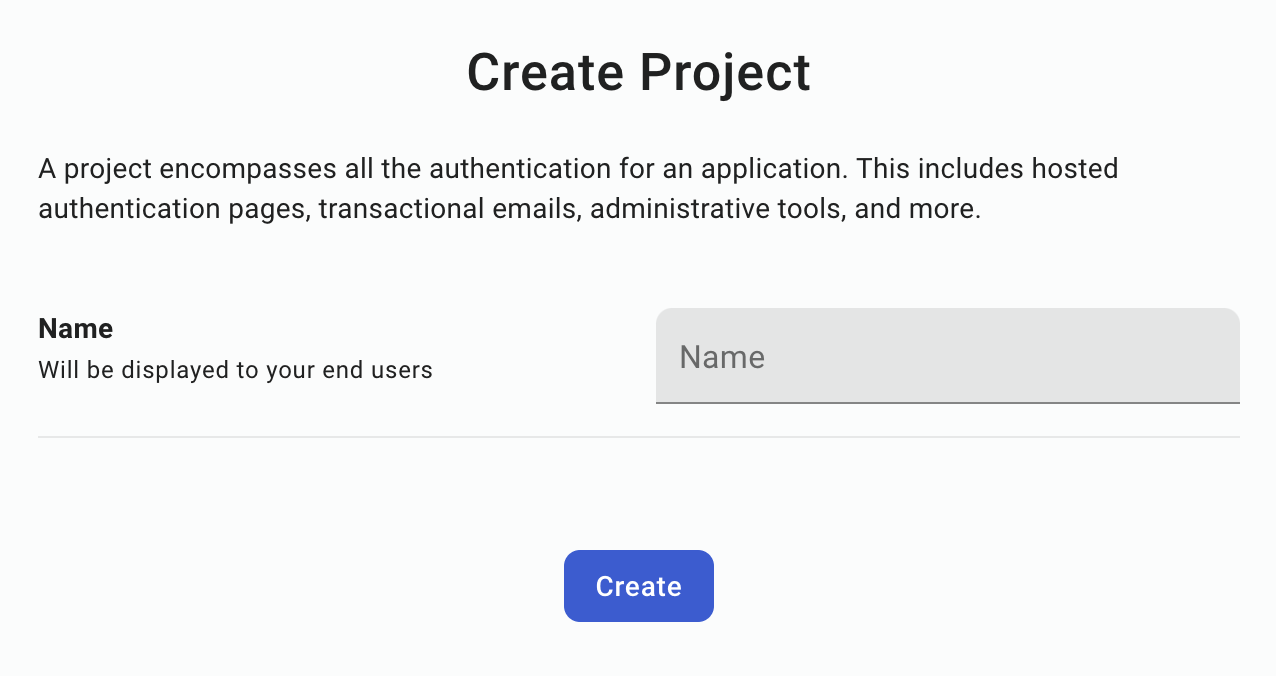
The first thing to do after you sign up is create your project:
Afterwards, a test environment is created for you.
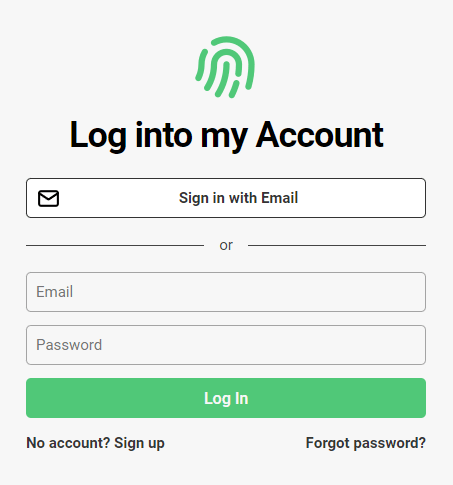
It includes login, signup, account pages, and optional organization management pages. There's a default logo, color scheme, and passwordless and password-based authentication. At this point, you can fully test what your end users will experience, transactional emails included, but you might want to configure its style first. You can do this in you dashboard under the Hosted Auth Pages section.
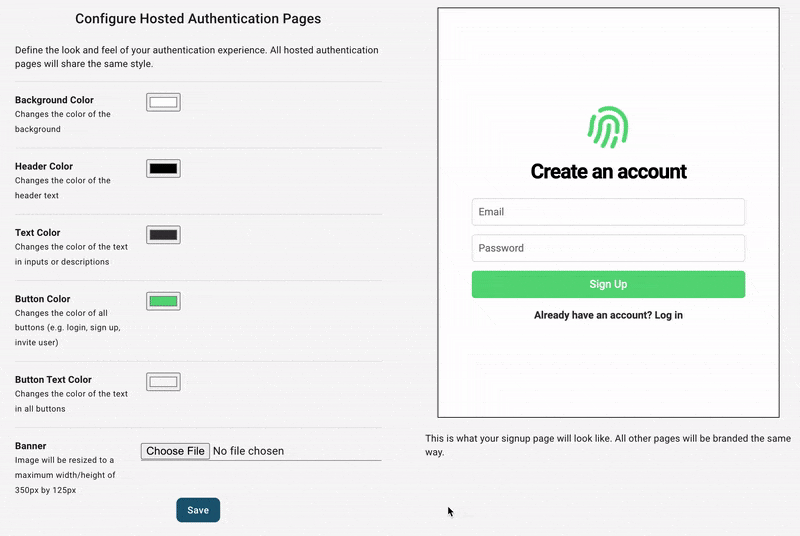
From here, you can configure other aspects of your end-users auth experience, including:
- Adding "Login in with Google" or other SSO providers
- Collecting additional metadata on signup - like username or first name/last name
- Allowing your users to upload their own profile picture
- Letting your end-users create organizations and invite their coworkers (called B2B support)
After configuring your project, it's now time to integrate it with your frontend and backend.
Authentication in React
One of the benefits of having PropelAuth manage your users is you can use whatever frontend or backend you want - or even migrate between them. In this case, we'll use React.js.
Creating a new React project
If you don't have a project already, you'll want to follow the official instructions and run:
$ npx create-react-app frontendInstallation
The @propelauth/react package provides an easy interface to access your users information. It will manage auth tokens for you and has nice features like refreshing auth information when the user reconnects or switches back to your tab.
$ yarn add @propelauth/reactSetup
At the top of our application, we will add our AuthProvider
import {AuthProvider} from "@propelauth/react";

ReactDOM.render(
    <AuthProvider authUrl={process.env.REACT_APP_PROPELAUTH_AUTH_URL}>
        <App/>
    </AuthProvider>,
    document.getElementById('root')
);
The authUrl is available on the Frontend Integration section of your PropelAuth project.
When a user logs in to our hosted pages, a secure, HTTP-only cookie is set. The AuthProvider is responsible for reaching out to PropelAuth and checking if the current user is logged in, and if they are, fetching auth tokens and user information. In production, we require you use a custom domain to avoid third-party cookie issues for your users.
Usage
withAuthInfo is a function that injects user information into your React components. Let's look at a simple example:
import {withAuthInfo} from '@propelauth/react';
// user is automatically injected from withAuthInfo
function AuthInfoOnFrontend({user}) {
return <span>
<h2>User Info</h2>
{user && user.pictureUrl && <img src={user.pictureUrl} className="pictureUrl" />}
<pre>user: {JSON.stringify(user, null, 2)}</pre>
</span>
}
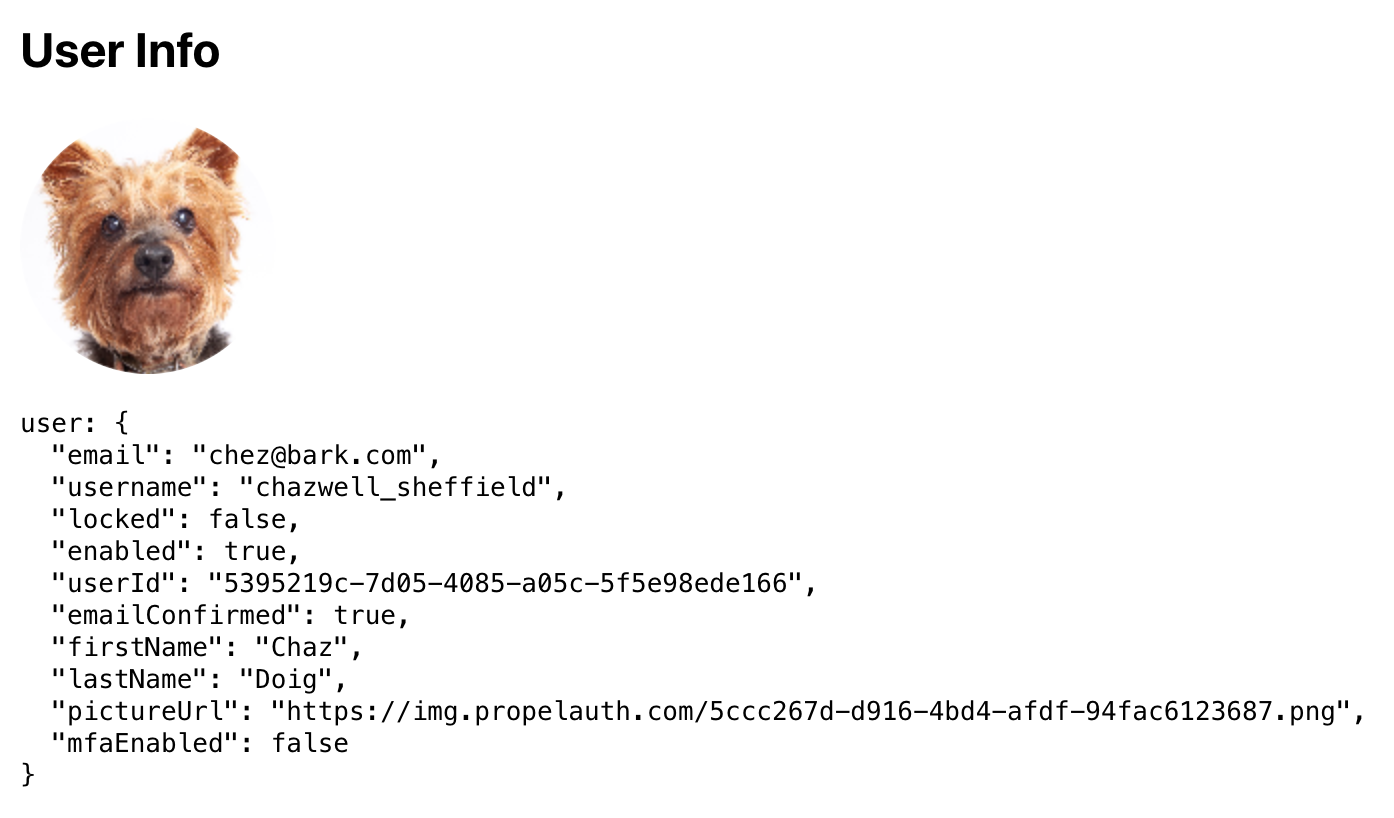
export default withAuthInfo(AuthInfoOnFrontend);If we add this component to our App and visit our site before we login, we'll see:

After logging in, we'll see:
In addition to user, withAuthInfo also injects useful values like isLoggedIn, accessToken (which we'll use shortly), and orgHelper (if you are using B2B support).
Creating Login/Logout Buttons
@propelauth/react also provides React hooks for redirecting your users to the login/signup/account pages, or logging your users out. Here's a common example of what we can do with that:
import {withAuthInfo, useLogoutFunction, useRedirectFunctions} from '@propelauth/react';

// isLoggedIn is automatically injected from withAuthInfo
function AuthenticationButtons({isLoggedIn}) {
    const logoutFn = useLogoutFunction()
    const {redirectToSignupPage, redirectToLoginPage, redirectToAccountPage} = useRedirectFunctions()

    if (isLoggedIn) {
        return <div>
            <button onClick={redirectToAccountPage}>Account</button>
            <button onClick={() => logoutFn()}>Logout</button>
        </div>
    } else {
        return <div>
            <button onClick={redirectToSignupPage}>Signup</button>
            <button onClick={redirectToLoginPage}>Login</button>
        </div>
    }
}

export default withAuthInfo(AuthenticationButtons);
Making authenticated requests
To make an authenticated request on behalf of your user, you’ll need to provide an access token. Just like isLoggedIn and user, the access token is available from withAuthInfo. You provide it in the request in the Authorization header, like so:
Authorization: Bearer ACCESS_TOKENWith fetch, this looks like:
function fetchWhoAmI(accessToken) {
    return fetch("/whoami", {
        headers: {
            "Content-Type": "application/json",
            "Authorization": `Bearer ${accessToken}`
        }
    }).then(response => {
        if (response.ok) {
            return response.json()
        } else {
            return {status: response.status}
        }
    })
}
We can add this to a component using React's useEffect hook.
import {withAuthInfo} from "@propelauth/react";
import {useEffect, useState} from "react";

// accessToken is automatically injected from withAuthInfo
function AuthenticatedRequestToBackend({accessToken}) {
    const [response, setResponse] = useState(null)

    useEffect(() => {
        fetchWhoAmI(accessToken).then(setResponse)
    }, [accessToken])

    return <span>
        <h2>Server Response</h2>
        <pre>{response ? JSON.stringify(response, null, 2) : "Loading..."}</pre>
    </span>
}

export default withAuthInfo(AuthenticatedRequestToBackend);
A quick note on CORS
Our React application runs on port 3000, so we’ll need to run our backend on a different port (in this tutorial, we use 3001). For security reasons, browsers will not allow you to make requests from one domain to another, and http://localhost:3000 and http://localhost:3001 are considered different domains.
A simple way to fix this issue is to add the following to your package.json:
"proxy": "http://localhost:3001"This will automatically proxy certain requests (like JSON requests) to http://localhost:3001. For more information, see the official React docs.
Great, we can now make authenticated requests to any backend we want. The only problem? We don t have a backend yet - let's fix that.
Authentication in Flask
Creating a virtual env
First, we create a new virtual environment and install our dependencies. We'll use propelauth-flask to validate the access token's the frontend sends.
$ mkdir backend
$ cd backend
$ python3 -m venv venv
$ source venv/bin/activate
$ pip install flask propelauth-flask python-dotenv
Creating our protected route
The code is simple enough that we can look at it first and explain it after:
# app.py
import os

from flask import Flask
from dotenv import load_dotenv
from propelauth_flask import init_auth, current_user

load_dotenv()

app = Flask(__name__)
auth = init_auth(os.getenv("PROPELAUTH_AUTH_URL"), os.getenv("PROPELAUTH_API_KEY"))

@app.route("/whoami")
@auth.require_user
def who_am_i():
    """This route is protected by require_user"""
return {"user_id": current_user.user_id}- @auth.require_user is a Python decorator that validates the access token. If a valid access token wasn't provided, the request is rejected with a 401 Unauthorized error. If you want the request to continue even without a valid access token, use @auth.optional_user instead.
- current_user is a request scoped value that is set by @auth.require_user when valid access tokens are provided.
- AUTH_URL and API_KEY can both be found by clicking on Backend Integration on the sidebar of your PropelAuth project. These are used once on startup to fetch the information needed to validate tokens. Access tokens (which are JWTs) are then validated quickly without needing to make any external requests.
You can run the code with:
$ flask run --port=3001Your requests from the browser should succeed when you are logged in and 401 when you are logged out.
Wrapping up
In under 100 lines of code, we made a pretty advanced application. By using PropelAuth for authentication, we were able to skip building any auth UIs, transactional emails, 2FA enrollment, profile picture management, and more.
Our frontend made a request to our backend, and our backend was able to identify the user that made the request. You can use this for things like saving information in a database per user_id.
If you have any questions, please reach out at support@propelauth.com.