Creating a B2B Next.js Application
In this guide, we’ll build an example B2B application in Next.js where users can sign up, invite their coworkers to the product, and manage permissions for their teams (RBAC). We'll also let our users join organizations based on their domain names (e.g. anyone with an @mycompany.com email can join MyCompany).
What is a B2B Application?
It's an application where your users use your product in groups. Let's say you are building a product that helps people create and share documents internally. Your customers might include:
- A two-person startup
- A fast growing 50 person tech company
- A hobbyist using you by themselves, but who might get more employees someday
- A large enterprise
Each of these is a group of users that will use your product together. This is also referred to as a multi-tenant system.
Setting up B2B Authentication with PropelAuth
PropelAuth makes it easy for B2B products to sign up and onboard other companies to their product. We do this by providing out-of-the-box interfaces and APIs like signup and organization management to our customers - ultimately meaning your product can be B2B ready in minutes.
The first thing to do after you sign up is create your project, and a test environment is created for you.
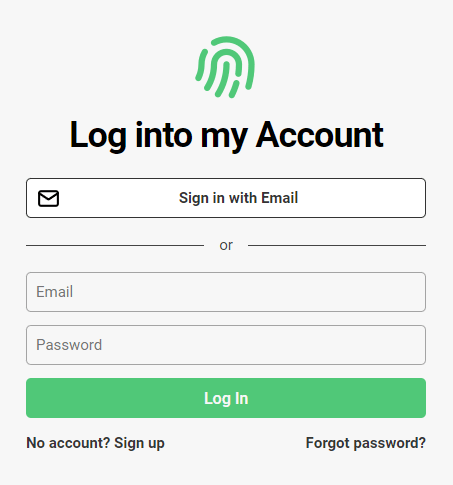
This is what your end users will see when they log in to your website. There's a default logo, color scheme, and passwordless and password-based authentication.
At this point, you can test what your end users will experience, transactional emails included, but you might want to configure its style first. You can do this in you dashboard under the Hosted Auth Pages section.
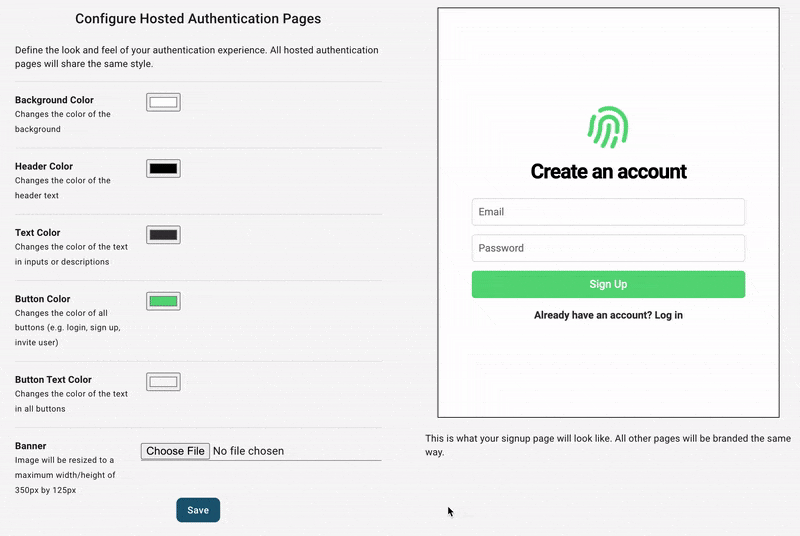
From here, you can configure other aspects of your end-users auth experience, including:
- Adding "Login in with Google" or other SSO providers
- Collecting additional metadata on signup - like username or first name/last name
- Allowing your users to upload their own profile picture
After configuring your project, it's now time to integrate it with your frontend and backend.
Next.js Authentication
If you don't have a project already, you can create one with:
$ npx create-next-app@latestInstallation
The @propelauth/react package provides an easy interface to access your users' information. It will manage auth tokens for you and has nice features like refreshing auth information when the user reconnects or switches back to your tab.
$ yarn add @propelauth/reactSetup
When a user logs in to your hosted pages, a secure, HTTP-only cookie is set. The AuthProvider is responsible for reaching out to PropelAuth and checking if the current user is logged in, and if they are, fetching auth tokens and user information. In production, we require you use a custom domain to avoid third-party cookie issues for your users.
At the top of our application, in pages/_app.js, we add our AuthProvider
import {AuthProvider} from "@propelauth/react";

function MyApp({Component, pageProps}) {
    return <AuthProvider authUrl={process.env.NEXT_PUBLIC_PROPELAUTH_AUTH_URL}>
        <Component {...pageProps} />
    </AuthProvider>
}
Make sure to create a .env file with NEXT_PUBLIC_PROPELAUTH_AUTH_URL=REPLACE_ME
The authUrl is available on the Frontend Integration section of your PropelAuth project.
Usage
withAuthInfo is a function that injects user information into your React components. @propelauth/react also provides React hooks for redirecting your users to the login/signup/account pages, or logging your users out. With those combined, we can add Login/Signup buttons when the user is logged out and Account/Logout buttons when the user is logged in:
import {withAuthInfo, useLogoutFunction, useRedirectFunctions} from '@propelauth/react';
// isLoggedIn is automatically injected from withAuthInfo
function AuthenticationButtons({isLoggedIn}) {
const logoutFn = useLogoutFunction()
const {redirectToSignupPage, redirectToLoginPage, redirectToAccountPage} = useRedirectFunctions()
if (isLoggedIn) {
return <div>
<button onClick={redirectToAccountPage}>Account</button>
<button onClick={() => logoutFn()}>Logout</button>
</div>
} else {
return <div>
<button onClick={redirectToSignupPage}>Signup</button>
<button onClick={redirectToLoginPage}>Login</button>
</div>
}
}
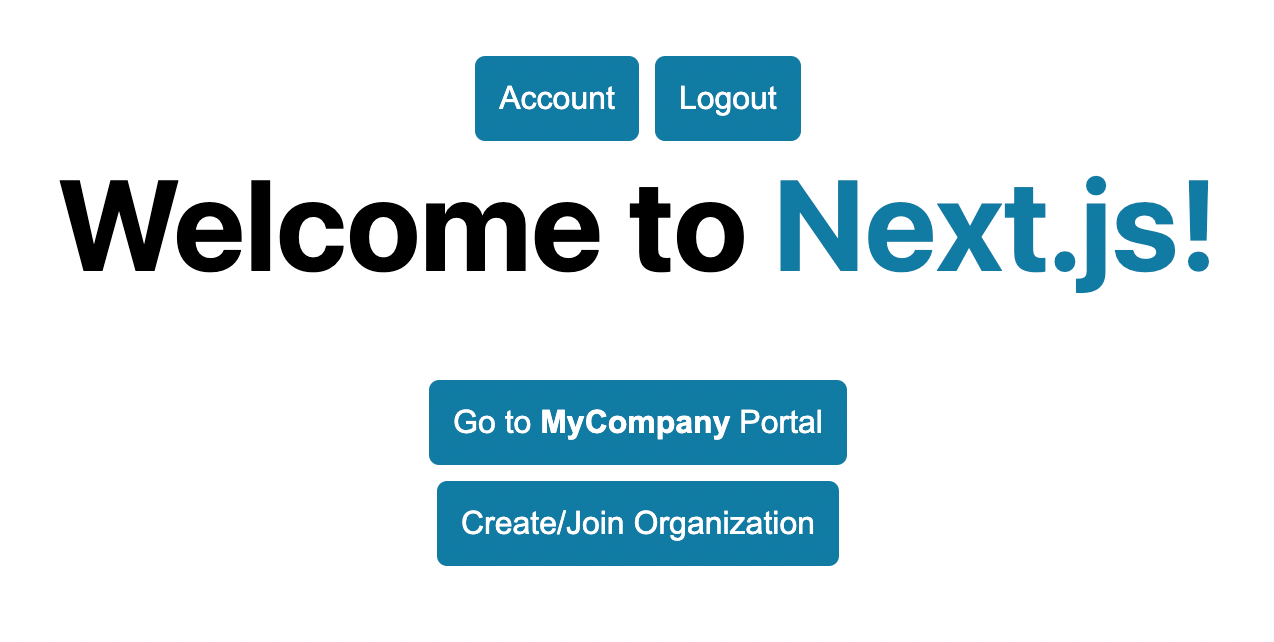
export default withAuthInfo(AuthenticationButtons);Then, let's go to src/index.js and add these buttons.
import Head from 'next/head'
import styles from '../styles/Home.module.css'
import AuthenticationButtons from "../components/AuthenticationButtons";
export default function Home() {
return (
<div className={styles.container}>
<Head>
<title>Create Next App</title>
<meta name="description" content="Generated by create next app"/>
<link rel="icon" href="/favicon.ico"/>
</Head>
<main className={styles.main}>
<AuthenticationButtons />
<h1 className={styles.title}>
Welcome to <a href="https://nextjs.org">Next.js!</a>
</h1>
</main>
</div>
)
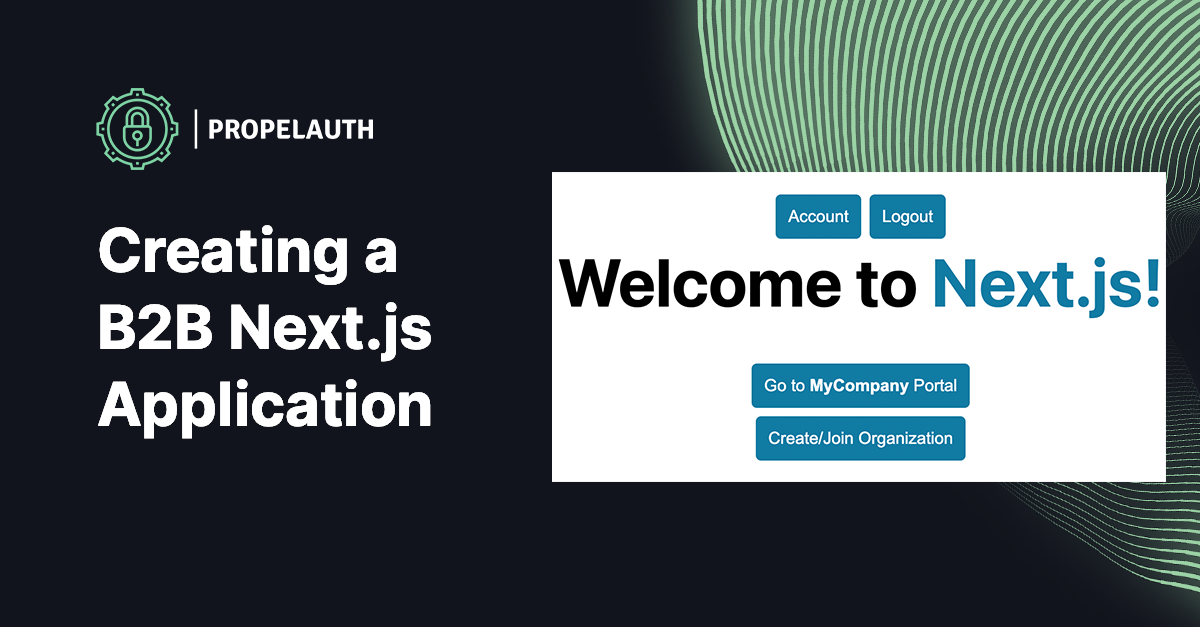
}When our users are logged out, they see:

And when they log in, they see:

Organizations and roles
PropelAuth provides out of the box UIs and APIs for your end users to create and manage their own organizations:
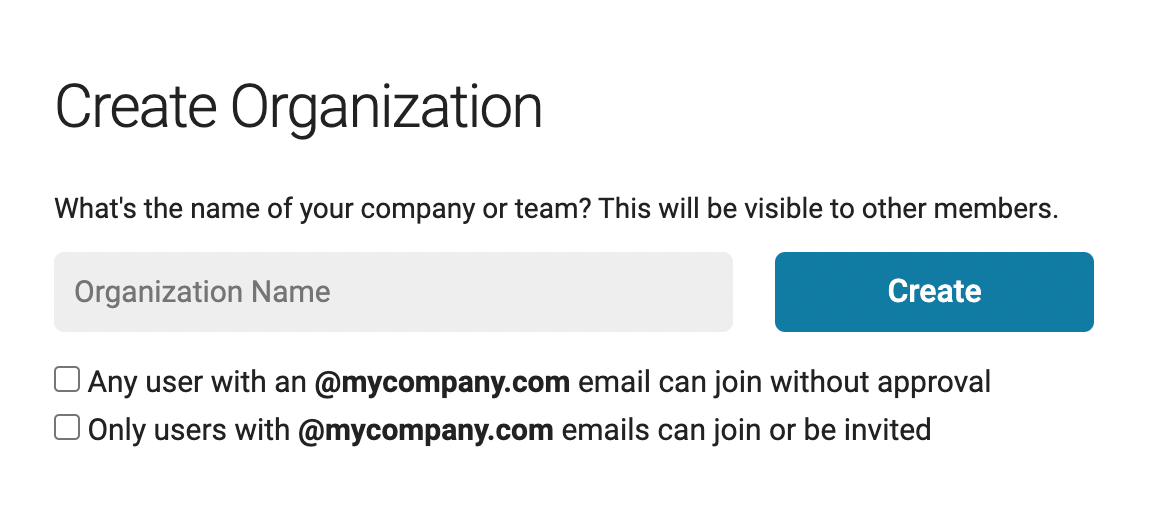
When your users create organizations, they can make it so any coworkers with the same email domain can automatically join - or they can invite coworkers manually.

Accessing org information
We've seen that withAuthInfo provides isLoggedIn, but it also provides an orgHelper which has functions like getAllOrgs - allowing us to get all the organizations the current user is a member of. We can use this to display a list:
import {withAuthInfo, useRedirectFunctions} from '@propelauth/react';
import Link from 'next/link'

// isLoggedIn and orgHelper are automatically injected from withAuthInfo
function OrgSelector({isLoggedIn, orgHelper}) {
    const {redirectToCreateOrgPage} = useRedirectFunctions()
    if (!isLoggedIn) {
        return <span></span>
    }

    return <div>
        {orgHelper.getOrgs().map(org => {
            return <span key={org.orgId}>
                <Link href={`/org/${org.orgId}`}>
                    <button>Go to <b>{org.orgName}</b> Portal</button>
                </Link><br/>
            </span>
        })}
        <button onClick={redirectToCreateOrgPage}>Create/Join Organization</button>
    </div>
}

export default withAuthInfo(OrgSelector);
Add OrgSelector to index.js and we can see all the orgs the current user is a member of:
Creating an Org Portal
The links we specified above redirects the user to /org/{orgId} - let's create a dynamic route for this page. Create a new file pages/org/[orgId].js and to start let's just display the orgId
import {useRouter} from 'next/router'

const Org = () => {
    const router = useRouter()
    const {orgId} = router.query

    return <p>Org ID: {orgId}</p>
}

export default Org
If we click one of our organizations, we can see it's ID

However... we can put anything we want in the URL and it will be considered an Org ID

We can fix this by using the orgHelper and checking if the user is a member of that organization.
const Org = ({orgHelper}) => {
    const router = useRouter()
    const {orgId} = router.query
    const org = orgHelper.getOrg(orgId)

    if (!org) {
        return <div>Not found</div>
    }

    return <div>
        <h3>Org: {org.orgName}</h3>
    </div>
}
And then our above examples become:


For security purposes, we also want to have checks on the backend.
Making authenticated requests
To make an authenticated request on behalf of your user, you’ll need to provide an access token. An access token is a JWT - which means that your backend can verify which user made the request without needing to reach out to PropelAuth.
Just like isLoggedIn and orgHelper, the access token is available from withAuthInfo. You provide it in the request in the Authorization header, like so:
Authorization: Bearer ACCESS_TOKENWith fetch, this looks like:
function fetchOrgInfo(orgId, accessToken) {
    return fetch(`/api/org/${orgId}`, {
        headers: {
            "Content-Type": "application/json",
            "Authorization": `Bearer ${accessToken}`
        }
    }).then(response => {
        if (response.ok) {
            return response.json()
        } else {
            return {status: response.status}
        }
    })
}
We can add this to our Org component using React's useEffect hook.
const Org = ({orgHelper, accessToken}) => {
    const router = useRouter()
    const {orgId} = router.query
    const org = orgHelper.getOrg(orgId)
    const [response, setResponse] = useState(null)

    useEffect(() => {
        fetchOrgInfo(org?.orgId, accessToken).then(setResponse)
    }, [org?.orgId, !!accessToken])

    if (!org) {
        return <div>Not found</div>
    }

    return <div>
        <h3>Org: {org.orgName}</h3>
        <pre>{response ? JSON.stringify(response, null, 2) : "Loading..."}</pre>
    </div>
}
We can now make authenticated requests to any backend we want! Luckily, Next.js has support for API routes so we will use that - but we do have guides for other backends.
Authentication with Next.js API Routes
Creating an unprotected route
Any files in pages/api are treated as a route. Let’s make a new file pages/api/org/[orgId].js:
export default function handler(req, res) {
  res.status(200).json({ message: `Hello ${req.query.orgId}` })
}
And that’s all, we can test this route with curl
$ curl localhost:3000/api/org/anythingreally
{"message":"Hello anythingreally"}
Protecting our route
At this point, our frontend is passing in an access token, but our server isn’t doing anything with it yet. We’ll use PropelAuth’s Node library @propelauth/node to get the user and verify they are a member of the org, since Next.js API routes are serverless Node functions.
$ yarn add @propelauth/nodeThen we'll create a new file lib/propelauth.js
import {initBaseAuth} from "@propelauth/node";

const propelauth = initBaseAuth({
    authUrl: process.env.NEXT_PUBLIC_PROPELAUTH_AUTH_URL,
    apiKey: process.env.PROPELAUTH_API_KEY,
    manualTokenVerificationMetadata: {
        verifierKey: process.env.PROPELAUTH_VERIFIER_KEY,
        issuer:  process.env.PROPELAUTH_VERIFIER_ISSUER

})

export default propelauth
Your specific values can be found in the Backend Integration section of your PropelAuth project. This exports a set of functions like propelauth.validateAccessTokenAndGetUserWithOrgInfo, which will make sure a valid accessToken was provided AND that user is in an organization. The full reference is available here.
And now we have everything we need to update our pages/api/org/[orgId].js route:
import propelauth from "../../../lib/propelauth"
export default async function handler(req, res) {
try {
const orgInfo = await propelauth.validateAccessTokenAndGetUserWithOrgInfo(
req.headers.authorization,
{orgId: req.query.orgId}
)
} catch (e) {
res.status(401).send("Unauthorized")
}
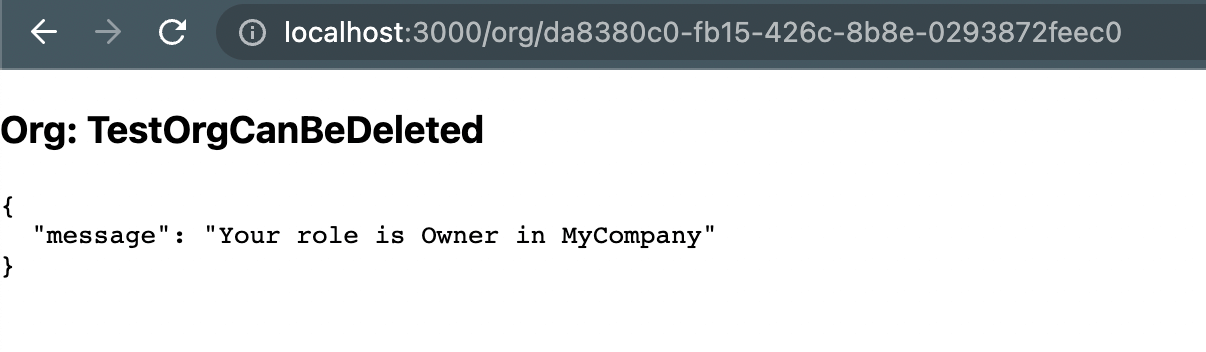
res.status(200).json({
message: `Your role is ${orgInfo.orgMemberInfo.assignedRole}
in ${orgInfo.orgMemberInfo.orgName}`
})
}- validateAccessTokenAndGetUserWithOrgInfo is a function that validates the access token and makes sure the user is a member of the specified organization.
- Access tokens (which are JWTs) are validated quickly without needing to make any external requests.
If we check our frontend, we see that the request succeeds:
If you try using curl but don't specify the auth header, the request is rejected:
$ curl -v localhost:3000/api/org/anythingreally
# ...
< HTTP/1.1 401 Unauthorized
# ...
Wrapping up
Without a lot of code, we made a pretty advanced B2B application. By using PropelAuth for authentication, we were able to skip building any auth UIs, transactional emails, 2FA enrollment, org management, and more. Our users are able to manage their own accounts and organizations, saving us on future support tasks.
Our frontend made a request to our backend, and our backend was able to identify the user that made the request. You can use this for things like saving information in a database per user_id or per org_id.
If you have any questions, please reach out at support@propelauth.com.