A Type-Safe Stack for Building B2B Apps Fast
Picking a tech stack is an important decision for any product. There’s a lot of constraints that you need to balance.
On the one hand, you want to get your product out into the world as quickly as possible. You want to see what works, what doesn’t work, and iterate quickly.
On the other hand, if things go well, you want to make sure you can support all the requirements your future customers have for you and you aren’t rearchitecting / rebuilding your product.
In this post, I’ll talk through a stack that balances these concerns for B2B products. I’ll show how we can get something up and running quickly, and then show how many common requirements that will come are easy to support - often without writing any new code.
What are we building?
We’re going to build a ticket management system.
It’s going to start off really simple: users can log in and view their tickets. Then we’ll show how we can add complexity quickly, like full text search of tickets, encrypted storage, and enterprise login support.
What’s the tech stack?
I’m a big believer that strong tooling and type safety is the key to moving fast while not breaking things. Each part of this stack provides strong type safety and will give developers immediate feedback when they make a mistake.
For our DB, we’ll use MongoDB. This will allow us to store data by just defining a TypeScript type, but it also natively supports full text search, vector search, and queryable encryption - all things that our future customers will appreciate.
For our backend, we’ll use Hono. Hono has first-class Zod support, which helps make sure that all our routes are clearly defining their inputs. More importantly though, Hono RPC gives us a fully typed client in our frontend, that matches our backend. If we change our backend route or input type, our frontend will immediately know.
For our authentication layer, we’ll use PropelAuth. PropelAuth has first class User and Organization types, meaning we can write code like user.isRole("Admin") or user.hasPermission("canViewBilling") to protect our routes. Its support for enterprise SSO/SCIM is built on top of those primitives, so when our first enterprise customer shows up, our code stays the same.
For our frontend, we’ll use React built with Vite because it is fast and stable. We’ll use TanStack Query as our data fetching layer to make sure our data stays up to date, and we’ll use TanStack Router as our client-side router, to give us type safety all the way down to our query parameters.
Finally, we’ll put it all together with pnpm workspaces so our frontend, backend, and data layers can all be versioned and typed together.
Let’s get started!
Setting up our backend
Hono has a CLI to bootstrap our backend that we’ll use. We’ll specifically use their nodejs template, but they also have templates for Cloudflare Workers, Deno, Fastly, Netlify, and more:
pnpm create hono@latest -i --pm pnpm \
    -t nodejs \
    backend
Our backend is now set up and exposes a single endpoint. As a quick test, we’ll run our server and curl it to make sure it works:
cd backend
pnpm run dev   # runs the server

# in a different window
curl http://localhost:3000
# Hello Hono!
Great! Now it’s time to design our data layer.
Setting up our Data Layer
Creating our Data Layer
We’re going to use MongoDB as our database, and MongoDB keeps things simple up front: we define a type, and the collection stores documents matching that shape. If you come from a SQL background, think of collections as tables.
For our ticketing system we have one core type, and it’s unsurprisingly a Ticket . We’ll make a backend/src/models directory to store all our database types, and then create backend/src/models/ticket.ts:
export interface Ticket {
    _id: string;
    userId: string;
    subject: string;
    customer: string;
    priority: "low" | "medium" | "high" | "urgent";
    status: "open" | "in-progress" | "resolved" | "closed";
    createdAt: string;
}
Connecting to our DB
Next, it’s time to connect to our DB so we can create, read, and search for Ticket s. We’ll install the official MongoDB Node.js Driver and dotenv for loading our connection string:
pnpm i mongodb dotenv
Then we’ll create a new file backend/src/db.ts which constructs a MongoClient , which will maintain a pool of connections to our DB.
import { MongoClient, type Db, type Collection } from "mongodb";
import type { Ticket } from "./models/ticket.js";

const uri = process.env.MONGODB_URI;

let clientPromise: Promise<MongoClient> | null = null;

async function getClient(): Promise<MongoClient> {
    if (!uri) {
        throw new Error("MONGODB_URI env variable isn't set");
    }

    if (!clientPromise) {
        const client = new MongoClient(uri);
        clientPromise = client.connect();
    }

    return clientPromise;
}
To make things easier, instead of exporting our low-level getClient function, we’ll instead export a tickets function which is a MongoDB collection containing our Ticket type:
async function getDb(): Promise<Db> {
    const client = await getClient();
    return client.db();
}

export async function tickets(): Promise<Collection<Ticket>> {
    const db = await getDb();
    return db.collection<Ticket>("tickets");
}
To add a ticket, for example, we’d just have to write:
const col = await tickets();
await col.insertOne({ subject: "Charts not loading?", ... })
Setting up our Database
Now that we can connect to our database, we’ll pre-populate it with our collection and some example data for our application.
Note that we don’t need to explicitly create the collection. MongoDB will automatically create a collection if we insert a record into it. However, explicitly creating the collection has a few advantages:
- We can also create search indices that we’ll use later on.
- We can set up some features like field-level encryption.
- When running locally, we can also seed the DB with example data.
Let’s add another function to our backend/src/db.ts called ensureDb which will ensure the database is fully initialized:
export async function ensureDb(): Promise<void> {
    const db = await getDb();
    await ensureTicketsCollection(db);
}

async function ensureTicketsCollection(db: Db) {
    const collections = await db.listCollections({ name: "tickets" }).toArray();
    if (collections.length === 0) {
        await db.createCollection("tickets");
        console.log(`Created collection 'tickets'`);
    }
}
Seeding our DB with test data
When developing, it’s nice to have a standard set of data that everyone starts with for testing purposes. We’ll create a new file backend/src/seed.ts which will call our ensureDb function, clear out any existing data, and then add some sample data:
import "dotenv/config";
import { tickets, ensureDb } from "./db.js";
import type { Ticket } from "./models/ticket.js";
const userId = "9556f257-95b7-45df-83a7-82ef1cbacb36";
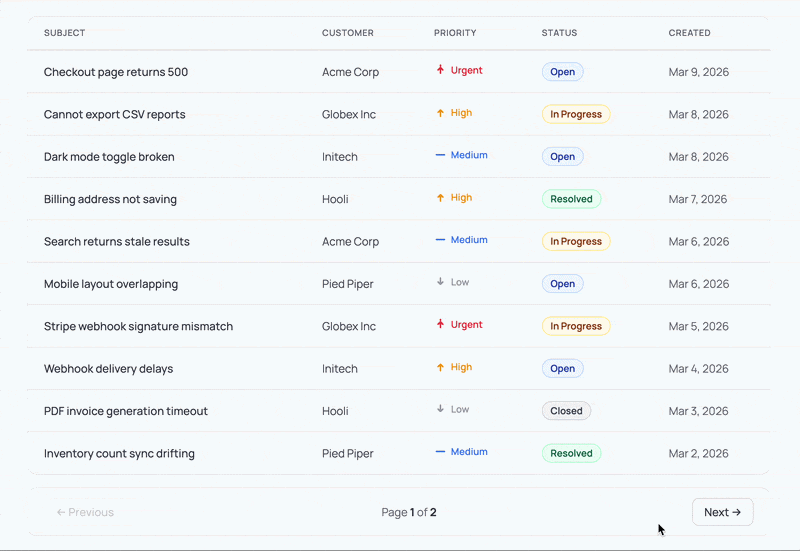
const seedTickets: Ticket[] = [
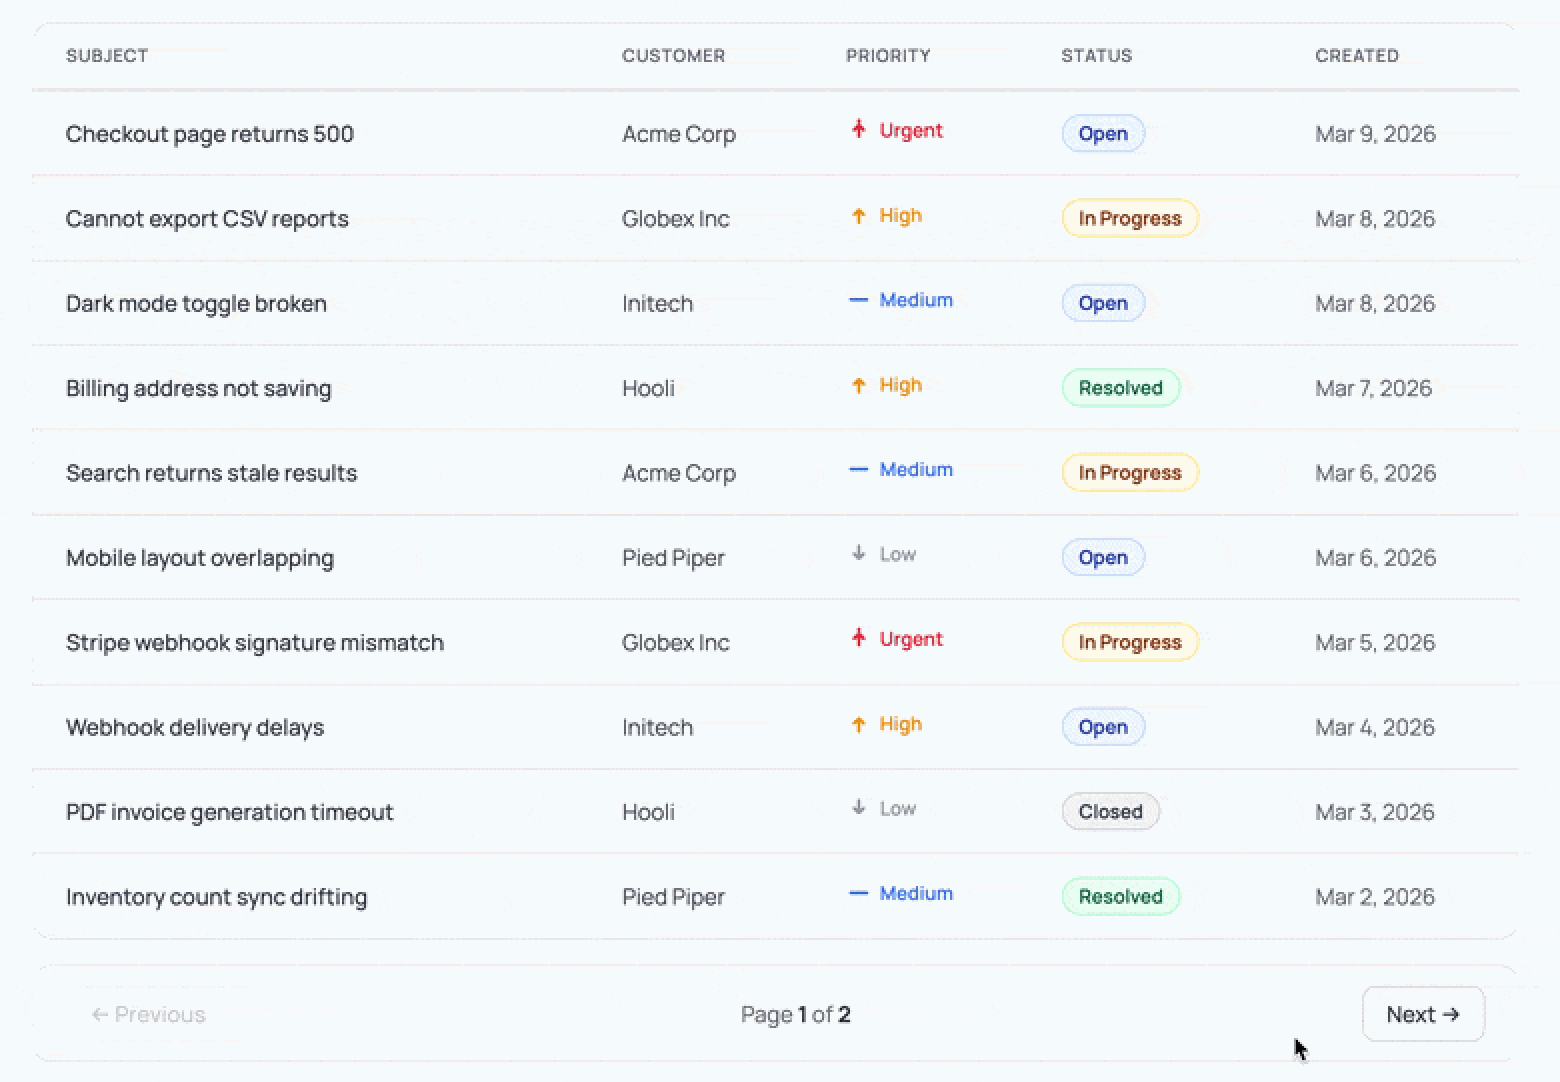
{ _id: "TK-001", userId, subject: "Checkout page returns 500", customer: "Acme Corp", priority: "urgent", status: "open", createdAt: "2026-03-10" },
{ _id: "TK-002", userId, subject: "Cannot export CSV reports", customer: "Globex Inc", priority: "high", status: "in-progress", createdAt: "2026-03-09" },
{ _id: "TK-003", userId, subject: "Dark mode toggle broken", customer: "Initech", priority: "medium", status: "open", createdAt: "2026-03-09" },
{ _id: "TK-004", userId, subject: "Billing address not saving", customer: "Hooli", priority: "high", status: "resolved", createdAt: "2026-03-08" },
{ _id: "TK-005", userId, subject: "Search returns stale results", customer: "Acme Corp", priority: "medium", status: "in-progress", createdAt: "2026-03-07" },
{ _id: "TK-006", userId, subject: "Mobile layout overlapping", customer: "Pied Piper", priority: "low", status: "open", createdAt: "2026-03-07" },
{ _id: "TK-007", userId, subject: "Stripe webhook signature mismatch", customer: "Globex Inc", priority: "urgent", status: "in-progress", createdAt: "2026-03-06" },
{ _id: "TK-008", userId, subject: "Webhook delivery delays", customer: "Initech", priority: "high", status: "open", createdAt: "2026-03-05" },
{ _id: "TK-009", userId, subject: "PDF invoice generation timeout", customer: "Hooli", priority: "low", status: "closed", createdAt: "2026-03-04" },
{ _id: "TK-010", userId, subject: "Inventory count sync drifting", customer: "Pied Piper", priority: "medium", status: "resolved", createdAt: "2026-03-03" },
{ _id: "TK-011", userId, subject: "Email notifications duplicated", customer: "Acme Corp", priority: "high", status: "open", createdAt: "2026-03-02" },
{ _id: "TK-012", userId, subject: "Dashboard charts not loading", customer: "Globex Inc", priority: "medium", status: "closed", createdAt: "2026-03-01" },
];
async function main() {
await ensureDb();
const col = await tickets();
await col.deleteMany({});
await col.insertMany(seedTickets);
console.log(`Seeded ${seedTickets.length} tickets`);
process.exit(0);
}
main().catch((err) => {
console.error(err);
process.exit(1);
});
To make this easier to run, we’ll also add the following to the scripts section of our backend/package.json file:
{
    // ...
    "scripts": {
        // ...
        "seed": "tsx src/seed.ts"
    }
    // ...
}
We can now run pnpm run seed and see our…
pnpm run seed
# Error: MONGODB_URI env variable isn't set
Oh right, we need to set up MongoDB first. To do this, we have two options:
Note that some features, like search, may only be available via Atlas. For this post, I set up Atlas, grabbed a connection string, and added it to my backend/.env file:
MONGODB_URI={connection_string_here}
Then, we can go back and run our seed script:
pnpm run seed
# Created collection 'tickets'
# Seeded 12 tickets
Perfect! Let’s now create an API to access this data.
Finishing our Backend
The entrypoint to our backend is backend/src/index.ts and we have two quick changes to make before we can hook up our APIs.
First, we want to pull in our .env just like we did in our seed script, so we add this import to the top:
import "dotenv/config";
Next, we want to make sure our DB is set up correctly before the application starts. There’s a serve function call which is how our application starts, which we will now call only after we call our ensureDb function:
ensureDb().then(() =>
    serve(
        {
            fetch: app.fetch,
            port: 3000,
        },
        (info) => {
            console.log(`Server is running on http://localhost:${info.port}`);
        },
    ),
);
Now, we’re ready to create our API routes.
Creating an API route for fetching tickets
First, install Zod support and Hono’s Zod validation which we will use to validate the input to our routes:
pnpm i zod @hono/zod-validator
For our routes, we’ll keep it simple: GET /api/tickets will page over all our tickets and GET /api/tickets/:id will fetch a single ticket.
Hono lets us validate both the query params (for the first route) and our path param (for the second route). Let’s add these schemas to backend/src/schemas/tickets.ts:
import { z } from "zod";

export const ticketsPageQuerySchema = z.object({
    page: z.coerce.number().int().min(1).default(1),
    pageSize: z.coerce.number().int().min(1).max(50).default(10),
});

export const ticketParamsSchema = z.object({
    id: z.string(),
});

export type TicketsPageQuery = z.infer<typeof ticketsPageQuerySchema>;
export type TicketParams = z.infer<typeof ticketParamsSchema>;
Next, we’ll create backend/src/data/tickets.ts. This keeps our route handlers focused on HTTP concerns instead of database details.
import { tickets } from "../db.js";
import type { Ticket } from "../models/ticket.js";
import type { TicketsPageQuery } from "../schemas/tickets.js";

// We'll replace this when we add authentication
const DEMO_USER_ID = "9556f257-95b7-45df-83a7-82ef1cbacb36";

// Note: In both these cases we're returning the DB type directly
//       back to the frontend. This is fine for our Ticket type,
//       however you may want to add an intermediate type if
//       there's anything at the DB-level you wouldn't want exposed
//       to the user.

export async function getTicketsPage({ page, pageSize }: TicketsPageQuery) {
    const col = await tickets();
    const skip = (page - 1) * pageSize;

    const [items, total] = await Promise.all([
        col
            .find({ userId: DEMO_USER_ID })
            .sort({ createdAt: -1 })
            .skip(skip)
            .limit(pageSize)
            .toArray(),
        col.countDocuments({ userId: DEMO_USER_ID }),
    ]);

    return {
        tickets: items,
        page,
        pageSize,
        total,
        totalPages: Math.ceil(total / pageSize),
    };
}

export async function getTicketById(id: string): Promise<Ticket | null> {
    const col = await tickets();
    return col.findOne({ _id: id, userId: DEMO_USER_ID });
}
Finally, we can hook up our schema and database functions into our two API routes, back in backend/src/index.ts:
// ...

const app = new Hono();

const routes = app
    .get("/api/tickets", zValidator("query", ticketsPageQuerySchema), async (c) => {
        const query = c.req.valid("query");
        const result = await getTicketsPage(query);
        return c.json(result, 200);
    })
    .get("/api/tickets/:id", zValidator("param", ticketParamsSchema), async (c) => {
        const { id } = c.req.valid("param");
        const ticket = await getTicketById(id);
        if (!ticket) {
            return c.json({ error: "Ticket not found" }, 404);
        }
        return c.json({ ticket }, 200);
    });

export type AppType = typeof routes;
Notice we're assigning the chained routes to a variable and exporting its type. This is what powers Hono RPC: our frontend will import AppType to get a fully typed client that mirrors these routes. We'll set that up shortly.
Test out our routes
Now we can test both endpoints:
curl "http://localhost:3000/api/tickets"
{
    "tickets": [
        { "_id": "TK-001", "subject": "Checkout page returns 500" /* ... */ }
        // ...
    ],
    "page": 1,
    "pageSize": 10,
    "total": 12,
    "totalPages": 2
}
We can also request a smaller page:
curl "http://localhost:3000/api/tickets?page=2&pageSize=5"
And fetch a single ticket by ID:
curl "http://localhost:3000/api/tickets/TK-001"
{
    "ticket": {
        "_id": "TK-001",
        "subject": "Checkout page returns 500"
        // ...
    }
}
Everything seems to work! Let’s switch over to the frontend so we can see our data in the browser.
Wiring it up with pnpm workspaces
Before we set up the frontend, let’s connect our packages into a single workspace. This lets us install dependencies with one command, and more importantly, it allows the frontend to import types directly from the backend.
First, create a pnpm-workspace.yaml in the project root:
packages:
    - frontend
    - backend
Then create a root package.json:
{
    "name": "example-app",
    "private": true,
    "scripts": {
        "dev": "pnpm -r --parallel dev"
    }
}
Now from the project root, pnpm install will install dependencies for both packages, and pnpm dev will start the backend and frontend in parallel.
Setting up our frontend
Just like Hono, TanStack Router has a CLI which will also set up React and Tailwind for us:
pnpx create-tsrouter-app@latest --no-examples \
    --no-git \
    --toolchain eslint \
    frontend
Then we’ll install the rest of our frontend dependencies:
cd frontend
pnpm i zod @tanstack/react-query
If you check out the src directory, you can see we have a few existing routes and components:
$ tree src
src
├── components
│   ├── Footer.tsx
│   ├── Header.tsx
│   └── ThemeToggle.tsx
├── main.tsx
├── router.tsx
├── routes
│   ├── __root.tsx
│   ├── about.tsx
│   └── index.tsx
├── routeTree.gen.ts
└── styles.css
For our purposes, I’m going to start simpler and remove all the components, the about route, most of the CSS, and update our index.tsx to be:
import { createFileRoute } from "@tanstack/react-router";

export const Route = createFileRoute("/")({ component: App });

function App() {
    return <p>Hello, world!</p>;
}
You can run the frontend with pnpm run dev and you’ll be greeted with our much less exciting site:

Setting up Vite to proxy to our Backend
When you are developing locally, you’ll likely have the frontend running on one port and the backend running on another. The only problem with this, is your frontend needs to fully specify its destination when making fetches:
fetch("http://localhost:3000/api/tickets");
And the backend needs to have CORS configuration set up to allow requests from the frontend. I personally find this annoying, so what you can do instead is set up your frontend to automatically proxy all requests that start with /api to the backend.
This means you can just write:
fetch("/api/tickets");
and you don’t need to set up CORS. To do this, add the following to your frontend/vite.config.ts file:
const config = defineConfig({
    // ...
    // Add this `server` block
    server: {
        proxy: {
            "/api": {
                target: "http://localhost:3000",
                changeOrigin: true,
            },
        },
    },
});
Setting up our APIs
Remember that AppType we exported from the backend? Now it's time to use it. Hono ships a lightweight hono/client module that gives us a typed fetch wrapper on the frontend. It's not a server, just the other half of the RPC system:
cd frontend
pnpm i hono
Now we can create frontend/src/api/client.ts:
import { hc } from "hono/client";
import type { AppType } from "../../../backend/src/index.js";

export const client = hc<AppType>("/");
The AppType import is type-only, so no backend code ends up in the frontend bundle. The base URL is "/" because our Vite proxy already forwards /api requests to the backend.
Setting up React Query
We already installed @tanstack/react-query earlier, so we just need to wire it up in frontend/src/main.tsx:
import { QueryClient, QueryClientProvider } from "@tanstack/react-query";

// ...

const queryClient = new QueryClient();

// Then wrap your app:
root.render(
    <QueryClientProvider client={queryClient}>
        <RouterProvider router={router} />
    </QueryClientProvider>,
);
Creating our first query hook
Here's where we get to combine a lot of the work we just did. We're going to export a React hook named useTicketsQuery that makes requests to our /api/tickets route.
Because it uses React Query, it'll provide us with loading and error states, and it'll automatically update on key events like when the tab is refocused.
Because it uses Hono RPC, the input and output types will be automatically inferred for us.
Let's see what this looks like by creating frontend/src/api/tickets.ts:
import { useQuery } from "@tanstack/react-query";
import type { InferRequestType, InferResponseType } from "hono/client";
import { client } from "./client";

const endpoint = client.api.tickets.$get;

export type TicketsRequest = InferRequestType<typeof endpoint>["query"];
export type TicketsResponse = InferResponseType<typeof endpoint>;

async function fetchTickets(query: TicketsRequest): Promise<TicketsResponse> {
    const res = await endpoint({ query });
    if (!res.ok) throw new Error("Failed to fetch tickets");
    return res.json();
}

export function useTicketsQuery(query: TicketsRequest) {
    return useQuery({
        queryKey: ["tickets", query],
        queryFn: () => fetchTickets(query),
    });
}
InferRequestType and InferResponseType derive our types directly from the endpoint, so we never have to manually keep them in sync with the backend. If we change a route's input or response shape, TypeScript will immediately tell us what needs to update on the frontend.
Using the hook
We can then update our frontend/src/routes/index.tsx to use the hook and display our tickets:
import { createFileRoute } from "@tanstack/react-router";
import { useTicketsQuery } from "../api/tickets";

export const Route = createFileRoute("/")({ component: App });

function App() {
    const { data, isLoading, error } = useTicketsQuery({});

    if (isLoading) return <p>Loading...</p>;
    if (error) return <p>Error: {error.message}</p>;

    return (
        <ul>
            {data?.tickets.map((ticket) => (
                <li key={ticket._id}>{ticket.subject}</li>
            ))}
        </ul>
    );
}
And just like that, we have a fully typed pipeline from our MongoDB collection, through our Hono API, all the way to our React component. Try hovering over ticket in your editor and you'll see the full Ticket type that we defined at the very beginning.
Adding pagination
Our backend already supports page and pageSize query params, but right now we're hardcoded to the first page. TanStack Router supports type-safe search params, which means we can have a user navigate to /?page=2, grab that value, validate it with Zod, pass it into our backend, and get back the right results. This also means the browser's back button just works, going back restores the previous page.
First, we add a Zod schema to our route definition with validateSearch. The router will parse and validate the URL's query params for us, and the .catch() fallback handles junk input like /?page=abc gracefully:
const searchSchema = z.object({
    page: z.number().int().min(1).default(1).catch(1),
    pageSize: z.number().int().min(1).max(50).default(10).catch(10),
});

export const Route = createFileRoute("/")({
    component: App,
    validateSearch: searchSchema,
});
Then inside our component, Route.useSearch() gives us the validated, typed params. We pass them into useTicketsQuery and use TanStack Router's <Link> component to wire up the pagination buttons:
const { page, pageSize } = Route.useSearch();
const { data, isLoading, error } = useTicketsQuery({
    page: String(page),
    pageSize: String(pageSize),
});
Note that Hono RPC expects query values as strings, so we convert them with String(). Our Zod schema on the backend will coerce them back to numbers.
For navigation, <Link> takes a search prop that updates the URL's query params:
<Link from="/" search={{ page: page - 1, pageSize }}>Previous</Link>
<span>Page {page} of {data?.totalPages}</span>
<Link from="/" search={{ page: page + 1, pageSize }}>Next</Link>
Clicking "Next" navigates to /?page=2, the router validates it, useSearch() updates, the query key changes, and React Query fetches the next page. The whole chain stays type-safe, so if you typo a search param name, TypeScript catches it.
We'll leave the styling up to you, but here's what it could look like:
Adding authentication
So far we've been using a hardcoded DEMO_USER_ID for all our queries. Let's replace that with real authentication using PropelAuth. We need to do two things: validate tokens on the backend and redirect unauthenticated users on the frontend.
Protecting our backend routes
First, install the PropelAuth Node library:
cd backend
pnpm i @propelauth/node
Create backend/src/auth.ts, which initializes PropelAuth and exports the function we'll use to validate access tokens:
import { initBaseAuth } from "@propelauth/node";

export const { validateAccessTokenAndGetUserClass } = initBaseAuth({
    authUrl: process.env.PROPELAUTH_AUTH_URL!,
    apiKey: process.env.PROPELAUTH_API_KEY!,
});
You'll find both values on the Backend Integration page of the PropelAuth dashboard. Add them to backend/.env:
PROPELAUTH_AUTH_URL=https://your-project.propelauthtest.com
PROPELAUTH_API_KEY=your-api-key
Now we need a Hono middleware that validates the PropelAuth provided access token from the Authorization header and makes the user available to our route handlers. We'll type the Hono environment so c.get("user") is fully typed:
import { createMiddleware } from "hono/factory";
import type { User } from "@propelauth/node";
import { validateAccessTokenAndGetUserClass } from "./auth.js";

type Env = { Variables: { user: User } };

export const authMiddleware = createMiddleware<Env>(async (c, next) => {
    try {
        const user = await validateAccessTokenAndGetUserClass(c.req.header("Authorization"));
        c.set("user", user);
        await next();
    } catch {
        return c.json({ error: "Unauthorized" }, 401);
    }
});
We apply it to all API routes by adding a single line before our existing route definitions:
const routes = app
    .use("/api/*", authMiddleware)
    .get("/api/tickets" /* ... */);
We can verify it's working by curling our endpoint without a token:
curl -s http://localhost:3000/api/tickets | head
# {"error":"Unauthorized"}
Every handler can now call c.get("user") to get the authenticated user. In backend/src/data/tickets.ts, we drop DEMO_USER_ID and accept the User directly:
import type { User } from "@propelauth/node";

export async function getTicketsPage({ page, pageSize }: TicketsPageQuery, user: User) {
    const col = await tickets();
    const skip = (page - 1) * pageSize;
    const [items, total] = await Promise.all([
        col
            .find({ userId: user.userId })
            .sort({ createdAt: -1 })
            .skip(skip)
            .limit(pageSize)
            .toArray(),
        col.countDocuments({ userId: user.userId }),
    ]);
    return { tickets: items, page, pageSize, total, totalPages: Math.ceil(total / pageSize) };
}

export async function getTicketById(id: string, user: User): Promise<Ticket | null> {
    const col = await tickets();
    return col.findOne({ _id: id, userId: user.userId });
}
That's it for the backend. Every /api route now requires a valid access token, and each query is scoped to the authenticated user.
Connecting our frontend to PropelAuth
Our backend now expects an Authorization header with every request, so our frontend needs to manage login state and send access tokens along with its API calls. PropelAuth's React library handles both: it provides a login flow out of the box and gives us hooks to grab a fresh token whenever we need one.
Install the PropelAuth React library:
cd frontend
pnpm i @propelauth/react
Add your Auth URL to frontend/.env (also found on the Backend Integration page):
VITE_AUTH_URL=https://your-project.propelauthtest.com
Wrap the app in a RequiredAuthProvider in frontend/src/main.tsx. If a user isn't logged in, they're automatically redirected to PropelAuth's hosted login page, so there are no auth screens to build:
import { RequiredAuthProvider } from "@propelauth/react";

// ...

root.render(
    <RequiredAuthProvider authUrl={import.meta.env.VITE_AUTH_URL}>
        <QueryClientProvider client={queryClient}>
            <RouterProvider router={router} />
        </QueryClientProvider>
    </RequiredAuthProvider>,
);
The last piece is passing the access token with our API requests. In frontend/src/api/tickets.ts, we update fetchTickets to accept a token and include it as a header:
async function fetchTickets(query: TicketsRequest, accessToken: string) {
    const res = await endpoint(
        { query },
        { headers: { Authorization: `Bearer ${accessToken}` }}
    );
    if (!res.ok) throw new Error("Failed to fetch tickets");
    return res.json();
}
And update our hook to grab a fresh token via useAuthInfo before each request:
import { useAuthInfo } from "@propelauth/react";

export function useTicketsQuery(query: TicketsRequest) {
    const { tokens } = useAuthInfo();
    return useQuery({
        queryKey: ["tickets", query],
        queryFn: async () => {
            const token = await tokens.getAccessToken();
            return fetchTickets(query, token!);
        },
    });
}
With that, our app has real authentication! Logged-in users see only their own tickets, and unauthenticated users are redirected to login automatically.
If you go to your application after logging in, you might be surprised to see that there's no data. Where did all our tickets go?
This is actually a good thing. The tickets in our seed script were created with our fake DEMO_USER_ID, and our queries are now scoped to the real authenticated user. Update the user ID in seed.ts to match your own (you can find it in the PropelAuth dashboard), rerun pnpm run seed, and you should see all your data again.
What happens when requirements change?
At the start of this post, I said a good stack balances moving fast now with being ready for what comes next. We've built a working app quickly, but the real test is what happens when new requirements show up.
We won't build each of these end to end, but let's look at what's involved for some requirements that come up for almost every B2B product.
Adding full text search
Your users want to search tickets by subject or customer name. With a lot of stacks, this means introducing something like Elasticsearch, syncing data to it, and maintaining that pipeline. With MongoDB, full text search is built in via Atlas Search.
First, we create a search index. This index will support both prefix matching (for autocomplete-style search) and substring matching (for "contains" queries) on the subject field. We can add this to our ensureDb flow so it's created automatically alongside our collection:
async function ensureTicketsIndices() {
    const col = await tickets();

    const existing = await col.listSearchIndexes("tickets_search").toArray();
    if (existing.length >= 1) {
        console.log("Search index 'tickets_search' already exists.");
        return;
    }

    await col.createSearchIndex({
        name: "tickets_search",
        definition: {
            // Custom analyzer for partial substring matches
            analyzers: [
                {
                    name: "ngram_ci",
                    charFilters: [],
                    tokenizer: {
                        type: "nGram", // Split text into overlapping pieces
                        minGram: 3, // Min piece length
                        maxGram: 10, // Max piece length
                    },
                    tokenFilters: [{ type: "lowercase" }], // Ignore case
                },
            ],
            mappings: {
                dynamic: false, // Only index fields declared here
                fields: {
                    subject: [
                        { type: "autocomplete", tokenization: "edgeGram", minGrams: 2, maxGrams: 10 }, // Prefix search
                        { type: "string", analyzer: "ngram_ci" }, // Contains search
                    ],
                },
            },
        },
    });
    console.log("Created search index 'tickets_search'");
}
From here, we add a search function in our data layer that uses MongoDB's $search aggregation stage, add an optional search query param to our existing Zod schema, and update the route handler. On the frontend, we add a text input that updates a search param in the URL.
Because TanStack Router validates our search params with Zod, the search query flows through the same typed pipeline as pagination: URL to router to hook to API to database and back.
We didn't have to hook up any new infrastructure or data syncing. We just added a search index, a few lines of code to each layer, and everything worked.
Multi-tenancy
Your customers want their own workspace where their whole team can manage tickets together. With a lot of stacks, multi-tenancy is a significant effort: you need a tenant model, RBAC, invitation flows, and an admin UI for managing it all.
With PropelAuth, this maps directly to Organizations. Each customer gets an org, users belong to one or more orgs, and the User object from the access token already carries org membership and roles. We add an orgId to our Ticket model:
export interface Ticket {
    _id: string;
    orgId: string; // <- new
    userId: string;
    // ... rest unchanged
}
In our route handlers, we verify the user belongs to the requested org before returning any data. We can also check roles and permissions on the same object:
const org = user.getOrg(orgId);
if (!org) {
    return c.json({ error: "Forbidden" }, 403);
}
// Role and permission checks are just method calls
org.isRole("Admin");
org.hasPermission("can_edit_tickets");
For the migration itself, we have options. We can make this backwards compatible by treating some tickets as user-scoped and some as org-scoped. Or we can migrate existing users into orgs along with their tickets. Either way, the data layer changes are small since our queries just swap userId for orgId.
PropelAuth also provides hosted pages for creating orgs, inviting members, and managing roles, so there's no admin UI to build either.
Enterprise SSO
At some point, your first enterprise customer shows up and they need SAML or OIDC single sign-on. With most auth setups, this is a real project: integrating with identity providers, handling metadata exchange, mapping groups to roles, and building an admin UI for your customers to configure it all.
With PropelAuth, this already works. Enterprise SSO is built on top of the same User and Organization primitives your code already uses. When an enterprise customer configures SSO through PropelAuth's hosted pages, their users log in through their identity provider and arrive in your app with the same user object your routes already check. No code changes.
The same goes for SCIM provisioning, where the enterprise's identity provider can automatically create and deactivate user accounts. PropelAuth manages the user lifecycle, so your app just sees users appearing and disappearing through the same APIs it already uses.
This works because PropelAuth's User, Organization, and role primitives aren't just convenient abstractions for v1. They're the same primitives that enterprise features are built on, so there's nothing to rearchitect when those requirements show up.
Queryable encryption
Sometimes a customer wants more than "encrypted at rest." They want sensitive fields encrypted before they ever hit the database, but they still need the app to query those fields normally. Queryable Encryption handles this, and it supports equality and range queries in production today.
Let's say we added a reporterEmail field to our Ticket model. To set up Queryable Encryption, we need to install a few things:
pnpm i mongodb-client-encryption
We also need a query analysis component and a KMS provider like AWS KMS to manage our master key.
Once that's in place, we tell our MongoDB client which fields are encrypted and whether we need to query them:
const encryptedFieldsMap = {
    encryptedFields: {
        fields: [
            {
                path: "reporterEmail",
                bsonType: "string",
                queries: { queryType: "equality" },
            },
        ],
    },
};
We pass this into our encrypted client configuration when creating the encrypted collection. From there, our application code doesn't change at all. Inserts and queries look exactly the same:
await col.insertOne({
    _id: "TK-013",
    userId,
    subject: "Cannot access invoice history",
    reporterEmail: "ops@acme.com",
    // ... other fields
});

// This just works. The driver encrypts the value before
// sending it and decrypts the result when it comes back.
const ticket = await col.findOne({
    reporterEmail: "ops@acme.com",
});
The reporterEmail value is automatically encrypted before it leaves our application and stored as randomized ciphertext in MongoDB. But because we configured it with queryType: "equality", we can still do exact-match lookups. The business logic stays the same; the complexity lives in the client configuration, not smeared across every query.
Wrapping up
We started with a simple question: how do you pick a stack that lets you move fast without painting yourself into a corner?
The speed that we get from this tech stack comes from how it keeps you on the right path at all times.
With TanStack Router, we can’t even add a link to our table on the frontend with a query parameter of page_size (instead of pageSize) without getting a type error. With Hono, we got a typed API layer that shares its route types directly with the frontend.
But it’s also flexible as our requirements change.
With MongoDB, we got a flexible document store that also handles full text search and encryption without bolting on extra services. With PropelAuth, we got authentication that scales from a demo user to enterprise SSO without touching our route logic.
The best part is none of these features required us to rearchitect. The same Ticket type, the same route structure, the same query hooks. Each new requirement was a small addition to what we already had.