Deep dive into OAuth 2.1 and MCP using Cloudflare Workers
Model Context Protocol (MCP) servers are a convenient way to allow AI applications (Claude, Gemini, ChatGPT, etc.) to connect to your product. We have a deep dive on MCP that will cover what it is and how it works.
In this blog post, we’re going to set up our own MCP server, add authentication to it, and deploy it as a Cloudflare Worker.
Along the way, we’re also going to spend some extra time really understanding how all these different pieces work. We have another version of this blog post here which will just cover how to do the integration without the deep dives.
Project Setup
We’re going to start with a (mostly) empty Cloudflare Worker.
pnpm create cloudflare@latest
We’ll choose the Hello World example in TypeScript.
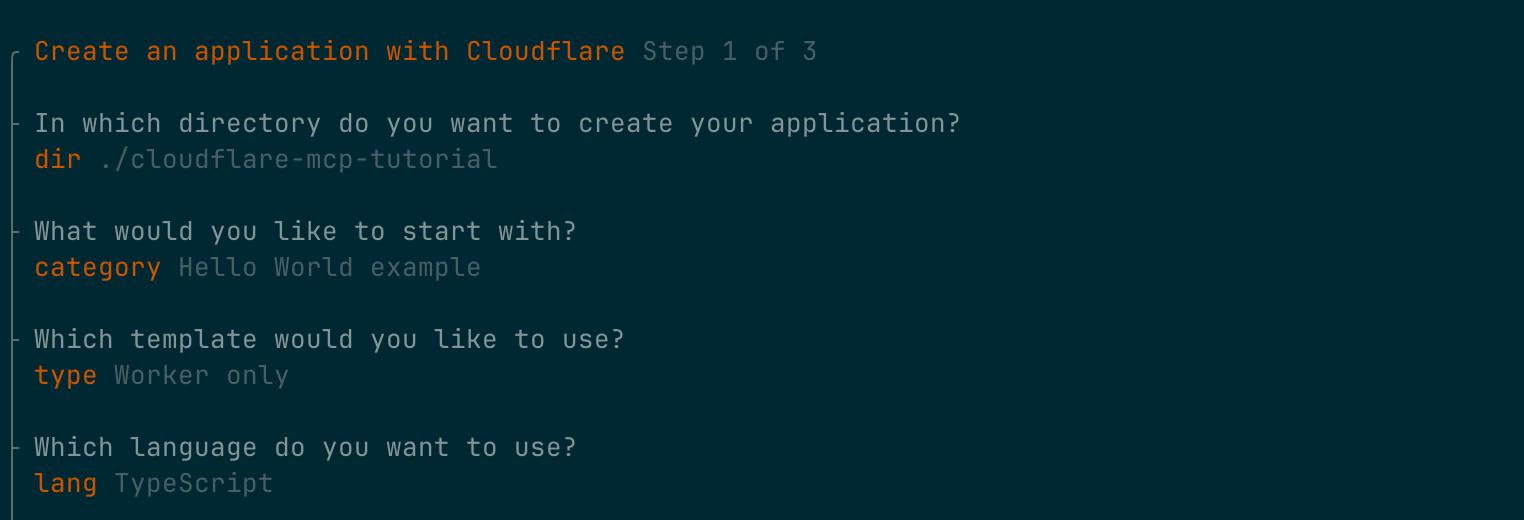
After you complete the CLI, you should see the following in src/index.ts
export default {
    async fetch(request, env, ctx): Promise<Response> {
        return new Response('Hello World!');
    },
} satisfies ExportedHandler<Env>;
We’ll ultimately want to turn this Cloudflare Worker into a production-ready MCP server, which means implementing the relevant parts of the spec.
Luckily for us, we can pull in a few dependencies that’ll do most of the heavy lifting:
@modelcontextprotocol/sdk- the official MCP TypeScript SDKagents- Cloudflare’s Agent library, which includes an adaptor for handling MCP requestszod- A validation library that the MCP SDK can use for both validating requests and providing the schema to MCP clients
Let’s install those and we’re ready to build our MCP server.
pnpm i zod agents @modelcontextprotocol/sdk
Creating a basic MCP server in our Cloudflare Worker
Now that we have our dependencies set up, we’ll make a simple MCP server for testing. An MCP server has “tools,” which you can think of very similarly to API endpoints.
A tool has a:
- Name
- Description
- Input schema
- A function that handles requests
For our example, we’ll make a simple calculator tool, which can add, subtract, multiply or divide two provided numbers:
import { createMcpHandler } from 'agents/mcp';
import { McpServer } from '@modelcontextprotocol/sdk/server/mcp.js';
import { z } from 'zod';

function createServer() {
    const server = new McpServer({ name: 'Calculator', version: '1.0.0' });

    server.registerTool(
        'calculator',
        {
            description: 'Perform basic math operations',
            inputSchema: {
                operation: z.enum(['add', 'subtract', 'multiply', 'divide']),
                a: z.number(),
                b: z.number(),
            },
        },
        async ({ operation, a, b }) => {
            let result: number;

            if (operation === 'add') result = a + b;
            else if (operation === 'subtract') result = a - b;
            else if (operation === 'multiply') result = a * b;
            else if (b === 0) return { content: [{ type: 'text', text: 'Error: Division by zero' }] };
            else result = a / b;

            // Tools can respond with text, images, audio, etc but for our
            // purposes, we'll always use text
            return { content: [{ type: 'text', text: String(result) }] };
        },
    );

    return server;
}
We then need to hook this MCP server up to our Worker’s fetch call so we can test it out. Note that we must create a new McpServer for each request for security purposes.
export default {
    async fetch(request, env, ctx): Promise<Response> {
        const server = createServer();
        const handler = createMcpHandler(server);
        return handler(request, env, ctx);
    },
} satisfies ExportedHandler<Env>;
And that’s actually it! We have a fully functional MCP server that allows clients like Claude, Gemini, and ChatGPT to make function calls to us. Let’s test it out.
Testing our MCP Server with Claude Desktop
While there are tools like the MCP Inspector that allow us to test and debug MCP servers, we’re going to jump straight to seeing what this will look like for real users and connect Claude Desktop to our server.
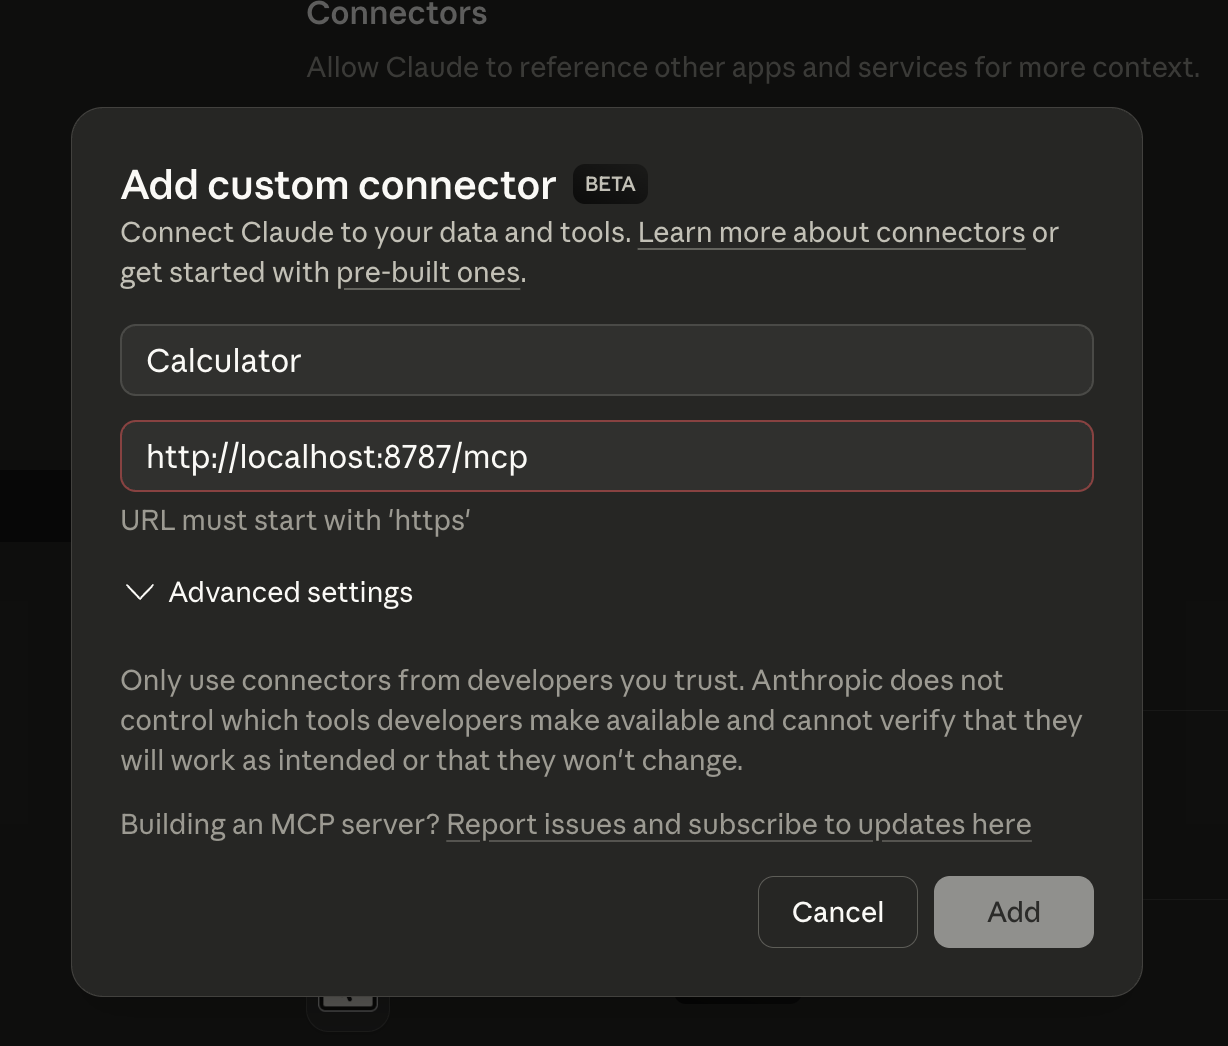
To set up an MCP server in Claude Desktop, go to Settings ⇒ Connectors ⇒ Add custom connector.
Enter Calculator for the Name and your MCP URL will be the location where your MCP Server is running with the path /mcp. You might run into one small problem here…
…not every AI client will work with locally running servers. We have two options to fix this:
- Use a reverse proxy tool like ngrok to get a public HTTPS endpoint pointing at your locally running MCP server
- Deploy your Worker with
pnpm run deployand use the Worker URL with/mcpas the path
Whichever you choose, you’ll now be able to add your MCP server (which Claude Desktop calls a Connector), and we are ready to use it!
Open up a new chat and ask Claude to use our calculator. You can expand the tool call to see the request that it’s going to make.
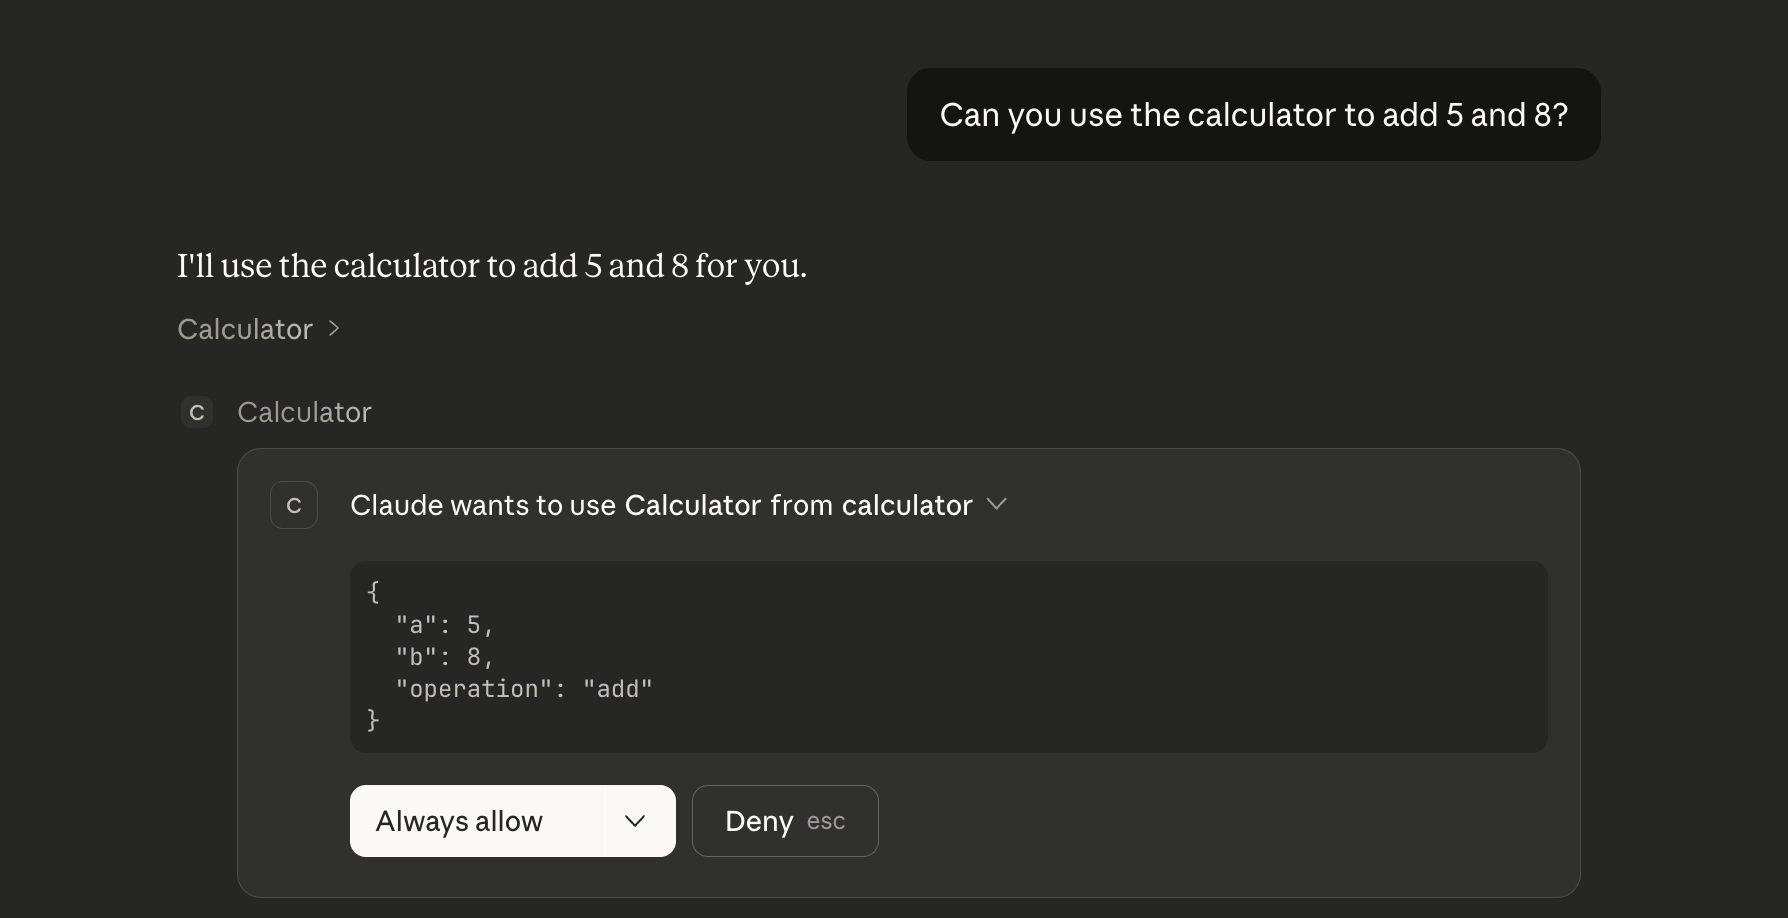
Once you approve it, you should see both the MCP server’s response as well as Claude’s commentary on it:
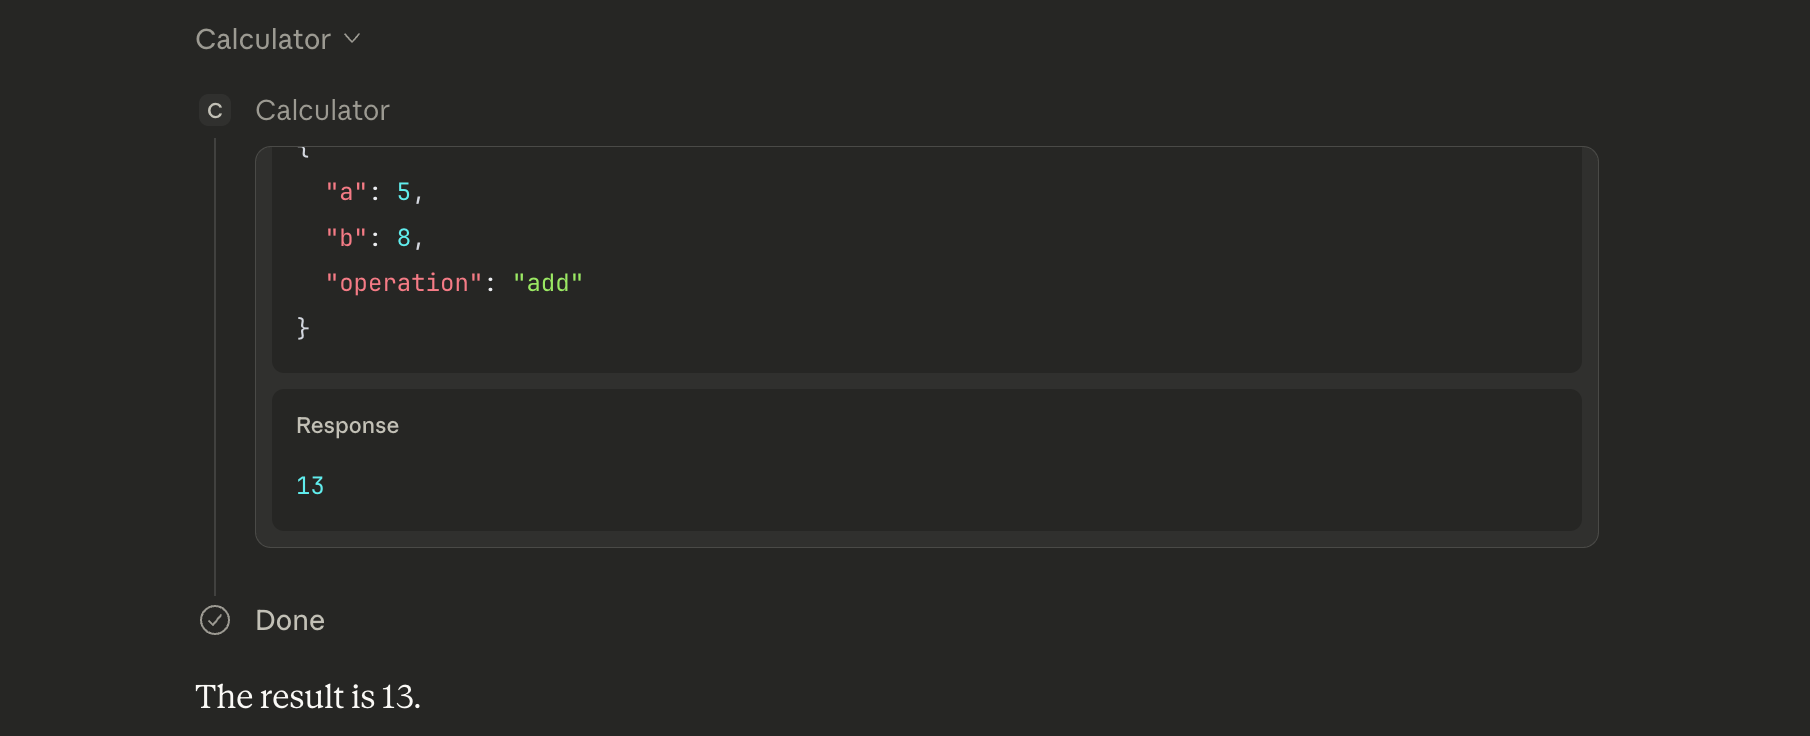
Success! The full workflow that just happened was:
- I asked Claude to add 5 and 8
- Claude recognized that it has a calculator tool available to it
- Claude called that calculator tool with the right arguments
- Our MCP server handled the request and responded with 13
- Claude took that response and presented it back to me
What’s happening under the hood?
MCP uses JSON-RPC for communication between the client and server. You can inspect the requests that the client makes to your server to get a better sense for how it works.
One example request you’ll see is tools/list which the client uses to figure out what tools are available to it:
{
    "method": "tools/list",
    "jsonrpc": "2.0"
}
When our server responds to this request, you’ll notice that it returns most of what we specified in the tool (name, description, schema).
{
   "result": {
      "tools": [{
            "name": "calculator",
            "description": "Perform basic math operations",
            "inputSchema": {
               "$schema": "<http://json-schema.org/draft-07/schema#>",
               "type": "object",
               "properties": {
                  "operation": {
                     "type": "string",
                     "enum": ["add", "subtract", "multiply", "divide"]
                  },
                  "a": { "type":"number" },
                  "b": { "type":"number" }
               },
               "required": ["operation", "a", "b"]
            },
            // ...
}
This is how the client knows both when to call this tool and how to call this tool.
You can also see the tools/call request which is how the client calls the tools on the server:
{
    "method": "tools/call",
    "params": {
        "name": "calculator",
        "arguments": {
            "a": 5,
            "b": 8,
            "operation": "add"
        }
    },
    "jsonrpc": "2.0"
}
Adding authentication and authorization to our MCP server
At this point, anyone can connect to our MCP server and use our calculator. For some MCP servers, this is totally reasonable, like:
- An MCP server that returns public documentation for a SaaS product
- An MCP server that proxies requests to public APIs, like a weather API
But, for some MCP servers, you’ll need to know both who the user is and if they have permission to make a specific tool call. In this section, we’ll see how we can add both of those to our calculator.
Understanding how MCP clients deal with 401 errors
To start, let’s just see what happens if we return a 401 error, with no other information:
async fetch(request, env, ctx): Promise<Response> {
    return new Response('Unauthorized', { status: 401 });

    // const server = createServer();
    // const handler = createMcpHandler(server);
    // return handler(request, env, ctx);
},
When we try to connect Claude Desktop to this MCP server, we see that it starts making a few requests to some other endpoints:
[wrangler:info] POST /mcp 401 Unauthorized (3ms)
[wrangler:info] GET /.well-known/oauth-protected-resource/mcp 401 Unauthorized (3ms)
[wrangler:info] GET /.well-known/oauth-protected-resource 401 Unauthorized (9ms)
[wrangler:info] GET /.well-known/oauth-authorization-server 401 Unauthorized (4ms)
[wrangler:info] POST /register 401 Unauthorized (5ms)
So, what’s going on here? Well, put yourself in Claude’s shoes for a second.
There’s really only one endpoint (/mcp) and unfortunately that endpoint just returned a 401. Now what do you do? You need to somehow obtain valid credentials and retry the request.
Fortunately, the MCP spec covers this, and what we need is an authorization server that implements OAuth 2.1 as well as a few other RFCs.
If you dig into these four extra requests, you’ll see that Claude is making a few educated guesses on where some key endpoints are located.
The first two requests:
[wrangler:info] GET /.well-known/oauth-protected-resource/mcp 401 Unauthorized (3ms)
[wrangler:info] GET /.well-known/oauth-protected-resource 401 Unauthorized (9ms)
are Claude attempting to find the Protected Resource Metadata endpoint. This is an endpoint on our MCP server that tells Claude where it can find the authorization server, like so:
{
    // an identifier for our MCP server
    "resource": "<https://mcp.example.com/mcp>",
    // the location of our authorization servers
    "authorization_servers": ["<https://auth.example.com/oauth/2.1>"]
}
Unfortunately, we didn’t implement this endpoint, so Claude has no idea where our authorization server is.
For the next two requests, Claude makes one more educated guess, which is… maybe our MCP server is also our authorization server.
[wrangler:info] GET /.well-known/oauth-authorization-server 401 Unauthorized (4ms)
[wrangler:info] POST /register 401 Unauthorized (5ms)
The first request is for our Authorization Server Metadata which is an endpoint that authorization servers implement to provide information like “what features does this authorization server support?” or “where can I find your userinfo endpoint?”
When that doesn’t work, Claude tries to call /register which is it’s guess at where our Dynamic Client Registration endpoint is (it’s also assuming we support DCR, because again, it doesn’t really know anything).
Unfortunately for Claude (and us too I suppose), all those guesses were wrong. Let’s set up a real OAuth 2.1 compliant authorization server, and properly set up our MCP server to use it.
Using PropelAuth for our MCP Authorization Server
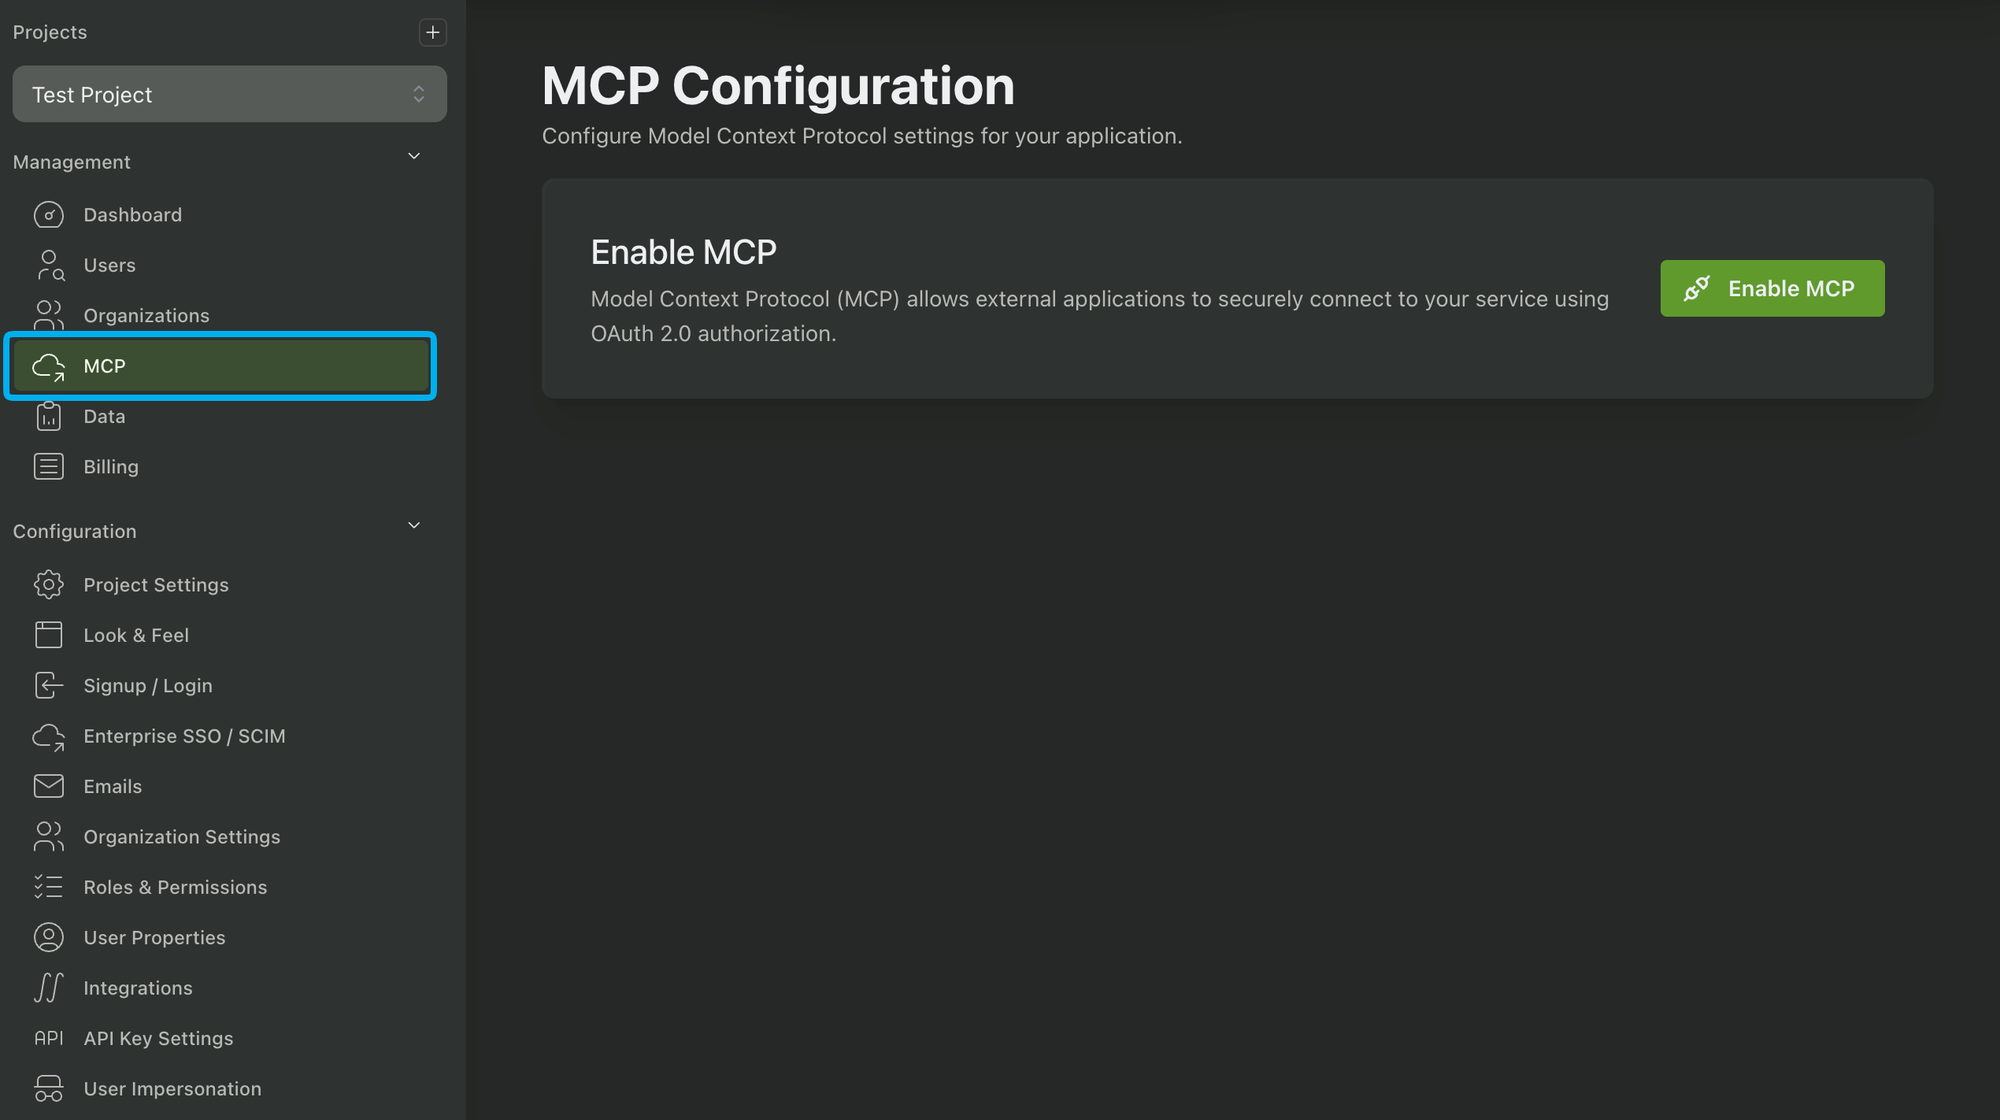
PropelAuth has built in support for MCP authentication/authorization that you can enable in a few clicks. To start, we’ll want to enable MCP support, which we can do in the dashboard:
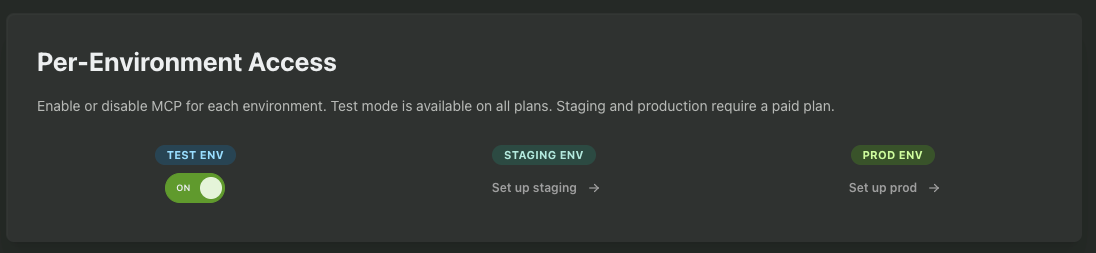
While testing, we recommend only enabling it in the Test and/or Staging environments.
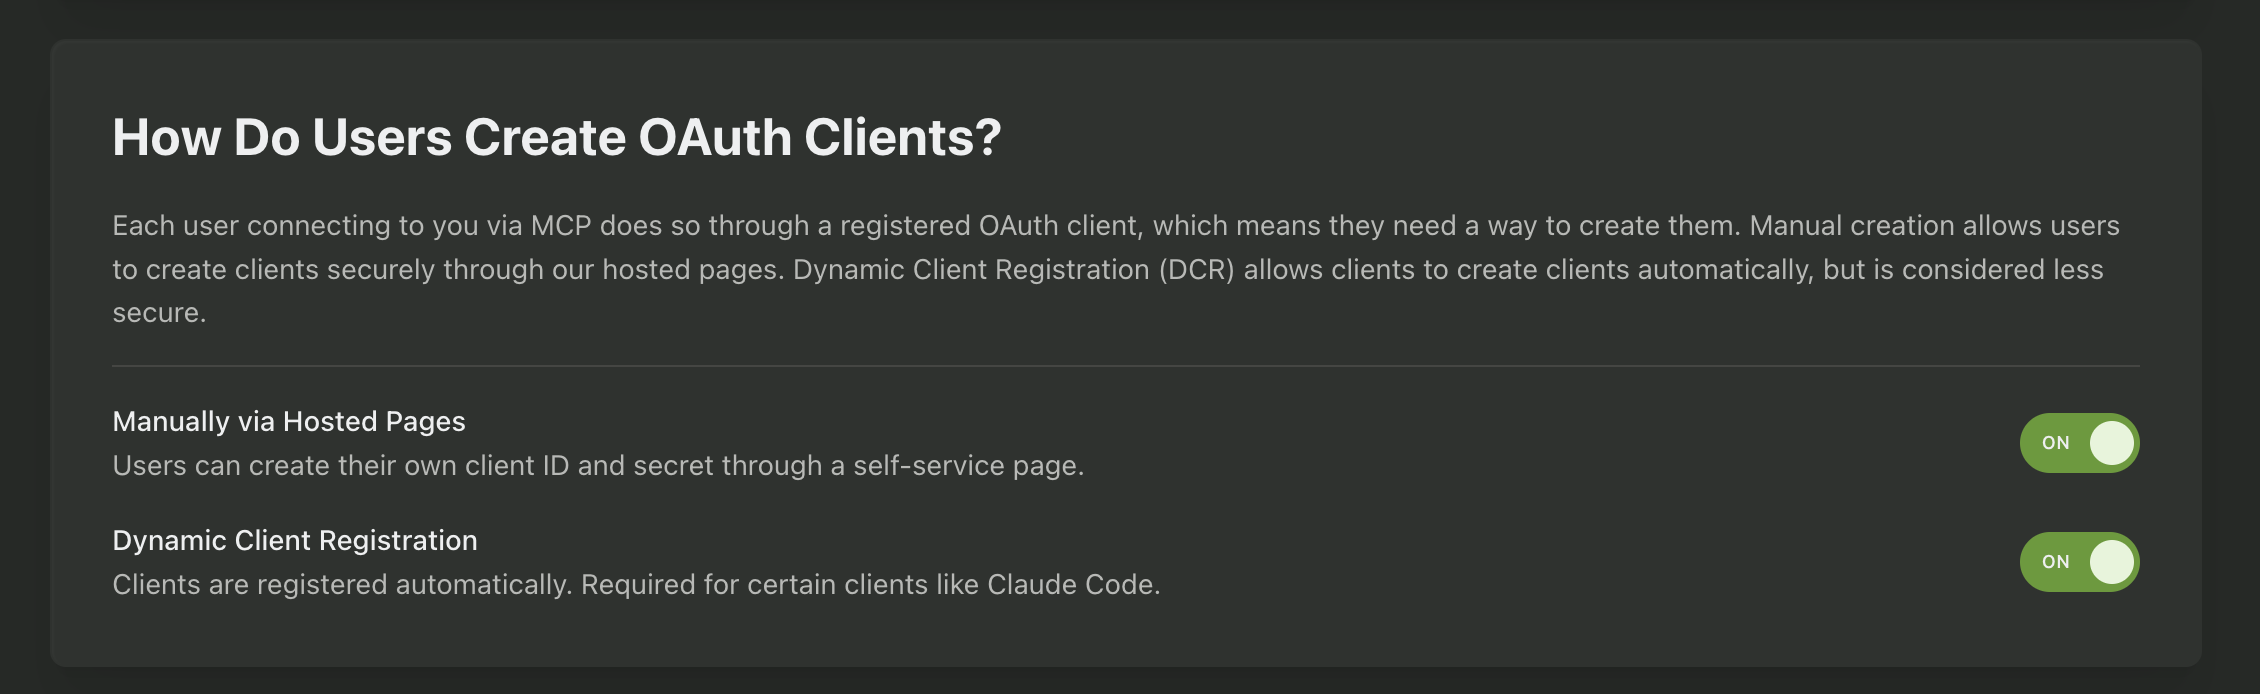
We also need to enable our users to create OAuth clients. We can either let them do this manually (meaning they’ll go to a hosted UI PropelAuth provides and generate a Client ID and Secret) or we can enable dynamic client registration (meaning Claude itself will generate the Client ID and Secret). We’ll enable both but will use DCR for simplicity.
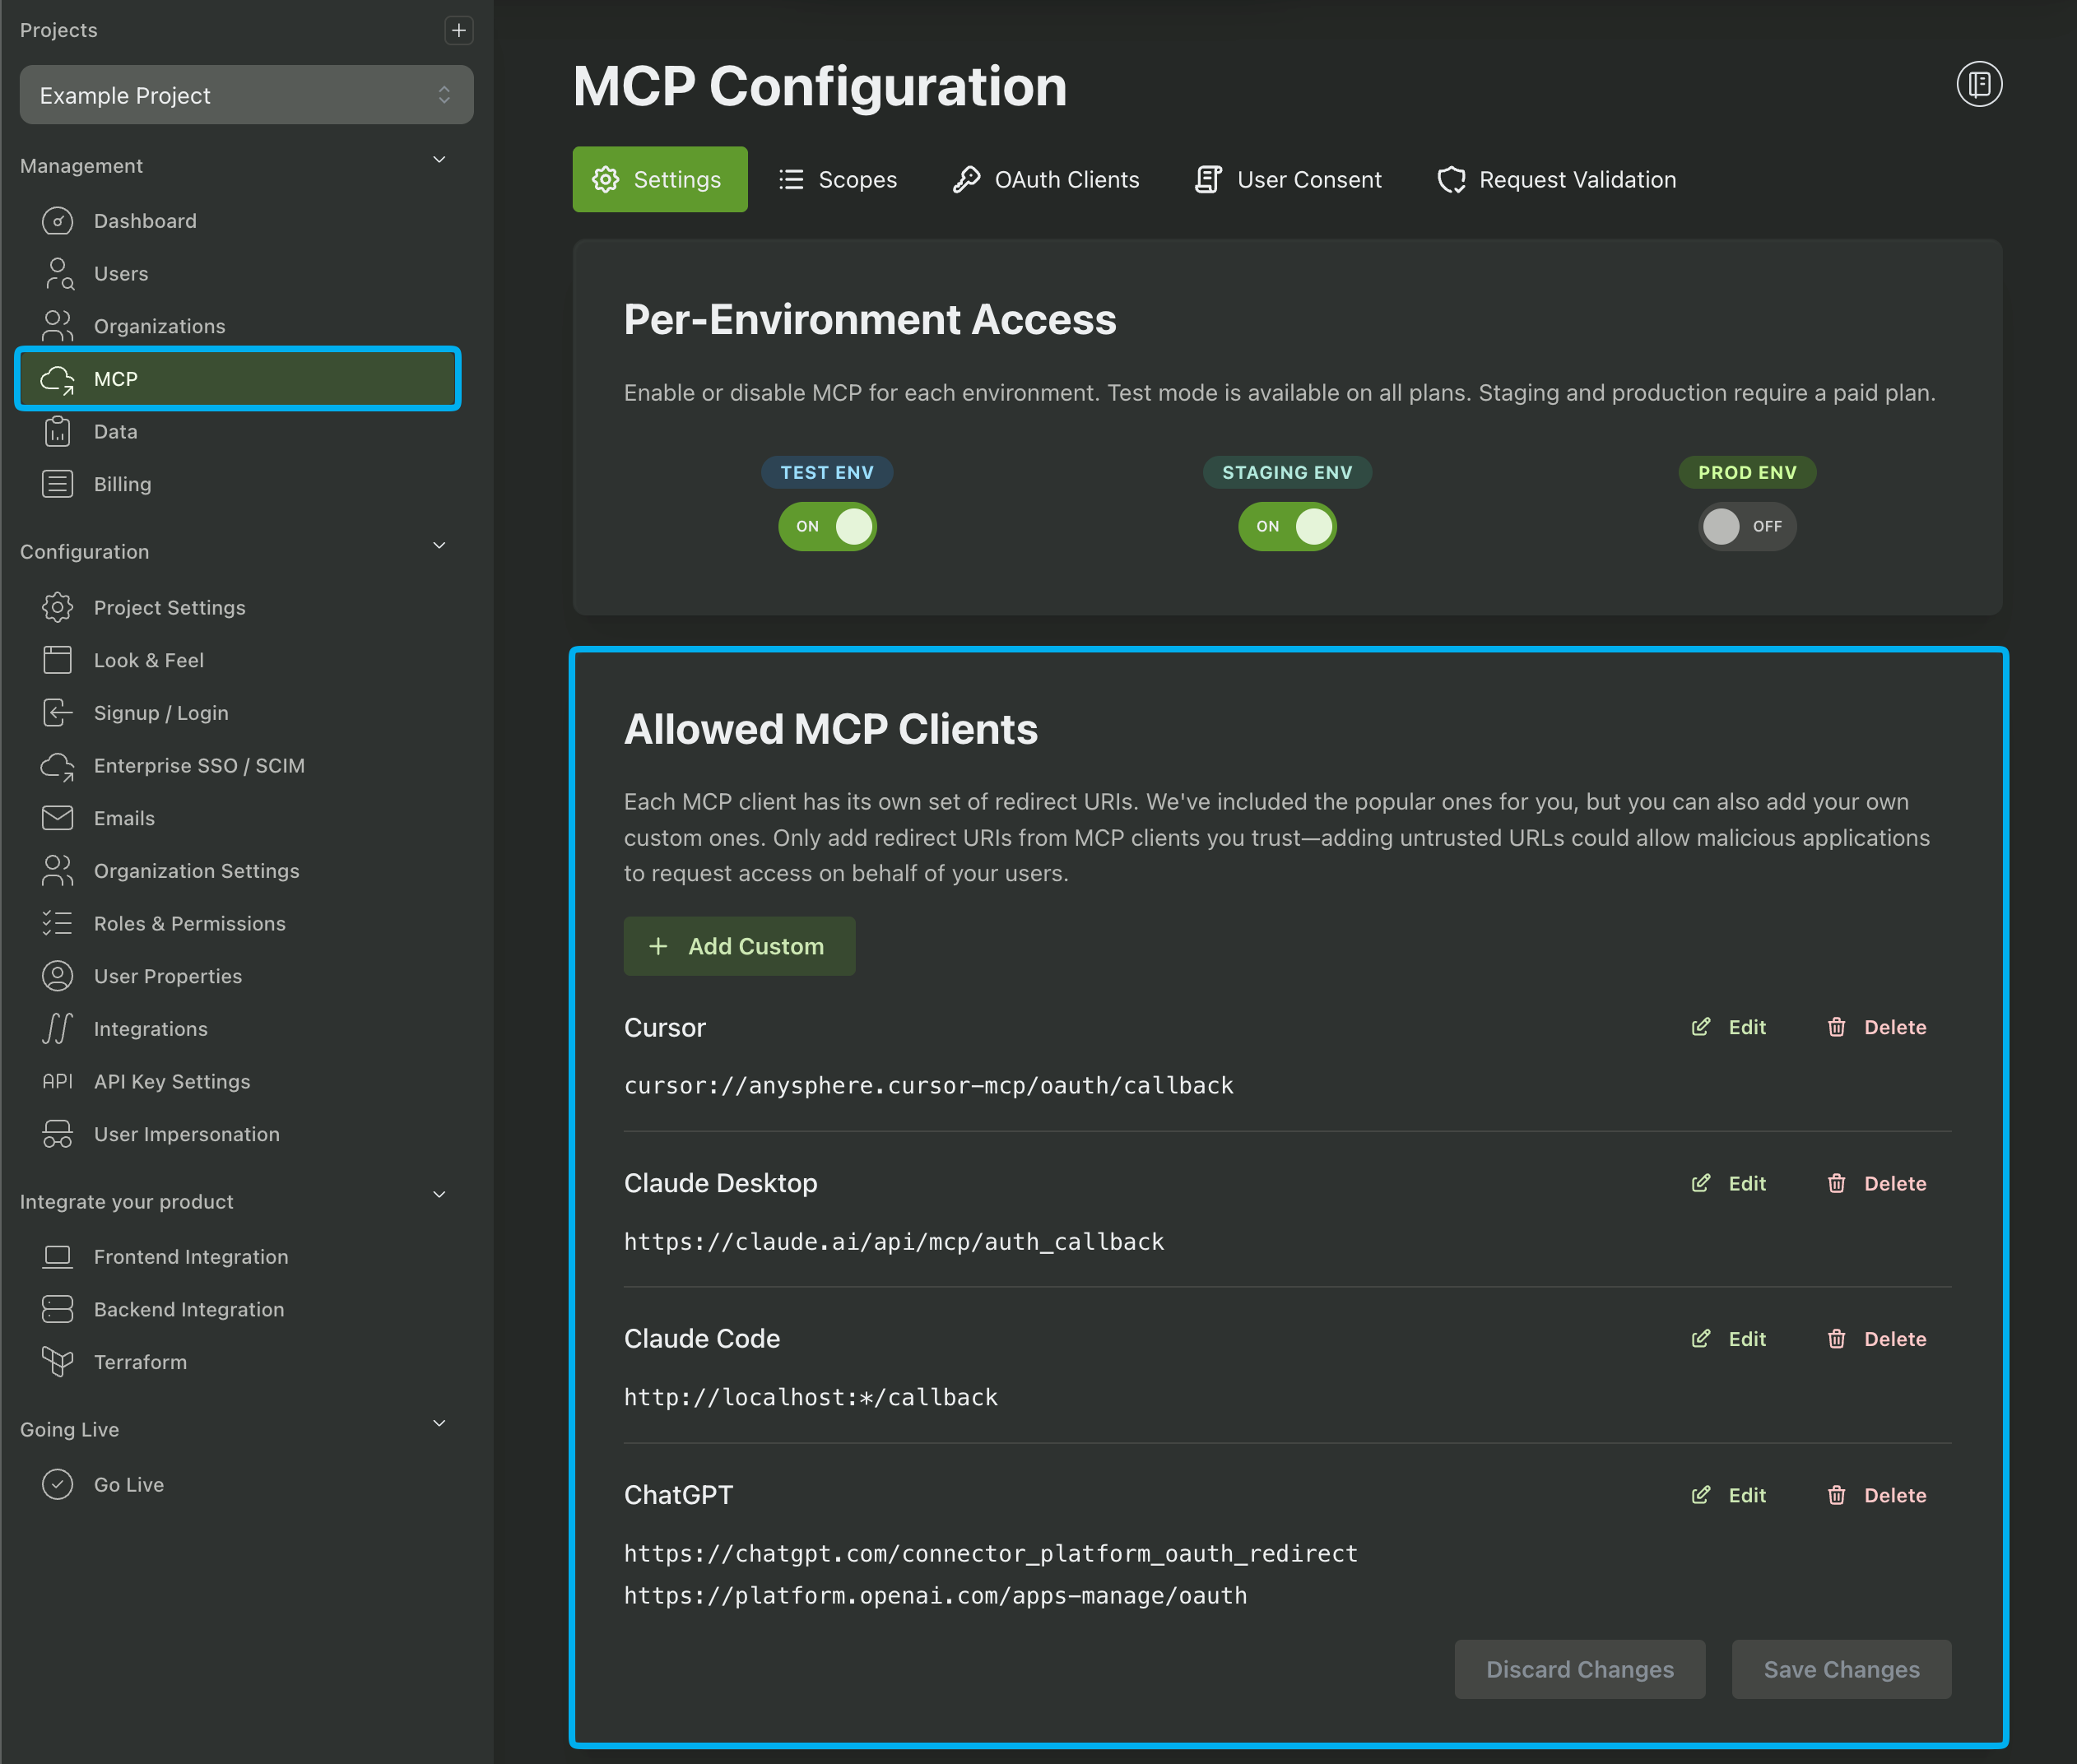
Next, you’ll want to choose which AI clients you allow your users to use. We provide configurations for popular clients like Cursor, Claude Desktop, ChatGPT, Gemini, etc or you can add your own custom clients. This helps to protect against open redirect attacks by ensuring your users can only be redirected to approved locations:
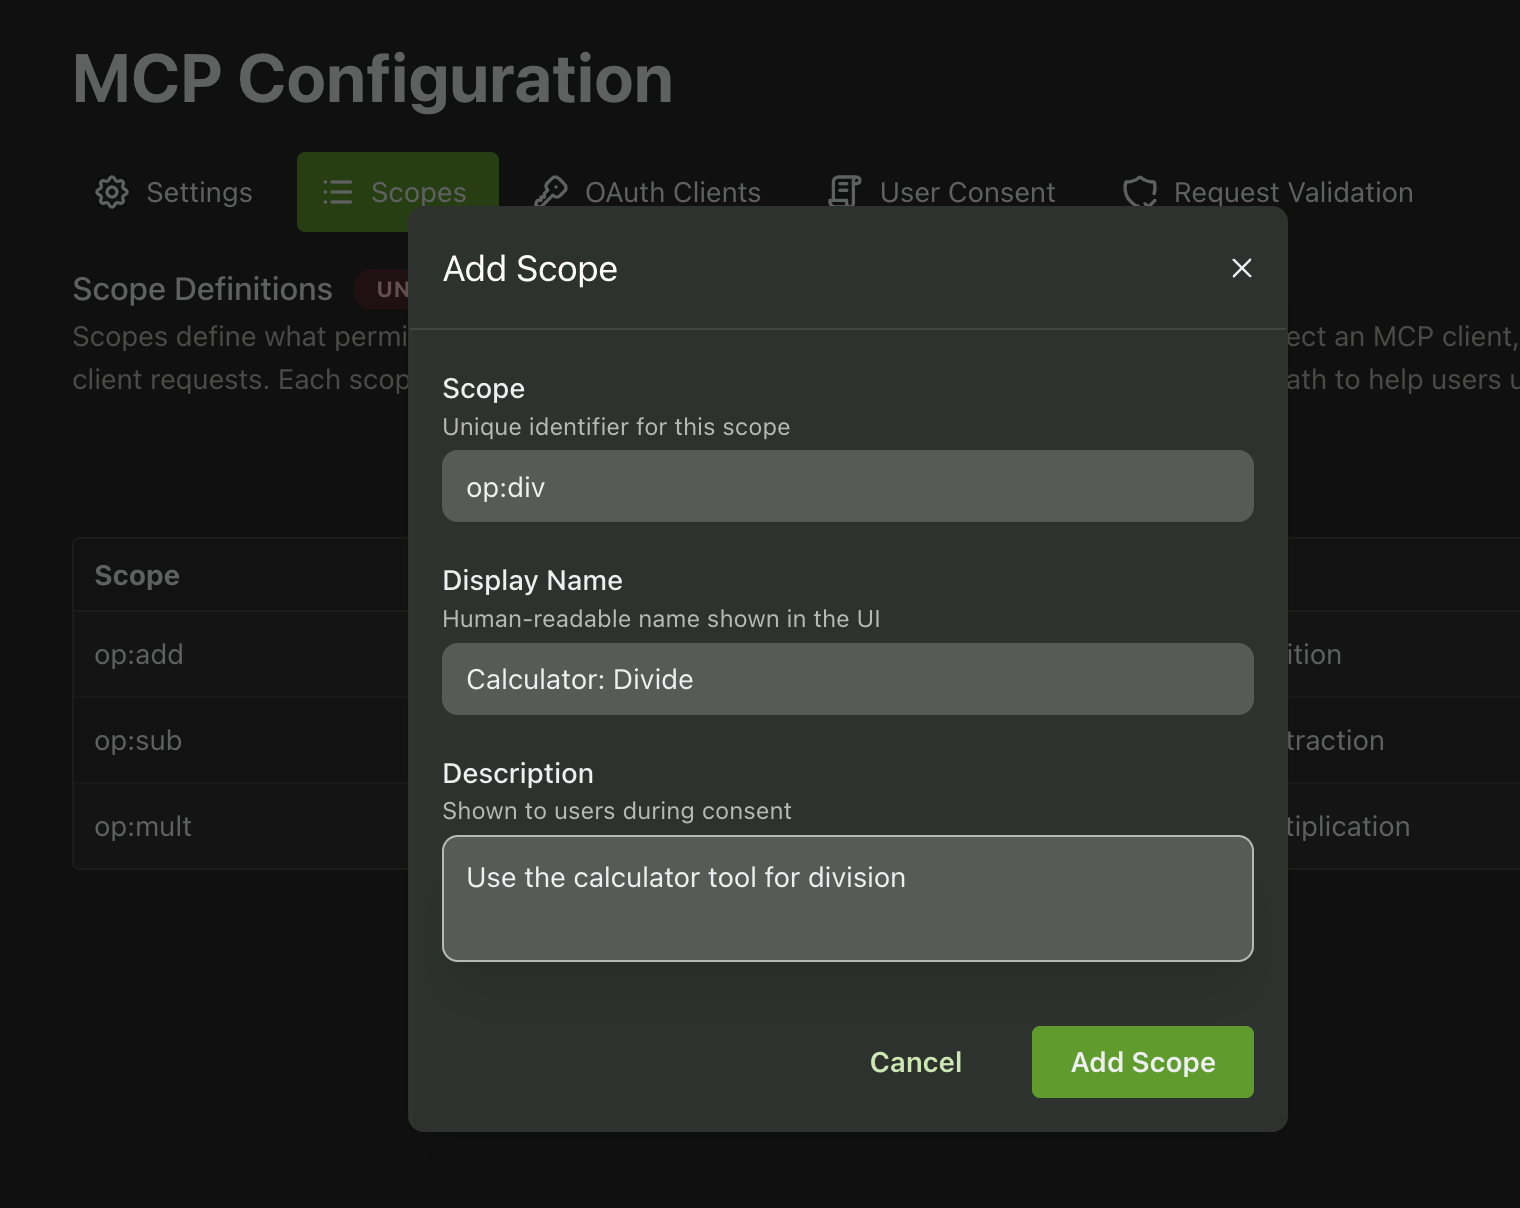
Finally, we’ll want to create our scopes. You can think of a scope as a permission to perform certain actions. For example purposes, we’ll take the overly verbose route of making a scope for each calculator operation (op:add, op:sub, op:mult, and op:div)
And we are done! We now have a full OAuth 2.1 compliant authorization server, available under {YOUR_AUTH_URL}/oauth/2.1
Pointing our MCP server at our Authorization Server
Now that we have an authorization server, we just need to tell our MCP server where to find it.
We mentioned previously that the OAuth 2.0 Protected Resource Metadata spec covers how a client can determine where the authorization server is. Now that we have an authorization server, we can set up this endpoint:
// We'll use Env variables to store the auth URL
type Env = {
    PROPELAUTH_AUTH_URL: string;
};

function protectedResourceMetadataResponse(env: Env, url: URL) {
    return Response.json({
        // The resource is just a URL that identifies our MCP server
        resource: `https://${url.hostname}/mcp`,
        // A list of our OAuth 2.1 compliant authorization servers
        authorization_servers: [`${env.PROPELAUTH_AUTH_URL}/oauth/2.1`],
        // The scopes that we / our authorization server supports
        scopes_supported: ['op:add', 'op:sub', 'op:mult', 'op:div'],
    });
}

export default {
    async fetch(request, env, ctx): Promise<Response> {
        const url = new URL(request.url);

        if (url.pathname === '/.well-known/oauth-protected-resource') {
            return protectedResourceMetadataResponse(env, url);
        }

        return unauthorizedResponse(url)
    },
} satisfies ExportedHandler<Env>;
One thing worth noting is that our 401 response was technically incorrect before. We are supposed to include a header that tells the client where the Protected Resource Metadata (PRM) URL is, like so:
function unauthorizedResponse(url: URL) {
    const protectedResourceMetadataUrl = `https://${url.hostname}/.well-known/oauth-protected-resource`;
    return new Response('Unauthorized', {
        status: 401,
        headers: {
            'WWW-Authenticate': `Bearer resource_metadata="${protectedResourceMetadataUrl}"`,
        },
    });
}
Claude will then directly fetch this URL and it doesn’t need to guess like it was doing before.
If we go back to Claude Desktop and re-add our MCP server, a browser will now open prompting us to log in (this step is skipped if you were already logged in).
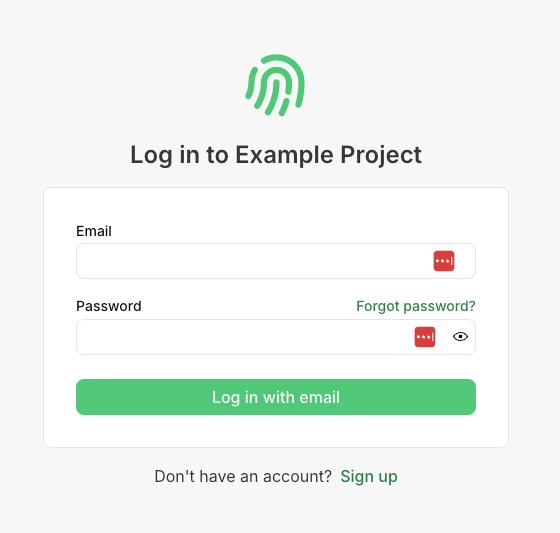
After we log in, we’ll be prompted to consent to the scopes we included in our PRM endpoint.

which is exactly what we want. We only have one last step we need to add, which is making sure the credentials passed to us are valid.
Validating MCP client’s requests
After the user goes through the consent flow, the MCP client receives credentials that it will include in its future requests to our MCP server. We just need to validate them.
PropelAuth provides a standard token introspection endpoint which takes in a token and returns whether or not it’s valid. For valid tokens, it’ll also include metadata about who the token is issued for and what scopes that user has consented to.
Let’s create a function for this introspection call:
// We need two new environment variables. You can generate the
// client ID and secret here in the PropelAuth dashboard under
// `Request Validation`
type Env = {
    PROPELAUTH_AUTH_URL: string;
    PROPELAUTH_INTROSPECTION_CLIENT_ID: string;
    PROPELAUTH_INTROSPECTION_CLIENT_SECRET: string;
};

// This is the response from the introspect endpoint
type IntrospectionResponse =
    | {
          active: false;
      }
    | {
          active: true;
          username: string;
          scope: string;
          sub: string;
          aud: string;
          client_id: string;
          exp: number;
          iat: number;
      };

async function introspectTokenRequest(env: Env, token: string): Promise<IntrospectionResponse | undefined> {
    const url = `${env.PROPELAUTH_AUTH_URL}/oauth/2.1/introspect`;
    const authorizationHeader = btoa(`${env.PROPELAUTH_INTROSPECTION_CLIENT_ID}:${env.PROPELAUTH_INTROSPECTION_CLIENT_SECRET}`);

    const resp = await fetch(url, {
        method: 'POST',
        headers: {
            Authorization: `Basic ${authorizationHeader}`,
            'Content-Type': 'application/x-www-form-urlencoded',
        },
        body: new URLSearchParams({ token }).toString(),
    });

    if (!resp.ok) return undefined;
    return (await resp.json()) as IntrospectionResponse;
}
Next, we’ll create a helper function which will take our request, parse out the token from the Authorization header, and validate it with our introspection call.
For simplicity, we’ll also convert this to a new type called User which has just the information we need.
type User = {
    userId: string;
    email: string;
    scopes: string[];
};

async function validateRequest(request: Request, env: Env, url: URL): Promise<User | undefined> {
    // Parse out the bearer token from the header
    const authorizationHeader = request.headers.get('Authorization') ?? '';
    const bearerMatch = authorizationHeader.match(/^Bearer\\s+(.+)$/i);
    if (!bearerMatch) return undefined;
    const bearerToken = bearerMatch[1].trim();

    // Call the introspection endpoint
    const introspection = await introspectTokenRequest(env, bearerToken);

    // We also need to check that the token is valid and was issued for our MCP server
    if (!introspection?.active) return undefined;
    if (introspection.aud !== `https://${url.hostname}/mcp`) {
        return undefined;
    }

    // Convert it to a User type so it's easier to use
    return {
        userId: introspection.sub,
        email: introspection.username,
        scopes: introspection.scope.split(' '),
    };
}
From here, we need to hook up our validateRequest function to our top level fetch call. Note that we also need to pass in the resulting user object to createMcpHandler so that we can access it in our tool calls:
export default {
    async fetch(request, env, ctx): Promise<Response> {
        const url = new URL(request.url);

        if (url.pathname === '/.well-known/oauth-protected-resource') {
            return protectedResourceMetadataResponse(url);
        }

        const user = await validateRequest(request, env, url);
        if (!user) {
            return unauthorizedResponse(url);
        }

        const server = createServer();
        const handler = createMcpHandler(server, {
            authContext: { props: user },
        });
        return handler(request, env, ctx);
    },
} satisfies ExportedHandler<Env>;
We’re almost done. At this point, you cannot call any tools on this server unless you are authenticated and have consented to a set of scopes.
The last issue? We aren’t checking scopes yet! Within the tool, we can call getMcpAuthContext which will return our authContext. We’ll add a new helper function validateUserHasScopeForCalcUse which checks that we have the correct permission:
function getRequiredScope(operation: string): string {
    if (operation === 'add') return 'op:add';
    else if (operation === 'subtract') return 'op:sub';
    else if (operation === 'multiply') return 'op:mult';
    else if (operation === 'divide') return 'op:div';
    else throw new Error(`Unknown operation "${operation}"`);
}

function validateUserHasScopeForCalcUse(operation: string): User {
    const authContext = getMcpAuthContext();
    const user = authContext?.props as User | undefined;
    const scope = getRequiredScope(operation);

    if (!user || !user.scopes.includes(scope)) {
        throw new Error(`Missing required scope "${scope}"`);
    }

    return user;
}
and finally we’ll call that at the top of our tool:
async ({ operation, a, b }) => {
    validateUserHasScopeForCalcUse(operation);

    let result: number;

    if (operation === 'add') result = a + b;
    else if (operation === 'subtract') result = a - b;
    else if (operation === 'multiply') result = a * b;
    else if (b === 0) return { content: [{ type: 'text', text: 'Error: Division by zero' }] };
    else result = a / b;

    return { content: [{ type: 'text', text: String(result) }] };
},
Now, we are finished! We can verify that our MCP server still works by connecting Claude to it and asking it add or subtract some numbers. We can also revoke consent and see that the requests will no longer succeed.
Putting it all together
Now that we have all the pieces in place, we can see the full authenticated workflow:
- A user tries to connect Claude Desktop to our Authenticated Calculator MCP server
- Claude makes requests to
/mcpto understand what tools are available - Claude gets back a 401 error, along with the location of the Protected Resource Metadata (PRM) endpoint
- Claude calls that PRM endpoint which will tell Claude where our MCP server’s authorization server is
- Claude will reach out to the authorization server to both understand it and register itself
- Claude will open a browser and ask our user to log in to their account with the Authenticated Calculator service
- The user is asked to consent to the scopes the MCP server requests
- The user is redirected back to Claude, where it now has valid credentials to call our
/mcpendpoint - The user asks Claude a question like
Hey can you add 5 and 8? - Claude recognizes that it can use our calculator tool for this
- Claude makes a JSON-RPC request to call our tool, including it’s credentials
- Our MCP server validates the credentials AND that we consented to the appropriate scopes for the tool call being made
- Our MCP server returns a response
- Claude presents the user with the response
And yes, this is obviously the most roundabout way to add two numbers together, however, there are a number of real world use cases that you can use instead. For example:
- Ahrefs has an MCP server where AI clients can query for SEO data like how popular certain keywords are. This allows Ahrefs users to have AI agents suggest long-tail keywords that are relevant to their business.
- There are multiple Google Calendar MCP servers that expose common calendar operations to your AI agents. You can use scopes to give the agent read-only access or even the ability to reschedule/delete events.
In general, for any product that has APIs, an MCP server is a convenient way to allow those APIs to be called by an AI agent/client.